ITrack/Pro/Search Screen
Searching your Inventory
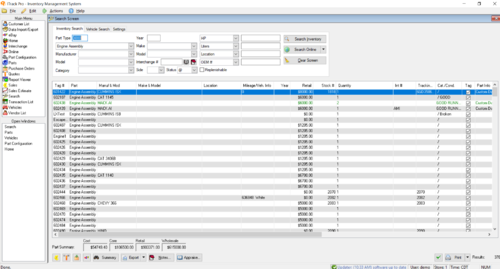
To search your inventory for parts or vehicles, click the Search button from the Main Menu. From the Search Screen you can search for either parts or vehicles. When the screen opens, it will automatically be on the Search For Parts tab.
You can use wild card symbols to help you find parts. The * can be used in place of any character or multiple characters. Example: F* in the Make field would find Freightliner or Ford. The ? allows for a single wildcard character. Example: Cat 3116? would bring up Cat 3116E and Cat 3116T.
| Tip |
| The @ status allows you to search for parts that are available or on hold. |
To search for parts, enter as much information into the fields as you wish. To search by part type, either enter the part number if you know it, or use the drop down list to select a part. You may type in the part as well. Selecting or typing in a part automatically fills in the corresponding type number.
After you have entered in all of the search information that you want, click the Search button located near the right, upper corner of the screen. This will bring up the search results.
| Tip |
| Double clicking on a part will bring up the part in the Part Management Screen. |
Result colors
Results will be colored differently based on the part record. Here are some possible colors, and their meanings:
- Green - Quantity on hand is greater than the maximum quantity, and max quantity is greater than 0.
- Yellow - Available quantity is less than the minimum quantity
- Blue - Available quantity is zero (but there is still quantity on hand) OR the item is set to status "H"
- Red - Quantity on hand is zero or less
Tree Items
Some columns on the search screen have tree lists to show related information about that part.
| Column | Data Shown in Tree |
|---|---|
| Tag # | Invoices |
| Status | Quotes |
| Part | Parts in same assembly |
Searching for a Vehicle
The Search For Vehicles tab functions much like the Search For Parts tab. The main difference is that you have different search capabilities. When you have finished entering in the search criteria, click the Search button on the right side of the screen.
| Tip |
| Double clicking on a vehicle from the Search Screen will bring up the vehicle information in the Vehicle Management Screen. |
ITrack Pro allows you to make a variety of searches, for example, you can search by dismantler to see which of your employees are the most productive. Remember to use the scroll bar at the bottom of the screen to see more information regarding your search.
In the example below, we did a search to see how many vehicles Robert dismantled. You can then use the scroll bar along the bottom of the screen to see more information about the vehicles Robert dismantled.
If you don't want to have to scroll to see a certain field, just click and hold the left mouse button on the field and drag it to the new location. For example, you need to scroll over to see who the dismantler is for a vehicle. If this is something you will need to see often, move that field closer to the left. ITrack Pro remembers your column orders so that they are always in the order you want.
To view the parts for a vehicle highlight the vehicle by clicking on it and then click on the Show Parts button located at the bottom of the screen. You then be taken back to the Search For Parts tab and you will be shown the list of parts for the vehicle.
Settings Tab
The final tab on the Search Screen is the Settings tab. Choosing different options on the Settings tab allows you to set the way ITrack searches for parts and vehicles. This is where you choose which flex fields are shown by default and how they are sorted in the results.
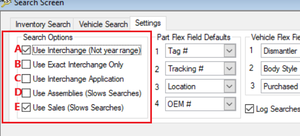
The check boxes under Search Options refine your search capabilities.
|
These options only apply to the Search for Parts tab. A When this box is checked, searches use the interchange but not the year of the part. B When checked, results will be perfectly interchangeable and not need modification. C Checking this box allows you to search for parts without interchange numbers that may still be interchangeable. D Unchecked, your searches will show part components not attached to a main part. Checked, it will show both unattached components and components still attached to a main part. E Checking this box allows you to see invoices and quotes attached to parts. |
- Set your default flex fields which will show up when you open the Search Screen and search for parts.
- Set the default flex fields which will show up when you open the Search Screen and search for vehicles.
- The Sort buttons allow you to set your default column order. When you search for parts or vehicles, the columns will now appear in the order you have set. Also, when printing search results, columns will appear in this order.
- When you click on Sort Vehicles By or Sort Parts By, a dialog box will come up. Click on a column type and click the up an down arrows on the right side of the box to move that type up or down in the list.
- Also, set the Default Status for parts and vehicles.(see Status section below)
Exporting to NMVTIS
ITrack Pro currently supports exporting to Auto Data Direct only. The export function will create a file formatted to be ready for upload to Auto Data Direct's online service. To use, follow the steps below
- Search for and select the vehicles you wish to export. To select all vehicles press Ctrl + A. To select a block hold Shift. To select one by one hold Ctrl.
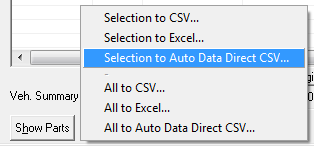
- Click the down arrow on the Export button at the bottom and choose "Export to Auto Data Direct."
- Save the file to a location you will remember.
- Open the file in Excel and review. Some fields may need to be addressed manually - see the NMVTIS AutoDataDirect notes.
Status
@: Available or On Hold
A: Available
B: Bid
C: Crushed
D: Deleted
H: On Hold
S: Sold
Buttons
| The Summary button displays financial totals on the parts you viewing. |
| The Tags button toggles all the search results tag checkboxes. This is a quick way to state that you want to print tags for all search results. |
| The Print button allows you to print either tags for your search results, or simply to print the list of results with some additional details |
| To sell a part, highlight it by clicking on it once and then click the Sell button located in the lower left corner. See the "Sales" section for more information about sales. |
| To add a part to a quote, click on the part to highlight it, and then click the Quote button. See the "Quotes" section for more information about quotes. |
| To buy a part on a Purchase Order, highlight the part you wish to send to a Purchase Order and then click the Purchase Order button. See the "Purchase Orders" section for more information about Purchase Orders. |
| To add a part to an eBay sale, highlight the part you wish to send to the sale and then click the eBay button. See the "eBay page under construction" section for more information about using eBay with ITrack Pro. |
| To add appraisal information to the search results, click the "Appraisal" button. This will calculate a rough estimate of what each item should be sold for given its average price on a variety of sites |


