Difference between revisions of "Presage/User Guide/Home Screen"
m (→Home Screen) |
|||
| Line 5: | Line 5: | ||
Below the ''Main Menu'' is ''Open Windows''. Every time a new screen is opened from the ''Main Menu'', it will show up under the ''Open Windows''. With this list, it is easy to toggle back and forth between opened screens without losing changes. | Below the ''Main Menu'' is ''Open Windows''. Every time a new screen is opened from the ''Main Menu'', it will show up under the ''Open Windows''. With this list, it is easy to toggle back and forth between opened screens without losing changes. | ||
Users can easily switch from one open window to another by clicking on it or by using the '''Ctrl''' | Users can easily switch from one open window to another by clicking on it or by using the '''Ctrl''' '''+''' '''Tab''' keys on the keyboard. | ||
The top box where the Presage logo is a separate browser. There is an option to set a page with often-viewed graphs for easy monitoring. There is also an option to set any other browser page in here. | The top box where the Presage logo is a separate browser. There is an option to set a page with often-viewed graphs for easy monitoring. There is also an option to set any other browser page in here. | ||
Revision as of 15:44, 29 April 2019
Home Screen
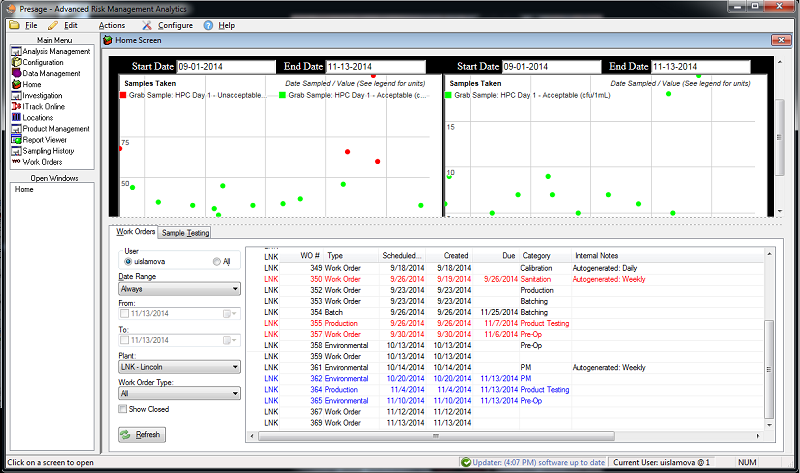
The Main Menu is the command center. All of the different screens for Presage are available in the Main Menu, located on the upper left side of the screen.
Below the Main Menu is Open Windows. Every time a new screen is opened from the Main Menu, it will show up under the Open Windows. With this list, it is easy to toggle back and forth between opened screens without losing changes.
Users can easily switch from one open window to another by clicking on it or by using the Ctrl + Tab keys on the keyboard.
The top box where the Presage logo is a separate browser. There is an option to set a page with often-viewed graphs for easy monitoring. There is also an option to set any other browser page in here.
The bottom box is the work order queue. The panel on the left is a way to filter work orders, both open and closed.
Work Orders Tab
The Work Order tab on the Home Screen lists all pending work orders. Work orders are scheduled to a specific plant, date, and Group. This list also specifies the date the work order was created, due date and the unique work order number. There is also a place for notes and instructions next to each work order which can be edited in the Work Order screen.
User
There is a menu to the left of the display panel in the Work Orders tab. User is the login user.
Date Range
Date Range drop-down list shows time periods during which work orders were assigned. For example, selecting “Last Month” will list all work orders created in the previous month. There is an option to set the date range to Custom. For this option, users can set a date range by specifying the start and end date. To the right of the date box is a calendar icon for easier date selection.
We recommend to set the Date Range to Always to ensure all open work order are visible. It is best to close work orders once all data has been entered so this Work Order Queue is always up to date and only shows work orders awaiting to be filled, otherwise the list gets very long and it is difficult to find the work order user is looking for.
Colorization
The Work Order Queue is colorized based on Due Date. Red work orders are those with a expired due dates. Blue work orders are those with due dates expiring within 24 hours. Black work orders do not have a due date assigned.
Plants
Users with access to multiple plants can narrow down the work order queue to one plant by selecting the plant of choice from the drop-down list. Users assigned to only one plant will not have to worry about this step as the plant will default to the plant specified in the login page.
Work Order Type
The list of work orders can be filtered by Work Order Type which is right below the Plant drop-down.
Show Closed
By checking the Show Closed box, users can view all closed in addition to the open work orders within the set date range.
Refresh
Once a work order is created, open the Home Screen and click Refresh to see the new work order.
Log Out
On top panel in the Home Screen, click File then Logout once you are finished using the program. User is automatically logged out once the program is closed or if Exit is selected from the File drop-down.
Sample Testing Tab
Sample Testing tab is next to the Work Orders tab in the Home Screen. Its purpose and function is very similar to that of the Work Order tab. This screen lists the testing samples which have to be pulled out of the testing mode. For example, it lists when samples have to be pulled out of the incubator.
No actions have to be taken in this screen. Once the samples are scanned to indicate when they have been pulled out, these samples are taken off of this list.
Items in this list are color-coded:
Dark grey if its been tested, Black if testing has not begun yet, Red if it should have been finished already but isn't, Blue if it should be finished 'soon' (currently in the next 24 hours), otherwise Green.

