Difference between revisions of "ITrack/Chromium Customer Info Page"
| (33 intermediate revisions by the same user not shown) | |||
| Line 5: | Line 5: | ||
==Addresses Tab== | ==Addresses Tab== | ||
On the '''Addresses''' tab, you can fill out the customers address and contact information | On the '''Addresses''' tab, you can fill out the customers address and contact information. | ||
* (A) After filling out all the info, click the '''create customer''' button to add the customer to your database. | *(A) After filling out all the info, click the '''create customer''' button to add the customer to your database. | ||
* (B) You can click the '''Map''' button to see the address on google maps. | *(B) You can click the '''Map''' button to see the address on google maps. | ||
* (C) You can click the '''Call''' button to call the number entered. | *(C) You can click the '''Call''' button to call the number entered. | ||
* (D) Clicking the '''Email''' button opens up your preferred email app and opens a new email addressed to the entered email address | *(D) Clicking the '''Email''' button opens up your preferred email app and opens a new email addressed to the entered email address. | ||
*(E) If the shipping address is the same as the billing address for your customer, simply check the '''match billing''' box to copy the info over. | |||
[[Image:ITrack-Chromium-Buttons.png|text-bottom|none|thumb|800px]] | |||
==Additional Info Tab== | ==Additional Info Tab== | ||
On the '''Additional Info''' tab, you can enter more optional information for a customer. This additional info includes: | |||
* A website URL, which you can access by clicking the '''open''' button to the right. | |||
* A notes field, where you can enter any additional info. | |||
* A Question and Answer section, where you can write common questions about the customer and give the corresponding answer. | |||
* An '''active''' checkbox in the top left. | |||
[[Image:ITrack-Chromium Additional Info tab.PNG|text-bottom|none|thumb|800px]] | |||
==Attachments Tab== | ==Attachments Tab== | ||
You can use the attachments tab to upload a file from your computer to associate with the customer, such as a profile picture or a PDF report of their previous transactions with you. Use the add video button to add a video from the internet, either by providing its URL or by searching for it by account on Youtube. | |||
[[Image:ITrack-Chromium-Customer Attachments.PNG|text-bottom|none|thumb|800px]] | |||
==Financials Tab== | ==Financials Tab== | ||
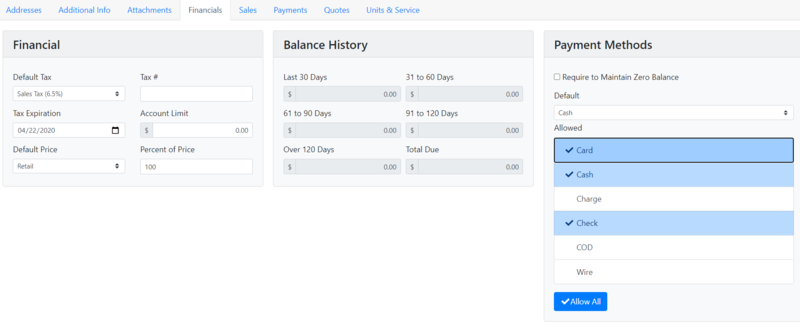
Use this tab to edit a customers advanced financial information. From this tab, you can: | |||
* Set the default tax. | |||
* Set a tax expiration (in case you want to keep track of tax-exempt customers whose status has an end date). | |||
* Set the default price from one of many options associated with an inventory option. | |||
* Keep track of the balance history of a customer. | |||
* Pick which payment methods are allowed for a customer. | |||
[[Image:ITrack-Chromium-Customer Financials.PNG|text-bottom|none|thumb|800px]] | |||
==Sales Tab== | ==Sales Tab== | ||
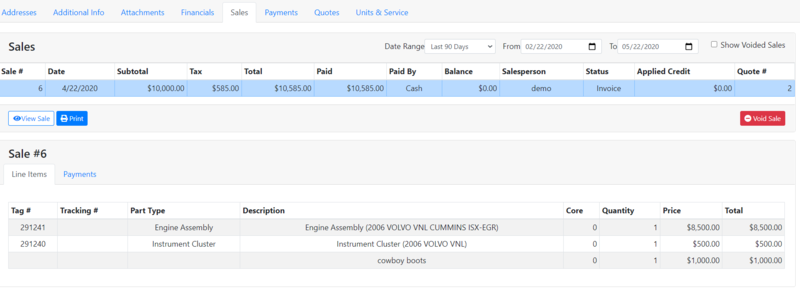
From the sales tab you can view the info of and interact with past sales of a customer. | |||
In the top right, there is a date range, the result screen will display every sale made between the '''From''' date to the '''To''' date. | |||
Checking the '''Show voided sales''' box will make the result screen also display voided sales within the specified date range. | |||
To interact with a sale, click one of the sales in the result set. Clicking on the sale will highlight it blue (as seen above). | |||
Once you select the sale, you will be able to. | |||
* View Sale- clicking the white, '''View Sale''' Button will open up the sale in the Sales Screen(include link here later). | |||
* Print- clicking the blue, '''Print''' button will | |||
* Void Sale- clicking the red '''Void Sale''' button will void the selected sale. | |||
* Selecting the sale will also pop up two new tabs on the bottom: | |||
*# The line items tab displays all the items involved in the sale. | |||
*# The payments tab displays all the payments made in the sale. | |||
[[Image:ITrack-Chromium-Customer Sales.PNG|text-bottom|none|thumb|800px]] | |||
==Payments Tab== | ==Payments Tab== | ||
Unable to access tab at the moment. Will get back to later | |||
==Quotes Tab== | ==Quotes Tab== | ||
The Quotes tab allows you to view a all quotes associated with a customer in a given date range. Click the '''Send to Sale''' button to convert the quote to an invoice. | |||
==Units & Service Tab== | ==Units & Service Tab== | ||
[[Image:ITrack-Chromium-Customer-Unit order.PNG|thumb|right|300px]] | |||
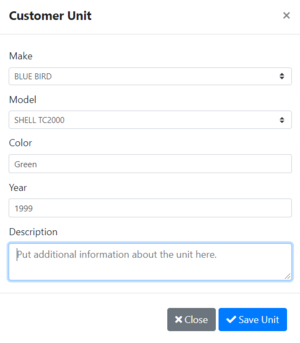
This tab allows you to create a unit order for a customer. Clicking on the '''Create Unit''' button allows you to create a new unit order while clicking the '''Edit Unit''' button for a selected unit order allows you to make any changes you need to. Both buttons bring up a popup where you can fill out any required info for the unit order. | |||
Latest revision as of 10:34, 26 May 2020
The Customer information page is where you can create new customers and edit existing ones.
Addresses Tab
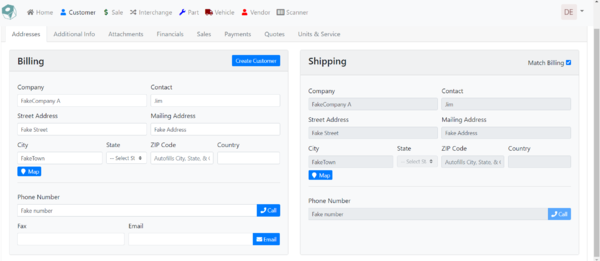
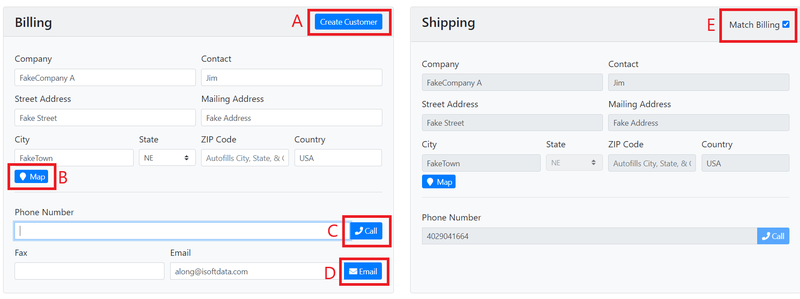
On the Addresses tab, you can fill out the customers address and contact information.
- (A) After filling out all the info, click the create customer button to add the customer to your database.
- (B) You can click the Map button to see the address on google maps.
- (C) You can click the Call button to call the number entered.
- (D) Clicking the Email button opens up your preferred email app and opens a new email addressed to the entered email address.
- (E) If the shipping address is the same as the billing address for your customer, simply check the match billing box to copy the info over.
Additional Info Tab
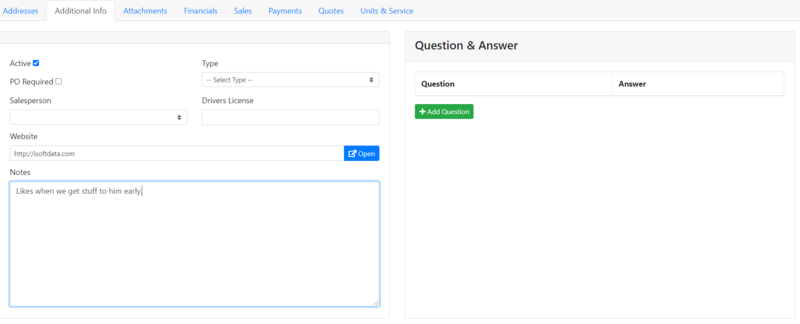
On the Additional Info tab, you can enter more optional information for a customer. This additional info includes:
- A website URL, which you can access by clicking the open button to the right.
- A notes field, where you can enter any additional info.
- A Question and Answer section, where you can write common questions about the customer and give the corresponding answer.
- An active checkbox in the top left.
Attachments Tab
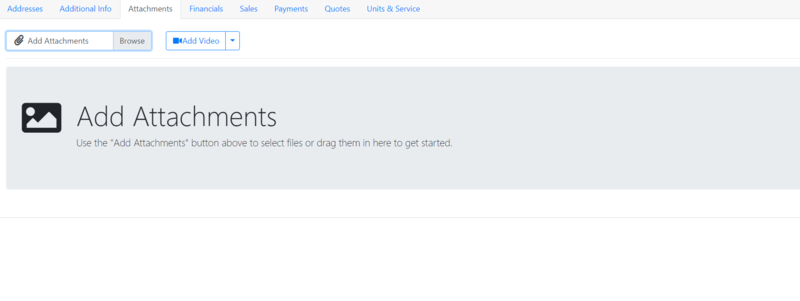
You can use the attachments tab to upload a file from your computer to associate with the customer, such as a profile picture or a PDF report of their previous transactions with you. Use the add video button to add a video from the internet, either by providing its URL or by searching for it by account on Youtube.
Financials Tab
Use this tab to edit a customers advanced financial information. From this tab, you can:
- Set the default tax.
- Set a tax expiration (in case you want to keep track of tax-exempt customers whose status has an end date).
- Set the default price from one of many options associated with an inventory option.
- Keep track of the balance history of a customer.
- Pick which payment methods are allowed for a customer.
Sales Tab
From the sales tab you can view the info of and interact with past sales of a customer.
In the top right, there is a date range, the result screen will display every sale made between the From date to the To date.
Checking the Show voided sales box will make the result screen also display voided sales within the specified date range.
To interact with a sale, click one of the sales in the result set. Clicking on the sale will highlight it blue (as seen above). Once you select the sale, you will be able to.
- View Sale- clicking the white, View Sale Button will open up the sale in the Sales Screen(include link here later).
- Print- clicking the blue, Print button will
- Void Sale- clicking the red Void Sale button will void the selected sale.
- Selecting the sale will also pop up two new tabs on the bottom:
- The line items tab displays all the items involved in the sale.
- The payments tab displays all the payments made in the sale.
Payments Tab
Unable to access tab at the moment. Will get back to later
Quotes Tab
The Quotes tab allows you to view a all quotes associated with a customer in a given date range. Click the Send to Sale button to convert the quote to an invoice.
Units & Service Tab
This tab allows you to create a unit order for a customer. Clicking on the Create Unit button allows you to create a new unit order while clicking the Edit Unit button for a selected unit order allows you to make any changes you need to. Both buttons bring up a popup where you can fill out any required info for the unit order.
