Difference between revisions of "Presage/User Guide/Document Management Screen"
From ISoft Wiki
< Presage | User Guide
Jump to navigationJump to search
| (50 intermediate revisions by the same user not shown) | |||
| Line 4: | Line 4: | ||
This allows you to post instructions, user manuals, and anything else that you want your employees or fellow coworkers to see. | This allows you to post instructions, user manuals, and anything else that you want your employees or fellow coworkers to see. | ||
To navigate to the document management screen, click the '''Document Mgmt''' button on the main menu. | |||
[[Image:ISoft-Presage FindingDocumentManagement.png|none|700px]] | |||
==Adding and Deleting documents== | ==Adding and Deleting documents== | ||
To add a document, follow these steps: | |||
[[Image:ISoft-Presage Add Document 1.png|none|700px]] | |||
Click the 'Add' button on the bottom left. | The 'Document Management' screen, make sure the proper plant is selected at the top left. | ||
Select which level of the hierarchy your document belongs. | Click the 'Add' button on the bottom left. | ||
Select which level of the hierarchy your document belongs. | |||
[[Image:ISoft-Presage Add Document 2.PNG|none|700px]] | |||
(A) Name your document, as you can see, the name fills out on the left to match what you put here. | |||
(B) Fill in a description, this can just be a simple summary of the document. | |||
Assign a 'Next review date' if the document contains perishable information. | |||
Verify the document is 'Mobile friendly' | |||
[[Image:ISoft-Presage Add Document 3.PNG|none|400px]] | |||
Make sure that you have your document ready. Here are ISoft's instructions for making a perfect bag of popcorn. | |||
[[Image:ISoft-Presage add document 4.PNG|none|700px]] | |||
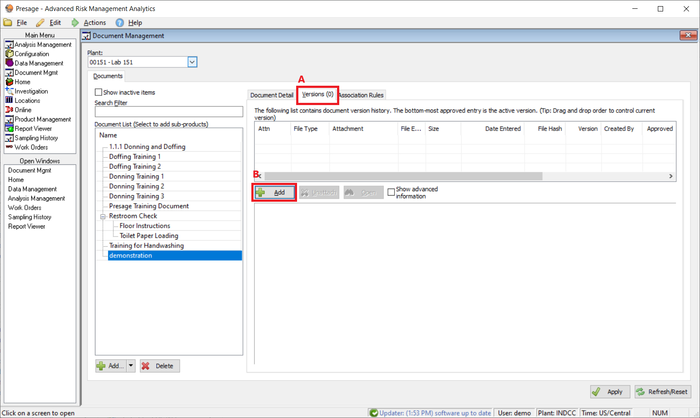
To actually add the document from your computer, first, click the | |||
(A) versions tab and then click the | |||
(B) add button. | |||
This will bring you to your file explorer on your computer. | |||
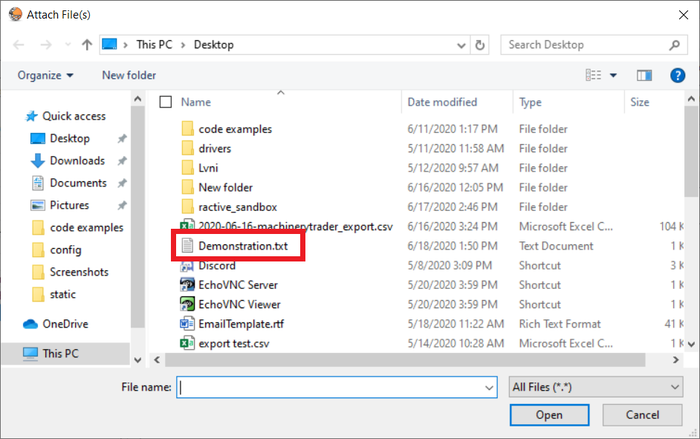
[[Image:ISoft-Presage add document 5.PNG|none|700px]] | |||
Navigate to the file of your choice. | |||
From here, you can double click the file or click the file and then click the '''Open''' button. | |||
This will close file explorer and attach the file to your document on presage | |||
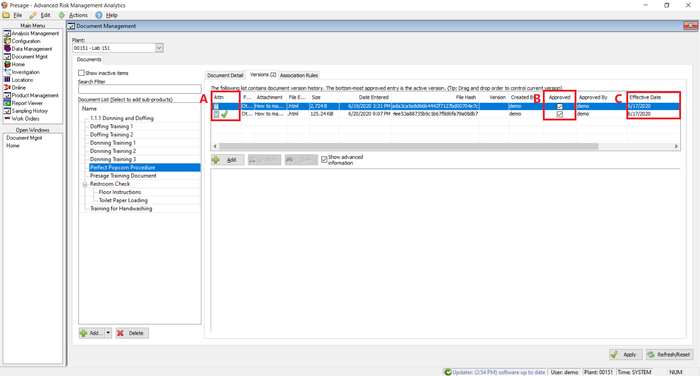
[[Image:ISoft-Presage-FinalizingAddition.png|none|700px]] | |||
(A) The document with the green check mark to the left is the current version. Simply drag whatever version you want to be the current version to the top of the list. | |||
(B) Next, check the '''approve''' box. | |||
(C) Finally, make sure '''Effective Date''' is chosen to allow the document to show up on work orders. | |||
{{Tip|If you have multiple versions approved, the version with the more recent '''Effective Date''' will be the used version}} | |||
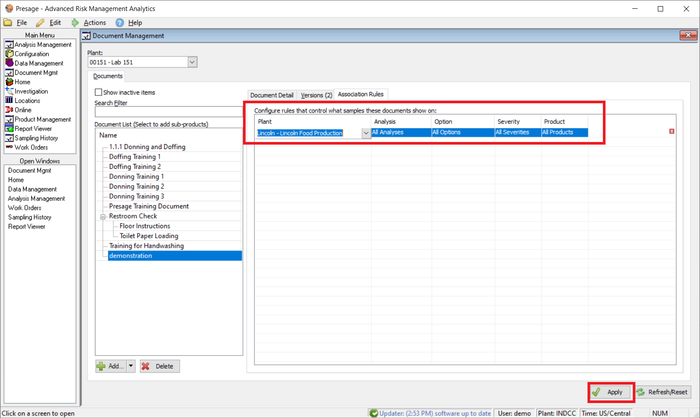
'''On the 'Association Rules' tab:''' | |||
[[Image:ISoft-Presage-AssociationRules.png|none|700px]] | |||
Configure the plant, analysis, option, severity, and product on which you want this document to appear | |||
Click the 'Apply' button at the bottom right to save your changes | |||
==Viewing on the phone== | |||
[[Image:DocumentUploadPhone1-3.png|none|1000px]] | |||
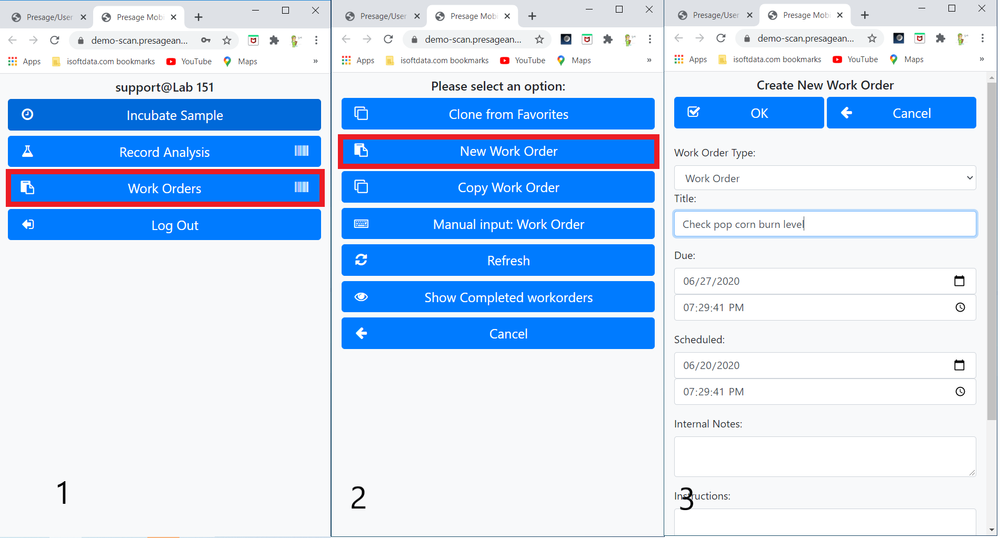
1. First, go to the work orders screen. | |||
2. For this example, we will create a new work order. | |||
3. Let's name this work order '''check pop corn burn level'''. | |||
[[Image:DocumentUploadPhone4-6.png|none|1000px]] | |||
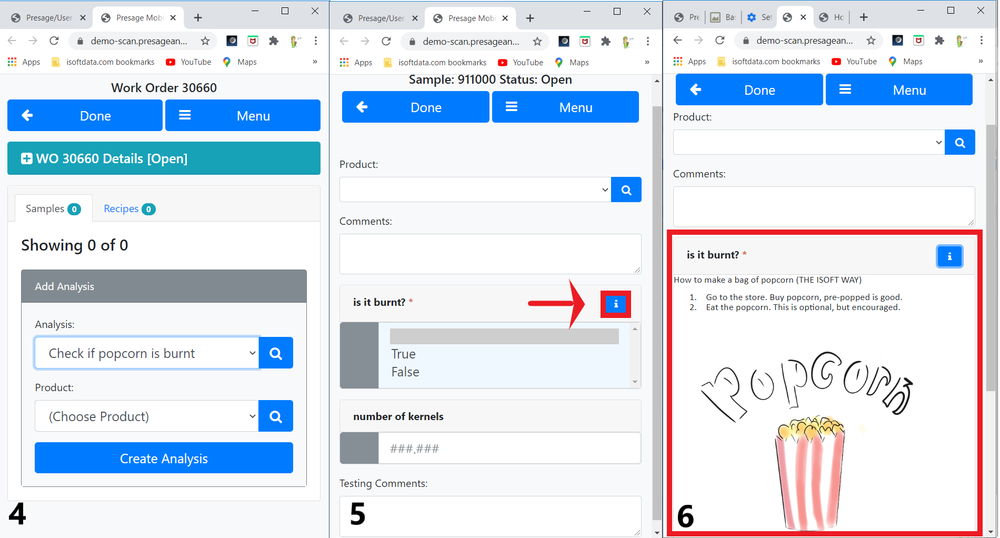
4. Now, let's bring up that work order.Let's add the analysis that we created on the Desktop software. | |||
5. Now, you should see an '''i''' button, click here to bring up the document. | |||
6. As you can see, the document comes up. | |||
== | ==Uploading a Word Document== | ||
Sometimes you may want to upload something a bit nicer than a .txt file. Presage supports uploading .HTML files as well. To see how to convert a word file to | |||
a .HTML file, click '''[[Presage/User_Guide/Document_Management_Screen/converting-doc-to-html|HERE]]'''. | |||
Latest revision as of 14:07, 22 June 2020
Main Summary
The main purpose of the Document Management screen is to allow Presage users to upload documents to their presage database and access those documents later.
This allows you to post instructions, user manuals, and anything else that you want your employees or fellow coworkers to see.
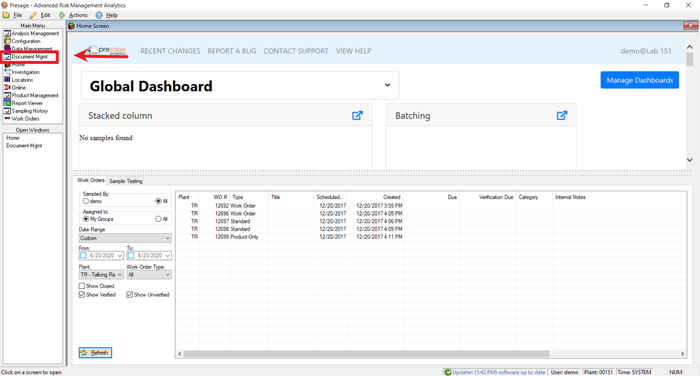
To navigate to the document management screen, click the Document Mgmt button on the main menu.
Adding and Deleting documents
To add a document, follow these steps:
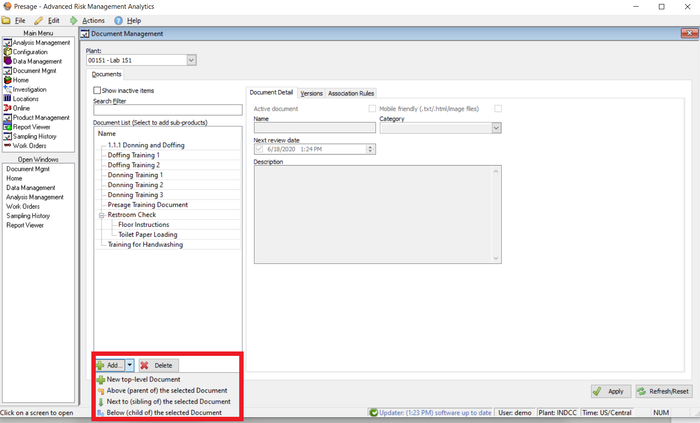
 The 'Document Management' screen, make sure the proper plant is selected at the top left.
 Click the 'Add' button on the bottom left.
 Select which level of the hierarchy your document belongs.
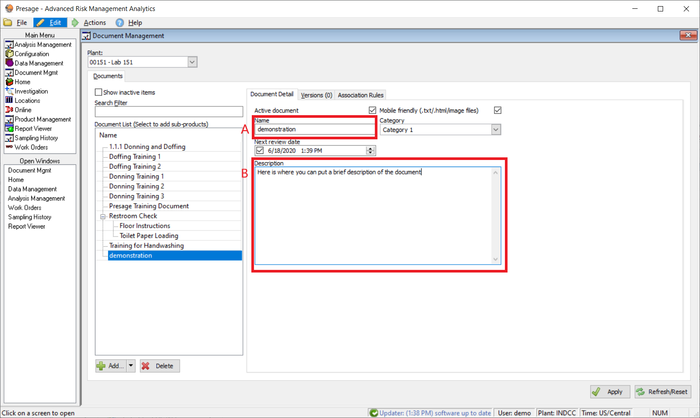
 (A) Name your document, as you can see, the name fills out on the left to match what you put here.
 (B) Fill in a description, this can just be a simple summary of the document.
 Assign a 'Next review date' if the document contains perishable information.
 Verify the document is 'Mobile friendly'
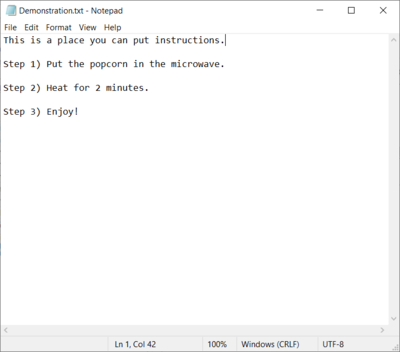
Make sure that you have your document ready. Here are ISoft's instructions for making a perfect bag of popcorn.
 To actually add the document from your computer, first, click the
 (A) versions tab and then click the
 (B) add button.
 This will bring you to your file explorer on your computer.
 Navigate to the file of your choice.
 From here, you can double click the file or click the file and then click the Open button.
 This will close file explorer and attach the file to your document on presage
 (A) The document with the green check mark to the left is the current version. Simply drag whatever version you want to be the current version to the top of the list.
 (B) Next, check the approve box.
 (C) Finally, make sure Effective Date is chosen to allow the document to show up on work orders.
| Tip |
| If you have multiple versions approved, the version with the more recent Effective Date will be the used version |
On the 'Association Rules' tab:
 Configure the plant, analysis, option, severity, and product on which you want this document to appear
 Click the 'Apply' button at the bottom right to save your changes
Viewing on the phone
1. First, go to the work orders screen.
2. For this example, we will create a new work order.
3. Let's name this work order check pop corn burn level.
4. Now, let's bring up that work order.Let's add the analysis that we created on the Desktop software.
5. Now, you should see an i button, click here to bring up the document.
6. As you can see, the document comes up.
Uploading a Word Document
 Sometimes you may want to upload something a bit nicer than a .txt file. Presage supports uploading .HTML files as well. To see how to convert a word file to
 a .HTML file, click HERE.
