Difference between revisions of "ITrack/Pro/Vehicles Screen"
| (30 intermediate revisions by 3 users not shown) | |||
| Line 1: | Line 1: | ||
[[Image:Pro vehicle management basic 01.png|thumb|right|600px|Vehicle Management Screen]] | [[Image:Pro vehicle management basic 01.png|thumb|right|600px|Vehicle Management Screen, Basic Tab]] | ||
==Entering New Vehicles== | ==Entering New Vehicles== | ||
Clicking on Vehicles in the Main Menu will bring up the Vehicle Management Screen. From this screen you will be able to enter all kinds of information about vehicles. | Clicking on Vehicles in the Main Menu will bring up the Vehicle Management Screen. From this screen you will be able to enter all kinds of information about vehicles. | ||
{{Tip|ITrack includes numerous fields to track many aspects of your inventory and your business. Not all fields are required. Fill out the information you deem necessary and save at any time. If you are missing required information, ITrack will notify you with a pop up box.}} | {{Tip|ITrack includes numerous fields to track many aspects of your inventory and your business. Not all fields are required. Fill out the information you deem necessary and save at any time. If you are missing required information, ITrack will notify you with a pop up box.}} | ||
The Tracking # field allows you to enter your own tracking numbers (which can be any combination of numeric, alpha, or special characters), for example vehicle type. If you don't want to enter a custom tracking number, ITrack will automatically assign a sequential number for you. | |||
==Basic Tab== | ==Basic Tab== | ||
The Basic tab (image at the top of this screen) contains basic information about a vehicle. Year, Make, and Model are all required fields. Entering a vehicle's VIN # will prompt you for the Make and Model of the vehicle. Once you choose the appropriate information, ITrack will fill in the Year, Make, Model, and add Internal Notes. Please note, this vehicle isn't a sellable item yet. To sell a complete vehicle, you must create a Complete Vehicle record in the Parts screen (Part type 9000). | |||
==Attachments Tab== | |||
[[Image:Pro vehicle management advanced 01.png|thumb|none|475px|Vehicle Management Screen, Attachments Tab]] | |||
After you have finished entering all of the information under the Basic tab, click on the Attachments tab to attach photos, scanned documents, videos, and other files related to the vehicle. | |||
You may enter an unlimited number of images and attachments for each vehicle. Click the Add button, select the file, and click the Open button to attach the file. | |||
You can preview attached files in the lower part of the screen. Files can be added (Add) or deleted (Unattach) at any time. You can also use the Open button to run files in their native applications. | |||
The Email button opens your default e-mail application and attaches any files marked "Public." This is a convenient option for sending pictures and vehicle information to potential customers. | |||
"Show Advanced Information" adds four additional columns of information -- File Extension, Size, Data Entered, and File Hash. You can sort files by clicking any of the columns headers. Clicking once sorts ascending (A-Z), clicking a second time will sort descending (Z-A) | |||
The Printout button sends a Vehicle report to a printer, or opens it in Preview. This printout will include information about vehicles, including any files attached to the vehicle that you have marked as Public. | |||
The Enter Parts button opens the Part Management (Parts) screen, and enters the Tracking# and VIN for the current vehicle. | |||
The | The Print Teardown button creates a Teardown sheet for the vehicle. These sheets are useful for listing the parts that are going to be removed from the vehicle. | ||
==Q And A Tab== | |||
[[Image:Pro veh mngmnt performance qa 1.png|thumb|none|475px|Vehicle Management Screen, Q and A Tab]] | |||
The Q And A tab allows you to answer Vehicle Questions. These show on the Printout report. You can add or edit these questions in the Part Configuration screen, Teardowns tab, Vehicles Questions button. These changes will appear the next time to are in the Vehicle screen. | |||
==Info Tab== | ==Info Tab== | ||
The | [[Image:Pro veh mngmnt info 01.png|thumb|none|475px|Vehicle Management Screen, Info Tab]] | ||
The Info tab allows you enter more information on the vehicle such as seller information, miscellaneous information, and title information. The fields in bold on this tab are required information for NMVTIS (National Motor Vehicle Title Information System), but are not required by ITrack Pro. | |||
{{Tip|If you don't want to enter information in any tabs other than Basic, just click Save & New or Save & Close, both located in the upper right. Or, if you want to enter parts from the vehicle, click the Parts From Teardown button in the lower right corner.}} | {{Tip|If you don't want to enter information in any tabs other than Basic, just click Save & New or Save & Close, both located in the upper right. Or, if you want to enter parts from the vehicle, click the Parts From Teardown button in the lower right corner.}} | ||
| Line 27: | Line 42: | ||
==Costs Tab== | ==Costs Tab== | ||
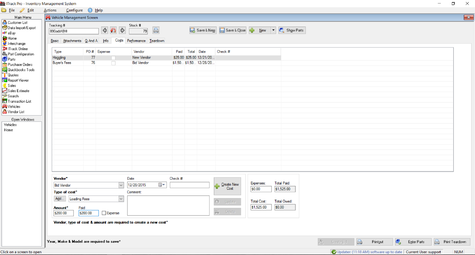
[[Image:Pro veh mngmnt costs 01.png|thumb|none|475px|Vehicle Management Screen, Costs Tab]] | |||
On the Costs tab, you can use the controls at the bottom left corner to enter and track all of the costs associated with a vehicle. | |||
The Vendor dropdown list shows all current vendors from the Vendor List. Any new values you add to this field will create a new vendor record in the Vendor List. To add more than the Company Name for a vendor, edit the vendor in the [[ITrack/Pro/Vendor_Screen|Vendor Information]] screen. | |||
The Type of Cost dropdown list shows all current types. To add a new type, click the Add... button. This will open a new window, where you can enter the name, select whether it is an Expense, and a default Tag#. Once entered, this Cost Type will be available for all Vehicle records. | |||
Each cost you enter will create a new PO that gets automatically closed and received by the system. These POs help you determine Cost of Goods Sold (CGS). Any "Expense" costs will NOT create a PO, and will not factor automatically into CGS. | |||
When you are satisfied with the information, click on the "Create New" button. The cost item will then show up on the screen. | When you are satisfied with the information, click on the "Create New" button. The cost item will then show up on the screen. | ||
<br> | <br> | ||
To update an existing cost, simply select the cost in the list and the information will show up in the fields at the bottom. Make any changes that need to be made and click the "Update" button. | To update an existing cost, simply select the cost in the list and the information will show up in the fields at the bottom. Make any changes that need to be made and click the "Update" button. | ||
==Performance Tab== | ==Performance Tab== | ||
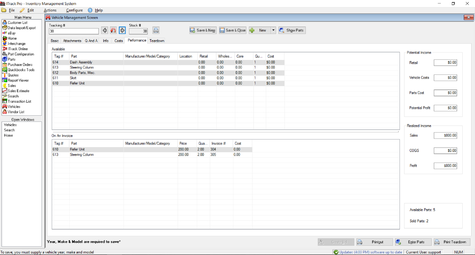
[[Image:Pro vehicle management performance 01.png|thumb| | [[Image:Pro vehicle management performance 01.png|thumb|none|475px|Vehicle Management Screen, Performance Tab]] | ||
The Performance tab will start out blank when you enter in a new vehicle. Information about parts will show up once you enter parts for the vehicle. The | The Performance tab will start out blank when you enter in a new vehicle. Information about parts will show up once you enter parts for the vehicle. The Available section shows available parts you still have in stock for the vehicle. The 'On An Invoice' section shows which parts you have sold from the vehicle. | ||
On the right side of the screen is the Totals section. It shows valuable information including how many parts you have sold from this vehicle and the total dollar amount you have sold from the vehicle. | On the right side of the screen is the Totals section. It shows valuable information including how many parts you have sold from this vehicle and the total dollar amount you have sold from the vehicle. | ||
{{Tip| Any parts marked as Crushed (Status C) will not show up on this tab.}} | |||
==Teardown Tab== | ==Teardown Tab== | ||
[[Image: | [[Image: ITrack_Vehicle_Teardown.png|thumb|none|475px|Vehicle Management Screen, Teardown Tab]] | ||
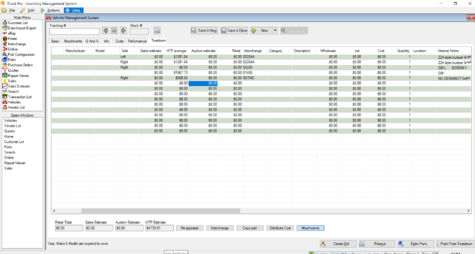
From the | From the Teardown tab you can go through the list and click the box in the left column to flag the parts you want to enter. If the item is not already a Part, the system will create a record for that part when you Save the Vehicle record. Use the horizontal scroll bar at the bottom to show more fields. | ||
* The Type# corresponds to the Part Type field in the Part Management screen. | |||
* The Side column allows you to specify left, right, or both sides of a part (for example, front doors). | |||
* Interchange corresponds to the Interchange# field in the Interchange screen. | |||
* Category corresponds to the Category field in the Part Management screen. | |||
* Quantity refers to the quantity of parts from this vehicle. This value will change the quantity field in the Part Management screen. | |||
* You can also add the Model and Manufacturer of the part in this screen using the drop down menus on the Model and Manufacturer fields. | |||
* Double-clicking the value in the Sales Estimate field will launch the Sales Estimate screen, which gives you access to Previous Sales and Current Inventory information. | |||
* The Sales Estimate value is based on your shop's sales history. | |||
* The Retail, Interchange, Category, Description, Wholesale, List, Cost, Quantity, and Location fields can now all be edited on this screen. | |||
* The Auction Estimate value is gathered from Berryhills Auctioneers sales history. Each shop has the ability to customize their settings, to show values that are most applicable to their area. | |||
* The HTP Average value is gathered from the Heavy Truck Parts website. This allows shops to see what their competitors are charging for similar parts. | |||
When you are finished selecting the parts from teardown for the vehicle, click the "Save & Close" button to save both the vehicle its parts. | |||
To access additional Sales info about a particular part, double click the Sales estimate column. This will take you to the [[ITrack/Pro/Sales Estimate Screen|Sales Estimate]] screen to give you additional sales information. | To access additional Sales info about a particular part, double click the Sales estimate column. This will take you to the [[ITrack/Pro/Sales Estimate Screen|Sales Estimate]] screen to give you additional sales information. | ||
===Interchange=== | ===Interchange=== | ||
| Line 64: | Line 87: | ||
==Bidding== | ==Bidding== | ||
Another feature of the Vehicles screen is the ability to create vehicle bids based on an estimate of the parts off the vehicle. Bids use local sales, Berryhill Auctioneer | Another feature of the Vehicles screen is the ability to create vehicle bids based on an estimate of the parts off the vehicle. Bids use local sales, Berryhill Auctioneer, and HeavyTruckParts.net data to give users price estimates. | ||
===Creating a Bid=== | ===Creating a Bid=== | ||
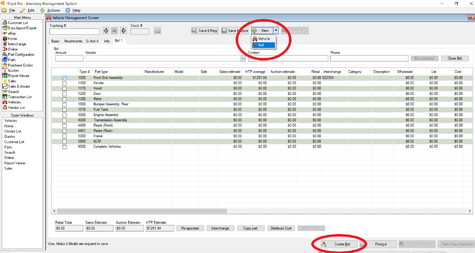
There are two ways to start a bid, clicking the arrow on the "New" button at the top and choosing "Bid" or by enter in the vehicle's Year, Make and Model and click the "Create Bid" button at the bottom. | There are two ways to start a bid, clicking the arrow on the "New" button at the top and choosing "Bid" or by enter in the vehicle's Year, Make and Model and click the "Create Bid" button at the bottom. | ||
[[Image: BidPic1.png|thumb|none|475px|Vehicle Management Screen, Teardown Tab]] | |||
Once in Bid mode you will notice the Costs and Performance tabs go away and a new Bid tab appears. From this tab you can enter in Manufacturer and Model information for parts and automatically receive local sales, auction and HTP price estimates. These estimates can be used to get an idea of the value of the vehicle you're bidding on. Mousing over these field will give you more even more detailed information such as average, min, max & the number of records. At the bottom, in the "Intelligence" section totals of the displayed estimates will be shown. Appraisal information is saved in ITrack to preserve the estimate that was given at the time of the bid. You can updated appraisal values at any time by pressing the "Re-appraise" button at the bottom. | Once in Bid mode you will notice the Costs and Performance tabs go away and a new Bid tab appears. From this tab you can enter in Manufacturer and Model information for parts and automatically receive local sales, auction and HTP price estimates. These estimates can be used to get an idea of the value of the vehicle you're bidding on. Mousing over these field will give you more even more detailed information such as average, min, max & the number of records. At the bottom, in the "Intelligence" section totals of the displayed estimates will be shown. Appraisal information is saved in ITrack to preserve the estimate that was given at the time of the bid. You can updated appraisal values at any time by pressing the "Re-appraise" button at the bottom. | ||
| Line 75: | Line 100: | ||
===Completing a Bid=== | ===Completing a Bid=== | ||
====Accepting==== | ====Accepting==== | ||
If your bid is accepted and you now own the vehicle you can receive the vehicle and its parts into inventory. To do this open the bid on the Vehicles screen and press the Bid accepted button. At this point ITrack will convert the bid to a Vehicle(changes it status from B to A) and receives puts the parts from the Bid tab into inventory(Status A). The original Bid will still be tied to this vehicle for your records. The parts will now appear on the Teardown tab and their information can be modified to your liking. | If your bid is accepted and you now own the vehicle you can receive the vehicle and its parts into inventory. To do this open the bid on the Vehicles screen and press the Bid accepted button. At this point ITrack will convert the bid to a Vehicle (changes it status from B to A) and receives puts the parts from the Bid tab into inventory (Status A). The original Bid will still be tied to this vehicle for your records. The parts will now appear on the Teardown tab and their information can be modified to your liking. | ||
====Closing==== | ====Closing==== | ||
| Line 84: | Line 109: | ||
===Search=== | ===Search=== | ||
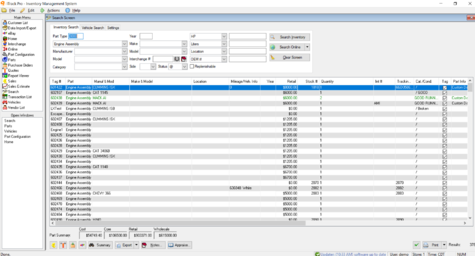
[[Image:Pro search 1.png|thumb|none|475px|Search Screen]] | |||
[[Image:Pro search 1.png|thumb| | |||
There are three ways to get to a vehicle you have already entered. The first is to click on the [[ITrack/Pro/Search Screen|Search]] Screen from the Main Menu. Click the Search for Vehicles tab, Conduct a search for the vehicle you are looking for. Double click on the vehicle you want and it will open in the Vehicle Management Screen. | There are three ways to get to a vehicle you have already entered. The first is to click on the [[ITrack/Pro/Search Screen|Search]] Screen from the Main Menu. Click the Search for Vehicles tab, Conduct a search for the vehicle you are looking for. Double click on the vehicle you want and it will open in the Vehicle Management Screen. | ||
{{Tip|See [[Pro/Search_Screen#Searching_for_a_Vehicle|“Searching for a Vehicle”]] for more information about how to search.}} | {{Tip|See [[Pro/Search_Screen#Searching_for_a_Vehicle|“Searching for a Vehicle”]] for more information about how to search.}} | ||
===Lookup=== | ===Lookup=== | ||
| Line 103: | Line 121: | ||
</td> | </td> | ||
<td> | <td> | ||
The second way to get to a vehicle is from the Vehicle Management Screen. Enter the tracking number for the vehicle in the Tracking # field and then click the lookup button (a car with a magnifying glass) to find the vehicle. | |||
</td> | </td> | ||
</tr> | </tr> | ||
| Line 115: | Line 133: | ||
</td> | </td> | ||
<td> | <td> | ||
The third way to view an entered vehicle is click on the arrows on either side of the lookup button to look through your saved vehicles numerically. Once you find the vehicle, you can its details in any of the tabs: Basic, Advanced, Info, Costs, Performance, and Q And A. | |||
Once you | |||
</td> | </td> | ||
</tr> | </tr> | ||
</table> | </table> | ||
== Assigning Cost from a Vehicle to Parts == | |||
ITrack Enterprise no longer supports vehicle cost ratios during teardown. However, the user can manually assign cost to teardown components from the vehicles screen or individually on the parts screen using the cost field. The user should not allocate cost to components that exceeds the entire vehicle cost pool. For more information as well as a description of percent of price costing, which is the preferred vehicle costing method in EE, see [[ITrack/Enterprise/Costing#Standard_Parts|standard part costing]]. | |||
[[Category:ITrack/Pro/Extensions]] | [[Category:ITrack/Pro/Extensions]] | ||
Latest revision as of 16:29, 1 December 2022
Entering New Vehicles
Clicking on Vehicles in the Main Menu will bring up the Vehicle Management Screen. From this screen you will be able to enter all kinds of information about vehicles.
| Tip |
| ITrack includes numerous fields to track many aspects of your inventory and your business. Not all fields are required. Fill out the information you deem necessary and save at any time. If you are missing required information, ITrack will notify you with a pop up box. |
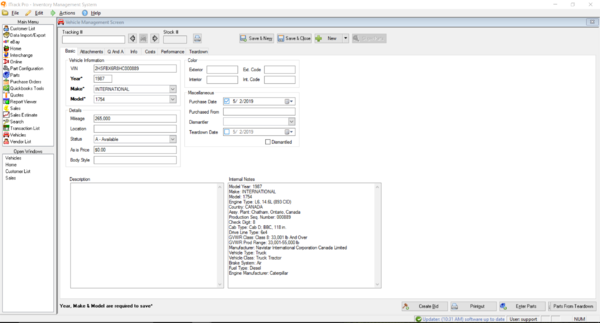
The Tracking # field allows you to enter your own tracking numbers (which can be any combination of numeric, alpha, or special characters), for example vehicle type. If you don't want to enter a custom tracking number, ITrack will automatically assign a sequential number for you.
Basic Tab
The Basic tab (image at the top of this screen) contains basic information about a vehicle. Year, Make, and Model are all required fields. Entering a vehicle's VIN # will prompt you for the Make and Model of the vehicle. Once you choose the appropriate information, ITrack will fill in the Year, Make, Model, and add Internal Notes. Please note, this vehicle isn't a sellable item yet. To sell a complete vehicle, you must create a Complete Vehicle record in the Parts screen (Part type 9000).
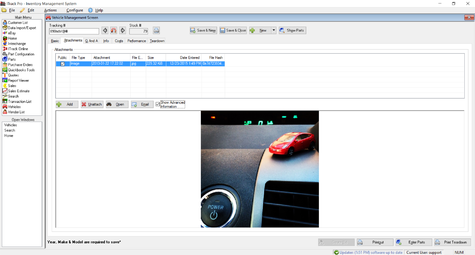
Attachments Tab
After you have finished entering all of the information under the Basic tab, click on the Attachments tab to attach photos, scanned documents, videos, and other files related to the vehicle.
You may enter an unlimited number of images and attachments for each vehicle. Click the Add button, select the file, and click the Open button to attach the file.
You can preview attached files in the lower part of the screen. Files can be added (Add) or deleted (Unattach) at any time. You can also use the Open button to run files in their native applications.
The Email button opens your default e-mail application and attaches any files marked "Public." This is a convenient option for sending pictures and vehicle information to potential customers.
"Show Advanced Information" adds four additional columns of information -- File Extension, Size, Data Entered, and File Hash. You can sort files by clicking any of the columns headers. Clicking once sorts ascending (A-Z), clicking a second time will sort descending (Z-A)
The Printout button sends a Vehicle report to a printer, or opens it in Preview. This printout will include information about vehicles, including any files attached to the vehicle that you have marked as Public.
The Enter Parts button opens the Part Management (Parts) screen, and enters the Tracking# and VIN for the current vehicle.
The Print Teardown button creates a Teardown sheet for the vehicle. These sheets are useful for listing the parts that are going to be removed from the vehicle.
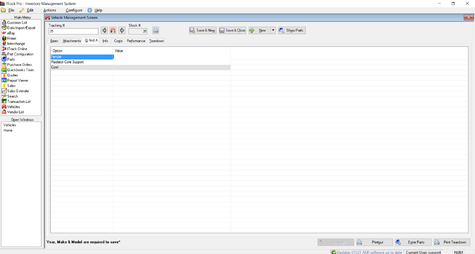
Q And A Tab
The Q And A tab allows you to answer Vehicle Questions. These show on the Printout report. You can add or edit these questions in the Part Configuration screen, Teardowns tab, Vehicles Questions button. These changes will appear the next time to are in the Vehicle screen.
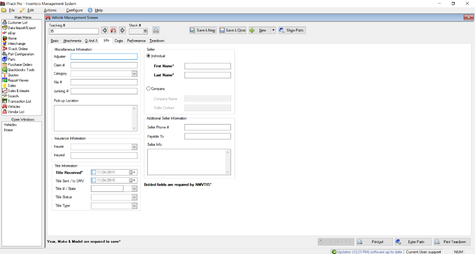
Info Tab
The Info tab allows you enter more information on the vehicle such as seller information, miscellaneous information, and title information. The fields in bold on this tab are required information for NMVTIS (National Motor Vehicle Title Information System), but are not required by ITrack Pro.
| Tip |
| If you don't want to enter information in any tabs other than Basic, just click Save & New or Save & Close, both located in the upper right. Or, if you want to enter parts from the vehicle, click the Parts From Teardown button in the lower right corner. |
The completed Info tab will have information about who you bought the vehicle from, title status on the vehicle, and other information about where you got the vehicle.
Costs Tab
On the Costs tab, you can use the controls at the bottom left corner to enter and track all of the costs associated with a vehicle.
The Vendor dropdown list shows all current vendors from the Vendor List. Any new values you add to this field will create a new vendor record in the Vendor List. To add more than the Company Name for a vendor, edit the vendor in the Vendor Information screen.
The Type of Cost dropdown list shows all current types. To add a new type, click the Add... button. This will open a new window, where you can enter the name, select whether it is an Expense, and a default Tag#. Once entered, this Cost Type will be available for all Vehicle records.
Each cost you enter will create a new PO that gets automatically closed and received by the system. These POs help you determine Cost of Goods Sold (CGS). Any "Expense" costs will NOT create a PO, and will not factor automatically into CGS.
When you are satisfied with the information, click on the "Create New" button. The cost item will then show up on the screen.
To update an existing cost, simply select the cost in the list and the information will show up in the fields at the bottom. Make any changes that need to be made and click the "Update" button.
Performance Tab
The Performance tab will start out blank when you enter in a new vehicle. Information about parts will show up once you enter parts for the vehicle. The Available section shows available parts you still have in stock for the vehicle. The 'On An Invoice' section shows which parts you have sold from the vehicle.
On the right side of the screen is the Totals section. It shows valuable information including how many parts you have sold from this vehicle and the total dollar amount you have sold from the vehicle.
| Tip |
| Any parts marked as Crushed (Status C) will not show up on this tab. |
Teardown Tab
From the Teardown tab you can go through the list and click the box in the left column to flag the parts you want to enter. If the item is not already a Part, the system will create a record for that part when you Save the Vehicle record. Use the horizontal scroll bar at the bottom to show more fields.
- The Type# corresponds to the Part Type field in the Part Management screen.
- The Side column allows you to specify left, right, or both sides of a part (for example, front doors).
- Interchange corresponds to the Interchange# field in the Interchange screen.
- Category corresponds to the Category field in the Part Management screen.
- Quantity refers to the quantity of parts from this vehicle. This value will change the quantity field in the Part Management screen.
- You can also add the Model and Manufacturer of the part in this screen using the drop down menus on the Model and Manufacturer fields.
- Double-clicking the value in the Sales Estimate field will launch the Sales Estimate screen, which gives you access to Previous Sales and Current Inventory information.
- The Sales Estimate value is based on your shop's sales history.
- The Retail, Interchange, Category, Description, Wholesale, List, Cost, Quantity, and Location fields can now all be edited on this screen.
- The Auction Estimate value is gathered from Berryhills Auctioneers sales history. Each shop has the ability to customize their settings, to show values that are most applicable to their area.
- The HTP Average value is gathered from the Heavy Truck Parts website. This allows shops to see what their competitors are charging for similar parts.
When you are finished selecting the parts from teardown for the vehicle, click the "Save & Close" button to save both the vehicle its parts.
To access additional Sales info about a particular part, double click the Sales estimate column. This will take you to the Sales Estimate screen to give you additional sales information.
Interchange
By default, when you open the screen, Interchange options will not appear. There will be a line for each part type that is associated with the teardown. If you click the check box next to a part type that has interchange options available, it will pop up a dialog that will let you choose the option. Alternatively, you can click the Interchange! button at the bottom to get a line to appear for each possible interchange option. In this mode, no Interchange option dialog will appear.
Bidding
Another feature of the Vehicles screen is the ability to create vehicle bids based on an estimate of the parts off the vehicle. Bids use local sales, Berryhill Auctioneer, and HeavyTruckParts.net data to give users price estimates.
Creating a Bid
There are two ways to start a bid, clicking the arrow on the "New" button at the top and choosing "Bid" or by enter in the vehicle's Year, Make and Model and click the "Create Bid" button at the bottom.
Once in Bid mode you will notice the Costs and Performance tabs go away and a new Bid tab appears. From this tab you can enter in Manufacturer and Model information for parts and automatically receive local sales, auction and HTP price estimates. These estimates can be used to get an idea of the value of the vehicle you're bidding on. Mousing over these field will give you more even more detailed information such as average, min, max & the number of records. At the bottom, in the "Intelligence" section totals of the displayed estimates will be shown. Appraisal information is saved in ITrack to preserve the estimate that was given at the time of the bid. You can updated appraisal values at any time by pressing the "Re-appraise" button at the bottom.
Additionally, information such as value of the bid placed, Vendor & Contact name can be entered at the top of of the "Bid" tab.
Completing a Bid
Accepting
If your bid is accepted and you now own the vehicle you can receive the vehicle and its parts into inventory. To do this open the bid on the Vehicles screen and press the Bid accepted button. At this point ITrack will convert the bid to a Vehicle (changes it status from B to A) and receives puts the parts from the Bid tab into inventory (Status A). The original Bid will still be tied to this vehicle for your records. The parts will now appear on the Teardown tab and their information can be modified to your liking.
Closing
If your bid is rejected you can simply mark the bid as "Closed". This can be done via the Bid tab to the right of the "Bid Accepted" button. This bid will still be accessible in the future for your records. If another bid opportunity for this vehicle comes up in the future, the Bid can be opened and a new Bid started. A Vehicle bid can have as many Bids associated with it as you like. To create a new Vehicle bid, simply press the "Create Bid" button at the bottom again and a "Bid 2" tab will appear.
Viewing and Editing Vehicles
There are times when you may want to view a vehicle you have entered in the past or make edits to information you have entered about a vehicle. This section will help you find a vehicle you have entered. Another pop up box will appear if you did not enter a custom tracking number for the vehicle. It will tell you the sequential number ITrack assigned to the vehicle.
Search
There are three ways to get to a vehicle you have already entered. The first is to click on the Search Screen from the Main Menu. Click the Search for Vehicles tab, Conduct a search for the vehicle you are looking for. Double click on the vehicle you want and it will open in the Vehicle Management Screen.
| Tip |
| See “Searching for a Vehicle” for more information about how to search. |
Lookup
|
The second way to get to a vehicle is from the Vehicle Management Screen. Enter the tracking number for the vehicle in the Tracking # field and then click the lookup button (a car with a magnifying glass) to find the vehicle. |
Arrows
|
The third way to view an entered vehicle is click on the arrows on either side of the lookup button to look through your saved vehicles numerically. Once you find the vehicle, you can its details in any of the tabs: Basic, Advanced, Info, Costs, Performance, and Q And A. |
Assigning Cost from a Vehicle to Parts
ITrack Enterprise no longer supports vehicle cost ratios during teardown. However, the user can manually assign cost to teardown components from the vehicles screen or individually on the parts screen using the cost field. The user should not allocate cost to components that exceeds the entire vehicle cost pool. For more information as well as a description of percent of price costing, which is the preferred vehicle costing method in EE, see standard part costing.
