Difference between revisions of "Configuring a barcode scanner"
Aringsmuth (talk | contribs) |
Aringsmuth (talk | contribs) |
||
| (4 intermediate revisions by the same user not shown) | |||
| Line 9: | Line 9: | ||
The Tera Handheld scanner has a trigger button on the handle as well as a button on the side of the device. Both buttons can be configured to scan. | The Tera Handheld scanner has a trigger button on the handle as well as a button on the side of the device. Both buttons can be configured to scan. | ||
[https:// | [https://cdn.shopify.com/s/files/1/0144/3482/8374/files/TR-UMP172-2023-7-21-S26-ZQ_1.pdf?v=1689931514 Download the User Manual] | ||
== Setting Up a Tera Scanner == | == Setting Up a Tera Scanner == | ||
From your Tera's home screen, swipe up to to see apps, then select the "keyboardemulator" app. | From your Tera's home screen, swipe up to to see apps, then select the "keyboardemulator" app. | ||
[[File:Tera_keyboardemulatorapp.jpg|200px]] | |||
=== Function === | === Function === | ||
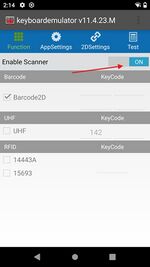
The Function page configures whether the scanner is enabled, and manages the buttons that trigger the laser to scan. | The ''Function'' page configures whether the scanner is enabled, and manages the buttons that trigger the laser to scan. | ||
* '''Enable Scanner''' should be ''On''. | |||
* '''Barcode2D''' should be checked. | |||
* There should be a '''KeyCode''' in both fields on the left. | |||
If it is enabled correctly, the ''Function'' page should look like this: | |||
[[File:Tera_KeyCodeCorrect.jpg|250px]] | |||
If the fields are empty, then pressing the button or trigger on the device won't trigger the laser and no scanning will happen. | If the fields are empty, then pressing the button or trigger on the device won't trigger the laser and no scanning will happen. | ||
| Line 25: | Line 34: | ||
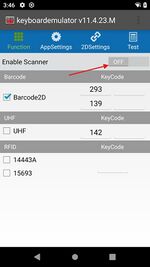
1. Toggle "Enable Scanner" to off. | 1. Toggle "Enable Scanner" to off. | ||
[[File:Tera_ToggleOff.jpg|150px]] | |||
2. Tap in the KeyCode field to make the field active and put the cursor in the field. | 2. Tap in the KeyCode field to make the field active and put the cursor in the field. | ||
3. Press the scan button on the device | [[File:Tera_InsertKeyCode.jpg|150px]] | ||
3. Press the scan button on the device '''-OR-''' manually enter the button's KeyCode. | |||
4. Repeat step 2 and 3 for each button you want to trigger the scan. For the handheld scanner, you want to program both the Scan button on the right side of the device (KeyCode 139) as well as the trigger button on the handle (KeyCode 293). | 4. Repeat step 2 and 3 for each button you want to trigger the scan. For the handheld scanner, you want to program both the Scan button on the right side of the device (KeyCode 139) as well as the trigger button on the handle (KeyCode 293). | ||
5. Toggle "Enable Scanner" back on. | 5. Toggle "Enable Scanner" back on. | ||
[[File:Tera_ToggleOn.jpg|150px]] | |||
[[File: | |||
=== App Settings === | === App Settings === | ||
The App Settings page configures how the scanner communicates to apps by entering characters before and after the scanned bar code. If these are not configured, the scanner will simply insert the bar code number as text and it won't function in an automatic way. | The ''App Settings'' page configures how the scanner communicates to apps by entering characters before and after the scanned bar code. If these are not configured, the scanner will simply insert the bar code number as text and it won't function in an automatic way. | ||
1. Scroll down to the End Mark section, and make sure | 1. Scroll down to the ''End Mark'' section, and make sure '''Enter''' is checked. | ||
[[File:Tera_EndMark.jpg|250px]] | |||
2. In the Data Format section, insert a tilde "~" in the Prefix field, and leave Suffix blank. | 2. In the ''Data Format'' section, insert a tilde "~" in the '''Prefix''' field, and leave '''Suffix''' blank. The tilde ~ can be found on the symbols portion of your keyboard. | ||
[[File:Tera_DataFormat.jpg|250px]] | |||
[[File:Tera_Prefix.jpg|250px]] | |||
'''''Note:''''' Some applications can configure their own overrides to the expected Preamble and End Mark. If you modify these values manually, you need to make sure the App Settings on the device match accordingly. | |||
[https://itrack-chromium.scroll.site/itrack-chromium-knowledge-base/scanner-configuration Read More about configuring ITrack Chromium to work with your scanner.] | [https://itrack-chromium.scroll.site/itrack-chromium-knowledge-base/scanner-configuration Read More about configuring ITrack Chromium to work with your scanner.] | ||
Latest revision as of 15:50, 31 March 2026
Tera P172 Handheld Scanner
This page will cover how to set up the Tera Android 13 Barcode Scanner PDA P172 to work with ITrack.
The Tera scanner is the device recommended to use with ITrack.
Scanner Info
The Tera Handheld scanner has a trigger button on the handle as well as a button on the side of the device. Both buttons can be configured to scan.
Setting Up a Tera Scanner
From your Tera's home screen, swipe up to to see apps, then select the "keyboardemulator" app.

Function
The Function page configures whether the scanner is enabled, and manages the buttons that trigger the laser to scan.
- Enable Scanner should be On.
- Barcode2D should be checked.
- There should be a KeyCode in both fields on the left.
If it is enabled correctly, the Function page should look like this:

If the fields are empty, then pressing the button or trigger on the device won't trigger the laser and no scanning will happen.
If the KeyCodes are empty, follow these steps:
1. Toggle "Enable Scanner" to off.

2. Tap in the KeyCode field to make the field active and put the cursor in the field.


3. Press the scan button on the device -OR- manually enter the button's KeyCode.
4. Repeat step 2 and 3 for each button you want to trigger the scan. For the handheld scanner, you want to program both the Scan button on the right side of the device (KeyCode 139) as well as the trigger button on the handle (KeyCode 293).
5. Toggle "Enable Scanner" back on.

App Settings
The App Settings page configures how the scanner communicates to apps by entering characters before and after the scanned bar code. If these are not configured, the scanner will simply insert the bar code number as text and it won't function in an automatic way.
1. Scroll down to the End Mark section, and make sure Enter is checked.


2. In the Data Format section, insert a tilde "~" in the Prefix field, and leave Suffix blank. The tilde ~ can be found on the symbols portion of your keyboard.


Note: Some applications can configure their own overrides to the expected Preamble and End Mark. If you modify these values manually, you need to make sure the App Settings on the device match accordingly.
Read More about configuring ITrack Chromium to work with your scanner.
Windows 11 Industrial Rugged Tablet
Two additional applications are required to use the scanner features: Honeywell Download manager tool (which will manage any subsequent Honeywell software downloads), then an EZConfig for Scanning software for the configuration of scanner itself. Both parts can be downloaded from the same portal: https://hsmftp.honeywell.com/
To download the zip file containing the Honeywell Download manager tool, select "here" marked by the first arrow. When finished, right-click the zip file selecting "Extract all..." then select a home/path for this installer.
To download the EZConfig for Scanning, in the file system on the left: Software -> Barcode Scanner -> Software -> Tools and Utilities -> EZConfig for Scanning -> Current.
- Open the EZConfig for Scanning software when it's finished downloading.
- Open the file "EZConfig-Scanning v4_msedge"
- select "Connected Device"
- select "Configure Device"
- select "Data Formatting"
- in Data Formatting, verify that you are on the "Prefix/Suffix" tab
- enter
~as the Prefix - enter
{ CR}as the Suffix
This may be out-dated.
^^^^^^^^^^^^^^^^^^^^^^^^^^^^^^^^^^^^^^^^^^^^^^^
Instead of using EZConfig, we need to use another Honeywell tool named SoftWedge. It can be downloaded from the same link as the download manager and EZConfig: https://hsmftp.honeywell.com/
To download the SoftWedge zip file you will need to navigate the Honeywell file system on the left when you open the link: Software > Barcode Scanners > Software > Tools and Utilities > Softwedge > Current.
- Unzip the SoftWedge folder
- Open and read the PDF instructions in the folder
- Run SoftWedge.exe, it will pop up in the system tray
- Open up SoftWedge and verify the "port status" is connected
- enter
~as the Prefix - enter
{ CR}as the Suffix - Verify things are working by doing test scans in Chromium/EEweb Configuration->Scanner->Test Scanner
NOTE on ENTERPRISE LX setup
enterpise lx default pre/postable preamble = "126" = "~" postamble = "13" = "Enter"
For munbyn scanner, the postamble/suffix does not allow you to use "Enter" so you need to leave that blank and instead check the box under EndMark that says "Enter"
TROUBLESHOOTING
My Tera scan returns a different barcode every time despite scanning the same barcode!
- At the top of the LX Landing Page where it say Signed In / Not Signed In, tap the Sign-In and choose "Disable Honeywell Mode."
Zebra DS2278
This page will cover how to setup a Zebra DS2278 Bluetooth Barcode Scanner to work with iSoft products on mobile devices.
Scanner Info
- Approx Cost: $190-$280 depending on accessories and support
- Important Features: Bluetooth, 14 hour+ battery life, 5ft drop, 36 month warranty, 123Scan app, SDKs for iOS, Android, Windows
Quick Start Guide
Android using Chrome
- The fastest way to get started is to scan the appropriate barcode for your device type. **Make sure your device is fully charged!
- This model of scanner can scan from a high resolution monitor or screen
- Each of the barcodes below will change the defaults on your scanner. You will need to "forget" or "remove" the device in your Bluetooth settings and reconnect
- The below barcodes have the following settings: Prefix : Suffix $, HID features for iOS, Host: HID BT Classic

iOS using ITrack LX App
Tip: You do not need to set up this device as a keyboard wedge
1. You first need to install the Zebra iOS app https://apps.apple.com/us/app/zebra-scanner-control/id1034012069
2. Open that app and go to Connection Help > Pair DS2278

3. Follow the onscreen instructions
4. Go back to the main screen and choose Connect
5. Tap on the DS2278 and choose Disconnect(this will disconnect it from the Zebra app so we can connect it to the ITrack LX app)

6. Go to the ITrack LX app and after a few seconds you should hear a connection beep from the scanner. Scanning in the ITrack LX app with the DS2278 should now work.
Charging the Scanner
- The charging circuit on the scanner is capable of using as much current as possible based on the power source
- Preferred Method: use a BC1.2 Compliant Micro USB adapter to a wall outlet (higher current charging capability above 900 mA)

123Scan Software
Explanation of Settings
External Links
Honeywell
Compatibility Notes
Please update the Chrome browser on the Honeywell to Chrome v101 so that the Teardown app is sized correctly. It currently ships with Chrome v70. -JW 2022-05-18
Setting up a Honeywell Scanner
ScanPal EDA71 https://www.honeywellaidc.com/products/computer-devices/tablet/scanpaleda71
These are the screens you set through to set up the honeywell device
Settings -> Honeywell Settings -> Scan Settings -> Internal Scanner -> Default profile -> Data Processing Settings
Wedge = checked
Wedge Method = Keyboard
no Prefix
no Suffix
Wedge as keys = empty input

Enterprise LX Honeywell config info
A global database setting "Scanner Mode (ambleMode,honeywell)" needs to be set to "honeywell"
The current default is ambleMode which may change in the near future. The following query will let you check on the setting. Note: A user has to have logged into an lx app before the default settings are present.
SELECT
   `globalsettingvalue`.`settingid`
    , `setting`.`location`
    , `setting`.`name`
    , `globalsettingvalue`.`value`
    , `setting`.`defaultvalue`
    , `setting`.`scope`
    , `setting`.`settingtype`
    , `value`=`defaultvalue` AS isdefault
FROM
    `globalsettingvalue`
    INNER JOIN `setting`
        ON (`globalsettingvalue`.`settingid` = `setting`.`settingid`)
WHERE (`setting`.`name` = 'Scanner Mode (ambleMode,honeywell)');
Munbyn
Setting up a Munbyn Scanner
This is for the MUNBYN IPDA081/IPDA086 Mobile Data Terminal: https://pos.munbyn.com/munbyn-ipda081-rfid-handheld-computer/
To set up:
Swipe up to see apps, then tap on "keyboardemulator".
On the "Function" page, make sure "Enable Scanner" is on.

On the "AppSettings" page, turn on "Release key off scan" (if it is not already enabled).

Then scroll down to "Process mode". Make sure it is set to "keyboard input". Under "End mark", none of the options should be checked.

Prefix/preamble and suffix/postamble for the device can be edited under "Data Format". If using a test program that uses prefix/suffix, be sure that the prefix/suffix in the program and in the scanner setting app (keyboardemulator) are the same.
