Difference between revisions of "ITrack/Pro/Interchange Screen"
Cellsworth (talk | contribs) (New page: thumb|right|600px|Interchange Screen ==Option Tab== Click on Interchange in the Main Menu to bring up the Interchange Screen. When you first open this scre...) |
Hheffelbower (talk | contribs) |
||
| (4 intermediate revisions by one other user not shown) | |||
| Line 1: | Line 1: | ||
[[Image:Pro_Interchange_1.png|thumb|right| | [[Image:Pro_Interchange_1.png|thumb|right|700px|Interchange Screen]] | ||
== | ==Options Tab== | ||
Click on Interchange in the Main Menu to bring up the Interchange Screen. When you first open this screen, the Options tab | [[Image:Pro_Interchange_Example_1.png|thumb|none|475px|Interchange Screen, Options Tab]] | ||
Click on Interchange in the Main Menu to bring up the Interchange Screen. When you first open this screen, the Options tab shows by default. | |||
Fill in the information about the part and click the Lookup button in the top section of the screen. This finds parts listed on the Interchange that will suit this need. You can find Exact or Inexact matches in the results area by selecting the option that you would want; an inexact match will find interchange numbers related to the item you want while an exact match will find only the interchange number you are searching for. For example, if you are looking for the interchange number '09083A', then an exact match will only return '12345A' results and an inexact match will show '09083', '09083A', '09083P', etc. If you have a VIN, you can use that in the top right. Using the VIN will bring up a small window (VIN Decoder), displaying the vehicle information. This is for display only, and will not fill in these values. The Part Search button launches the Search screen, and finds matches on the Inventory tab. Clear will allow you to start a new search. | |||
Our example (pictured) looks up an engine for a Ford Taurus. The results are displayed under Options and all of the different engines that are available for a Ford Taurus are shown. The first column shows Hollander's Interchange #. The next two columns show the date range of these parts. The Option column shows more details about the part. As with other screens you can sort ascending (A-Z) or descending (Z-A) by any column. | |||
At the bottom of the screen are three buttons: | |||
* Print Info will print all items on the Interchange that match your criteria. | |||
* Vehicles searches your shop for vehicles matching the Make and Model you specified. | |||
* Car Part searches on car-part.com for parts matching the Interchange #, Make, and Model you specified. This functionality has to be set up by Support. | |||
==Application Tab== | ==Application Tab== | ||
[[Image:Pro Interchange AppTab 1.png|thumb|none|475px|Interchange Screen, Application Tab]] | |||
The Application tab displays all options related to the part selected on the Options tab. Selecting Exact will display all options with the same Interchange number (for example only 09083A), while Inexact will display variations on the Interchange number (for example 09083, 09083A, 09083P, etc.). | |||
The Print Info button will print a report based on the items that are visible. The Vehicles button will search for vehicle records in your shop that match the Make and Model of the selected record. The Part Search button will search for part records in your shop that match the selected record. | |||
==Notes Tab== | ==Notes Tab== | ||
The Notes tab displays helpful information about installing the part. Some parts may require modifications before being installed in a different vehicle. | [[Image:Pro Interchange NotesTab 1.png|thumb|none|475px|Interchange Screen, Notes Tab]] | ||
The Notes tab displays helpful information about installing the part. Some parts may require modifications before being installed in a different vehicle. For example, 09083 might contain the note, "Oil cooler design varies, compare and switch as necessary." | |||
==Group Tab== | ==Group Tab== | ||
The Group tab allows you to create new interchange information for parts that are not already in your interchange. | [[Image:Pro Interchange GroupTab 1.png|thumb|none|475px|Interchange Screen, Group Tab]] | ||
The Group tab allows you to create new interchange information for parts that are not already in your interchange. Most parts and their interchangeability are already in the system, but you may know of other interchangeable parts not in the system. These changes remain in your shop only. | |||
First, click the New Group button on the left. ITrack will automatically assign a new interchange number for your group. Next, enter in the part information and then enter the Make and Model for the first vehicle interchangeable with this part. You can also set a year range and side for the part. You can also click the Add From Search button (bottom right) to search for a part instead of entering one manually. You may also wish to fill in the pricing information on the left side of the screen. | |||
Click the Add To Group button and now that part for the make and model you entered will be listed as having that interchange number. | |||
Click the Add | |||
Now, when you do an interchange search, the part you have grouped will show up and your new interchange information will be displayed. In the future you can return to the Group tab and add more interchangeable vehicles to this part or remove ones that you discover are not actually interchangeable. | Now, when you do an interchange search, the part you have grouped will show up and your new interchange information will be displayed. In the future you can return to the Group tab and add more interchangeable vehicles to this part or remove ones that you discover are not actually interchangeable. | ||
[[Category:Pro Extensions]] | The part will now show up as being in the current group. Now, add more vehicles that have an interchangeable version of this part. | ||
[[Category:ITrack/Pro/Extensions]] | |||
Latest revision as of 16:05, 4 January 2016
Options Tab
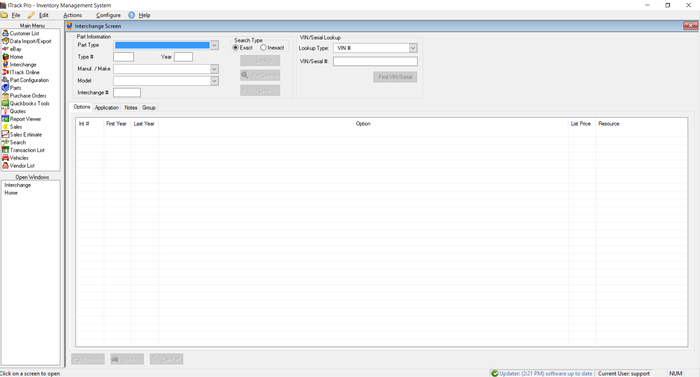
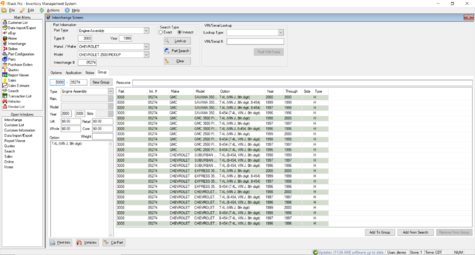
Click on Interchange in the Main Menu to bring up the Interchange Screen. When you first open this screen, the Options tab shows by default. Fill in the information about the part and click the Lookup button in the top section of the screen. This finds parts listed on the Interchange that will suit this need. You can find Exact or Inexact matches in the results area by selecting the option that you would want; an inexact match will find interchange numbers related to the item you want while an exact match will find only the interchange number you are searching for. For example, if you are looking for the interchange number '09083A', then an exact match will only return '12345A' results and an inexact match will show '09083', '09083A', '09083P', etc. If you have a VIN, you can use that in the top right. Using the VIN will bring up a small window (VIN Decoder), displaying the vehicle information. This is for display only, and will not fill in these values. The Part Search button launches the Search screen, and finds matches on the Inventory tab. Clear will allow you to start a new search.
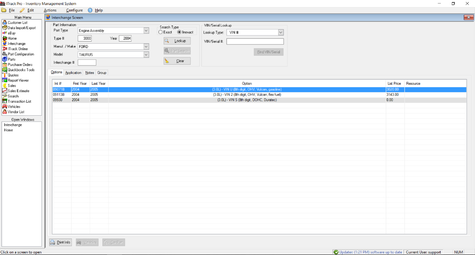
Our example (pictured) looks up an engine for a Ford Taurus. The results are displayed under Options and all of the different engines that are available for a Ford Taurus are shown. The first column shows Hollander's Interchange #. The next two columns show the date range of these parts. The Option column shows more details about the part. As with other screens you can sort ascending (A-Z) or descending (Z-A) by any column.
At the bottom of the screen are three buttons:
- Print Info will print all items on the Interchange that match your criteria.
- Vehicles searches your shop for vehicles matching the Make and Model you specified.
- Car Part searches on car-part.com for parts matching the Interchange #, Make, and Model you specified. This functionality has to be set up by Support.
Application Tab
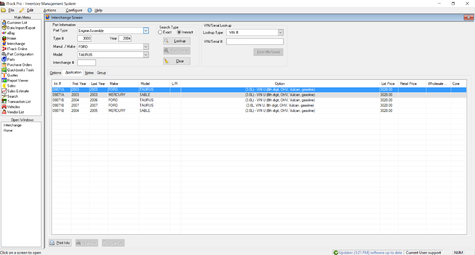
The Application tab displays all options related to the part selected on the Options tab. Selecting Exact will display all options with the same Interchange number (for example only 09083A), while Inexact will display variations on the Interchange number (for example 09083, 09083A, 09083P, etc.).
The Print Info button will print a report based on the items that are visible. The Vehicles button will search for vehicle records in your shop that match the Make and Model of the selected record. The Part Search button will search for part records in your shop that match the selected record.
Notes Tab
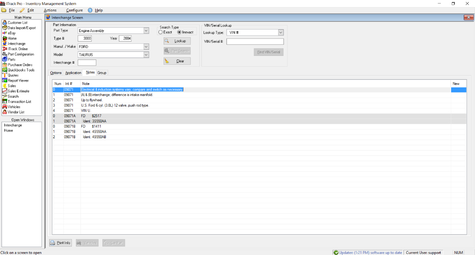
The Notes tab displays helpful information about installing the part. Some parts may require modifications before being installed in a different vehicle. For example, 09083 might contain the note, "Oil cooler design varies, compare and switch as necessary."
Group Tab
The Group tab allows you to create new interchange information for parts that are not already in your interchange. Most parts and their interchangeability are already in the system, but you may know of other interchangeable parts not in the system. These changes remain in your shop only.
First, click the New Group button on the left. ITrack will automatically assign a new interchange number for your group. Next, enter in the part information and then enter the Make and Model for the first vehicle interchangeable with this part. You can also set a year range and side for the part. You can also click the Add From Search button (bottom right) to search for a part instead of entering one manually. You may also wish to fill in the pricing information on the left side of the screen.
Click the Add To Group button and now that part for the make and model you entered will be listed as having that interchange number. Now, when you do an interchange search, the part you have grouped will show up and your new interchange information will be displayed. In the future you can return to the Group tab and add more interchangeable vehicles to this part or remove ones that you discover are not actually interchangeable.
The part will now show up as being in the current group. Now, add more vehicles that have an interchangeable version of this part.
