Difference between revisions of "ITrack/Pro/Vendor Screen"
From ISoft Wiki
Jump to navigationJump to search
| Line 1: | Line 1: | ||
==QuickStart Adding a New Vendor== | ==QuickStart Adding a New Vendor== | ||
===Adding a New Vendor=== | ===Adding a New Vendor=== | ||
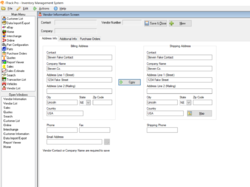
[[Image:AddVendor.png|thumb|left|250px|Adding a Vendor]] | [[Image:AddVendor.png|thumb|left|250px|Adding a Vendor]] | ||
To add a new vendor: | |||
:1. Click Vendor List in the Main Menu. | |||
:2. Click the Add button at the bottom of the page and the Vendor Information Screen will open. | |||
:3. Enter the address into the appropriate fields. | |||
:4. When you are finished entering vendor information, click the Save & Close button. | |||
==ITrack Tips== | ==ITrack Tips== | ||
Revision as of 08:33, 10 June 2009
QuickStart Adding a New Vendor
Adding a New Vendor
To add a new vendor:
- 1. Click Vendor List in the Main Menu.
- 2. Click the Add button at the bottom of the page and the Vendor Information Screen will open.
- 3. Enter the address into the appropriate fields.
- 4. When you are finished entering vendor information, click the Save & Close button.
ITrack Tips
- Entering the Zip Code will automatically fill out the city, state and country fields.
- If the Shipping Address is the same as the Billing Address clicking the Copy>> button will automatically copy the address fields.
