Difference between revisions of "LX Scanning on an Android Device"
(Info about using a scanner in LX on an Android phone) |
(Adding screenshots to the wiki page) |
||
| Line 8: | Line 8: | ||
2. The app will ask you to enable the new digital keyboard. Click on the 'Language & Keyboard Settings' button and enable it. | 2. The app will ask you to enable the new digital keyboard. Click on the 'Language & Keyboard Settings' button and enable it. | ||
[[File:SettingUpScannerKeyboard1.png]] | |||
3. When you tap on 'Next' you will be offered a chance to switch to the new digital keyboard you downloaded. In the top left you should see a keyboard looking icon. Swipe downward from the top of the screen... | 3. When you tap on 'Next' you will be offered a chance to switch to the new digital keyboard you downloaded. In the top left you should see a keyboard looking icon. Swipe downward from the top of the screen... | ||
[[File:SettingUpScannerKeyboard2.png]] | |||
4. And you will be asked to chose an input method. | 4. And you will be asked to chose an input method. | ||
[[File:SettingUpScannerKeyboard3.png]] | |||
5. Select the Barcode Keyboard. | 5. Select the Barcode Keyboard. | ||
[[File:SettingUpScannerKeyboard4.png]] | |||
6. When that is selected, Android will send you back to the app. You will notice that they keyboard layout looks a little different, in specific there will be a bar code scan button next to the space bar. Click Finish to close the app. | 6. When that is selected, Android will send you back to the app. You will notice that they keyboard layout looks a little different, in specific there will be a bar code scan button next to the space bar. Click Finish to close the app. | ||
[[File:SettingUpScannerKeyboard5.png]] | |||
== Configure the keyboard to automatically accept scan input from LX == | == Configure the keyboard to automatically accept scan input from LX == | ||
| Line 21: | Line 31: | ||
1. On your Android device, tap on 'Settings' | 1. On your Android device, tap on 'Settings' | ||
[[File:ConfiguringScannerKeyboard1.png]] | |||
2. Then scroll down to Language and Input. | 2. Then scroll down to Language and Input. | ||
[[File:ConfiguringScannerKeyboard2.png]] | |||
3. Find the Barcode Keyboard that you installed earlier and click on the gear icon to configure its settings. | 3. Find the Barcode Keyboard that you installed earlier and click on the gear icon to configure its settings. | ||
[[File:ConfiguringScannerKeyboard3.png]] | |||
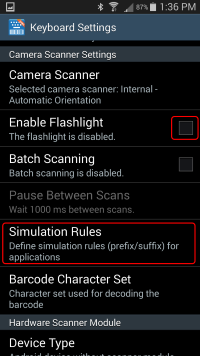
4. You can enable the flashlight if you think you need more light to scan barcodes, but either way you should tap on 'Simulation Rules'. | 4. You can enable the flashlight if you think you need more light to scan barcodes, but either way you should tap on 'Simulation Rules'. | ||
[[File:ConfiguringScannerKeyboard4.png]] | |||
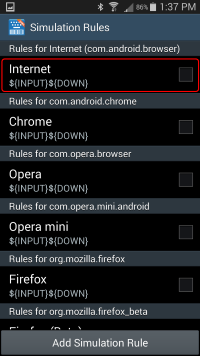
5. Select the web browser that you will be using to interact with LX. | 5. Select the web browser that you will be using to interact with LX. | ||
[[File:ConfiguringScannerKeyboard5.png]] | |||
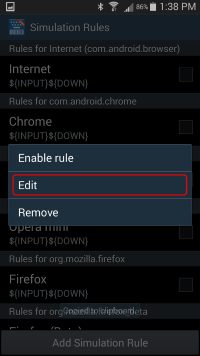
6. You will want to edit the rules that happen when a scan is accepted. | 6. You will want to edit the rules that happen when a scan is accepted. | ||
[[File:ConfiguringScannerKeyboard6.png]] | |||
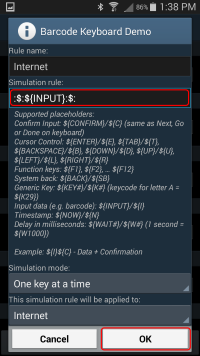
7. Change the simulation rule to: ''':$:${INPUT}:$:''' | 7. Change the simulation rule to: ''':$:${INPUT}:$:''' | ||
[[File:ConfiguringScannerKeyboard7.png]] | |||
That adds a prefix and suffix of ''':$:''' to the '''${INPUT}''' variable, which causes bar codes to be automatically accepted in LX. | That adds a prefix and suffix of ''':$:''' to the '''${INPUT}''' variable, which causes bar codes to be automatically accepted in LX. | ||
8. Click OK when you are done, and another prompt should pop up, asking you to enable the rule. | 8. Click OK when you are done, and another prompt should pop up, asking you to enable the rule. | ||
[[File:ConfiguringScannerKeyboard8.png]] | |||
9. When you have enabled the rule it will have a green check mark next to it, which signifies that the rule is now active. | 9. When you have enabled the rule it will have a green check mark next to it, which signifies that the rule is now active. | ||
[[File:ConfiguringScannerKeyboard9.png]] | |||
Latest revision as of 14:43, 22 April 2015
Apple devices such as an iPhone or iPod Touch have Linea Pro cases that fit around them (cases with barcode scanning technology built in). However, because of the variety of devices that run the Android operating system there are no cases like that available. If a user wants to have scanning capability using an Android phone they will have to download a digital keyboard that has bar code scanning functionality on it. The "bar code scanner" will typically use the phone's built-in camera to decipher the bar code.
Downloading the digital bar code scanner
On the Android device, go to the Google Play store and search for 'Barcodescanner Keyboard'. The app you want to select will have been created by 'TEC-IT'. There will be a free demo version that periodically asks you to download the full version, and a full version for $3.99.
Setting up the digital bar code scanner
1. Once the app is installed, launch it.
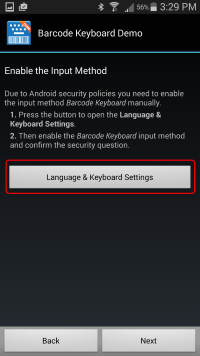
2. The app will ask you to enable the new digital keyboard. Click on the 'Language & Keyboard Settings' button and enable it.
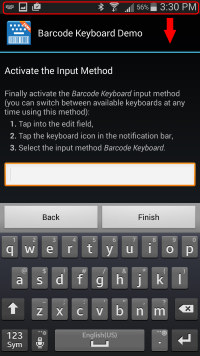
3. When you tap on 'Next' you will be offered a chance to switch to the new digital keyboard you downloaded. In the top left you should see a keyboard looking icon. Swipe downward from the top of the screen...
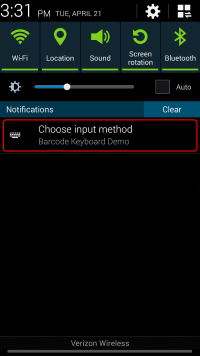
4. And you will be asked to chose an input method.
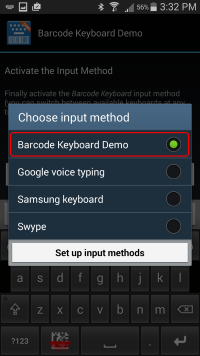
5. Select the Barcode Keyboard.
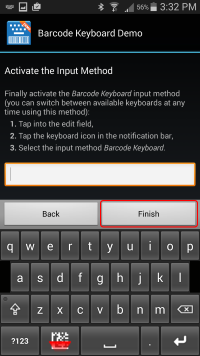
6. When that is selected, Android will send you back to the app. You will notice that they keyboard layout looks a little different, in specific there will be a bar code scan button next to the space bar. Click Finish to close the app.
Configure the keyboard to automatically accept scan input from LX
The digital keyboard can now accept scans from LX, but as it is currently configured, once you hit the scan button and the phone camera receives its input you need to tap enter to hand the information to the program. Wouldn't it be easier if we just scanned the bar code and had the program automatically hit enter for us? Yes it would! And here is how to set that up:
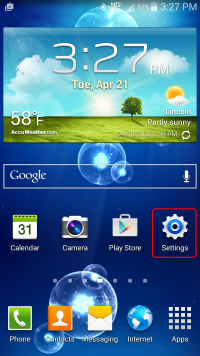
1. On your Android device, tap on 'Settings'
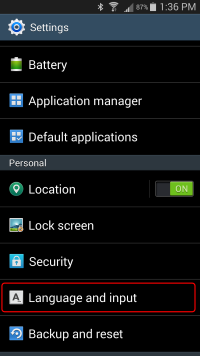
2. Then scroll down to Language and Input.
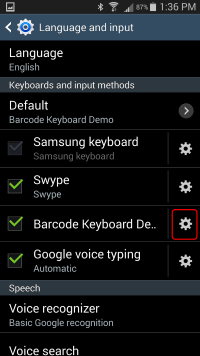
3. Find the Barcode Keyboard that you installed earlier and click on the gear icon to configure its settings.
4. You can enable the flashlight if you think you need more light to scan barcodes, but either way you should tap on 'Simulation Rules'.
5. Select the web browser that you will be using to interact with LX.
6. You will want to edit the rules that happen when a scan is accepted.
7. Change the simulation rule to: :$:${INPUT}:$:
That adds a prefix and suffix of :$: to the ${INPUT} variable, which causes bar codes to be automatically accepted in LX.
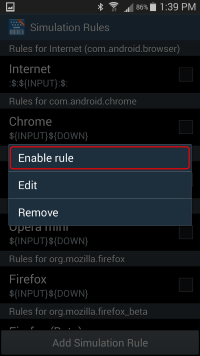
8. Click OK when you are done, and another prompt should pop up, asking you to enable the rule.
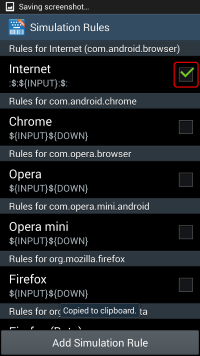
9. When you have enabled the rule it will have a green check mark next to it, which signifies that the rule is now active.
