Difference between revisions of "ITrack/Pro/Customer Screen"
(No difference)
|
Revision as of 10:15, 17 June 2009
From this screen you will be able to monitor all of the information about your customers. From the Customer List Screen you will be able to add, edit, delete and sell to customers. To get to this screen from the Main Menu, click on Customer List.
Adding a Customer
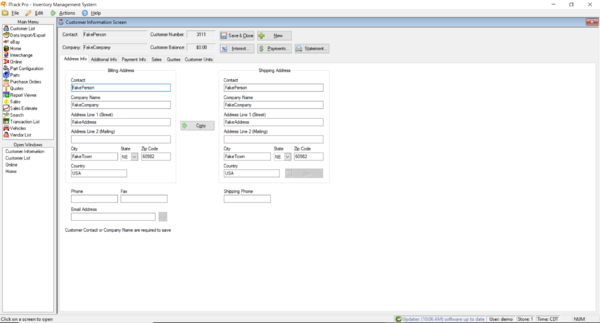
To add a customer, simply click the Add button in the lower left hand corner. This will bring you to the Customer Information Screen. You will start in the Address Info tab.
Address Tab
As you fill in the Contact and Company Name fields under Billing Address, they will appear in the gray fields above and in the correct corresponding fields under Shipping Address. Clicking on the Copy button in the center of the screen will transfer the rest of the information such as street address to the shipping address side of the screen.
The Map button located below the Copy button will bring up Google® Maps and show a map and driving directions from your location to the customer's location. At this point you may choose use any of the other tabs on the screen such as Additional Info or Payment Info. Instructions for these tabs are located below.
You may also print a statement by clicking on the Statement button, or apply payments for the customer by clicking on the Payments button. Or you may create a new customer by clicking on the New button in the upper right corner or close by clicking on the Save & Close button.
If you want to continue adding information about your customer, or want to check the history of this customer, the tabs following Address Info will be useful.
Additional Information Tab
Click on the Additional Info tab located to the right of the Address Info tab. From this screen you can enter more information about the customer such as an email address, a web page address, and other important information. The Option and Value fields are particularly useful. You can enter in specific things you want to know about each customer. Click Add Option to add a new question. Click the Show on Customer List Screen box if you want your new question to show up on the Customer List Screen. Then, in the Values field, answer the question you asked in the Option field. This Option will now appear on all customers' screens. Now, if you go to the Customer List Screen, you can search by the new Option you entered. (Additinal Info Tab screen shot)
Payment Information Tab
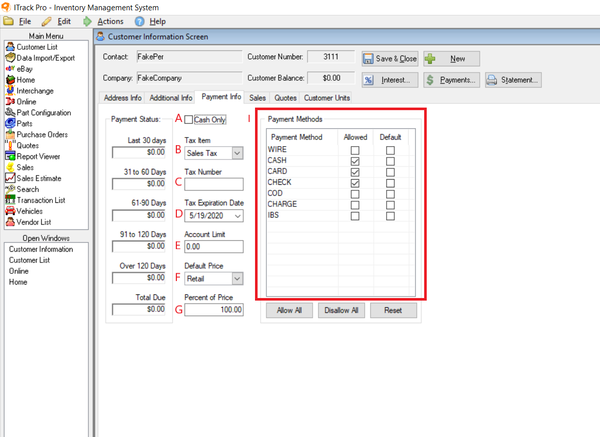
The next tab is the Payment Info tab. From here, you can see the payment status of the customer, choose payment methods you will accept from the customer and other payment information such as an account limit.
- A The Cash Only check box prevents the customer from charging.
- B The Tax Item field allows you to choose the default tax item to use when quoting or selling to this customer.
- C The Tax Number field will print the customer's tax number on invoices.
- D Default Pay Type allows you to select the default payment method used on the Sales Screen.
- E The Account Limit prevents a customer from charging more than the amount you set.
- F&G These fields allow you to adjust the price for a customer automatically. The default setting is 100% retail, but some customers might pay 100% wholesale or 120% cost or 95% retail (5% discount).
- H Use Allowed Payment Types to select the payment methods you allow for a customer.
Sales Tab
The next tab is the Sales tab. This tab shows the invoice history for the customer and line items. The Reprint button will reprint items you have selected. The Void button will void a payment or invoice, hiding it forever. (Sales Tab screen shot)
Quotes Tab
The final tab is the Quotes tab. From here you can look at all the quotes that have been given to this customer. A quote can easily be converted to an invoice by highlighting the quote by clicking on it (it will turn blue) and then clicking the Convert To Invoice button in the lower left of the screen. From this tab you may also choose to reprint a quote or delete a quote. (Quotes Tab screen shot)
Remember that new quotes are made in the Quotes Screen which can be accessed via the Main Menu. Also keep in mind that double clicking on an invoice or payment will re-open it and that double clicking on a line item will open it in the Part Management Screen.

