Difference between revisions of "ITrack/Pro/Sales Screen"
(No difference)
|
Revision as of 10:52, 17 June 2009
Sales Screen
The Sales Screen is where you will sell parts and record payments received. There are many ways to get to the Sales Screen:
- From the Main Menu, click on Sales.
- From the Search Screen, highlight a part and click the Sell To button located at the bottom left of the screen
- From the Customer List Screen, highlight a customer and click the Sell To button located in the middle bottom of the screen.
- From the Quotes Screen, click the Convert To Inv button in the lower right corner.
There are also several ways to open existing invoices:
- Double clicking on an invoice in the Sales tab of the Customer Info screen.
- Double clicking an invoice in the Sales tab of the Parts Screen.
- Double clicking on an invoice listed in the tag number tree in the Search Results Screen.
Add Customer
There are several ways to bring a customer onto the Sales Screen. You can enter either the Contact Name, Company Name, Phone Number, or Customer Number into the Customer field at the top of the Sales Screen and hit the enter key on your keyboard.
If one match is found, that customer will be brought onto the sales screen. If more than one result matches your entry, you will be switched to the Customer List Screen showing the matching results. Double clicking on a customer in the Customer List Screen will return you to the sales screen and bring that customer onto it. Alternatively, you can click the Choose Customer button to select which customer is making a purchase. This will bring up the Customer List Screen. Enter your lookup information to search for a customer then double click on the customer or click on the customer once and then click the Sell To button. This will fill in all of the customer information on the Sales Screen.
If you need to enter a new customer, click the Choose Customer button then click the Add button at the bottom of the list to enter a new customer. When you click Save & Close on the Customer Screen, you will be returned to the Sales Screen with your new customer entered.
Add Parts
There are several ways to add parts to the Sales Screen. You can click in the Lookup field and enter one of the following:
- Part SKU Number
- Tag number prefaced by a "T" (ie. "TTAG3")
- Part Model name Prefaced by a "P" (ie. "PRTLO13610B")
- OEM Number prefaced by an "O" (ie. "O12345")
- Type#-Interchange# or just Interchange# prefaced by "I" (ie. "I300-1563B")
Alternatively, you can click the Add Item button near the lower right corner of the screen. This will bring up the Search Screen. Conduct a search to find the part. Double click on the part or click the Sell button to add the part to the invoice. You may also multi-select parts by holding down the Ctrl button on your keyboard and clicking on the item to sell, then click Sell.
Additionally, you can enter a miscellaneous item by simply typing in a description and entering a price. All line items default to a quantity of one. If you are selling more than one of an item, simply change the quantity.
If you want to credit the sale of the item to a particular vehicle, enter the stock number of the vehicle or the tracking number into the Stock # field. The sale price of that miscellaneous item will be credited towards the profitability of the vehicle.
Payment Method
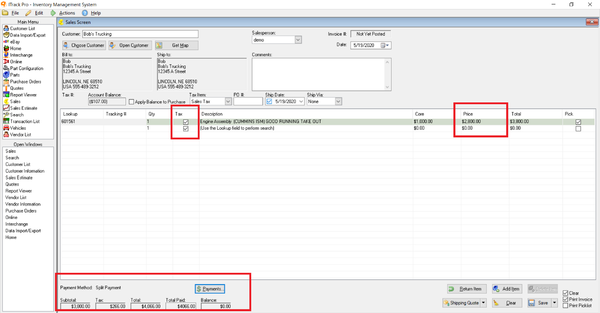
Now, we can fill in the remaining information about the purchase, such as payment method. You must specify a payment. New payment methods can be added by going to Edit --> Options and clicking on the Payment Methods tab. You can change the price by clicking the field and typing in a new price.
The tax will be automatically calculated based on the tax rate you entered. Resale items will not be taxed.
If the customer wants to use multiple payment methods to pay for an item, click the Payments button. Now you can enter in the split payments.
When you click the OK button, you will return to the Sale Screen and the Payment Method field will be gray and say Split. (Split Payment screen shot)
Choose a shipping method by clicking the Ship Via drop down box. Choosing a shipping method and then hitting the Tab key on your keyboard will bring up a Tracking # field to the right of the Ship Via field.
Before finishing the sale, you may also want to choose to have ITrack print a pick list for you. A pick list is a list of parts that are being purchased. Give the list to your inventory specialist so they know which items to go get for the customer. To print the list, simply check the Pick List box in the lower right corner of the screen. Now, when you click the Print/Save button, the pick list will print also.
Click the Print/Save button to finish the sale and print copy of the sale for your records. If you have the Pick List box checked, it will also print the pick list. You can select a printer by going to Edit --> Options and then clicking on the Printers tab. Instructions for setting printers can be found in the ITrack Pro Administrator's Guide under "Printer Settings."
