Difference between revisions of "ITrack/Pro/Customer List Screen"
(No difference)
|
Revision as of 09:47, 10 July 2009
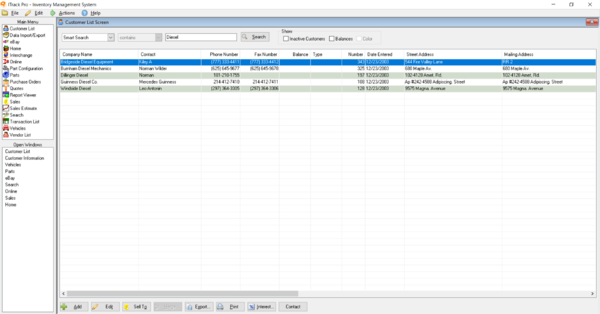
From this screen you will be able to monitor all of the information about your customers. From the Customer List Screen you will be able to add, edit, delete and sell to customers. To get to this screen from the Main Menu, click on Customer List.
Searching for a Customer
Return to the Customer List Screen. You may get to this screen by clicking on it from the Open Windows section on the left side of the screen, or, if you have closed the Customer List Screen, you can open it from the Main Menu.
At the top of the screen is a drop down list which will show the default search, Smart Search. By clicking on the down arrow in the list, you will see other search options such as Phone Number, Type and City. The customer database can be searched using any of these criteria, so it isn't a problem if you don't remember the name of the company, so long as you remember something about the customer.
The Smart Search is particularly useful as it searches for matching company or name or partial phone number or customer number all at once. The next field allows you to specify what you want the search to find in regards to the type of search you selected.
After deciding on your search criteria, enter in keywords into the blank field located right of the middle of the screen. In our example below, we searched for a contact containing the letter J. Then hit the enter key on your keyboard or click the Search button on your screen. This will bring up all of the customers that fit your search request.
If you want to see your entire customer database, simply click on the Show All button located to the right of the Search button. If you are viewing multiple customers, you can sort them by a variety of ways. By clicking on a certain field near the top of the screen, you can sort the customers by that particular type. All fields will sort alphabetically. For example, if you click the State field, states that start with "A" would appear towards the top. By clicking State again, the results will sort in reverse alphabetical order so the states that start with "A" would appear towards the bottom.
You can choose the order of your columns so that the most important information is easily viewable. Simply click and drag and column to have it place where you want it. ITrack will remember your column order.
At the bottom of the screen you will notice two check boxes: Lookup Balances and Colorize Balances. If Lookup Balances is checked, your search results will include customers' account balances in the Balance column. If it is unchecked, no balances will appear. If the Colorize Balances box is checked, customers will appear as colors that correspond to account information.
- Black: Customer has no balance.
- Blue: You owe the customer (customer has a credit).
- Red: The customer owes you money and is over their credit limit.
- Yellow: The customer owes you money but is under their credit limit.
If the Colorize Balances box is unchecked, all customers will appear black.
Unchecking both of these boxes will result in slightly faster search lookups.
By highlighting a customer, you can then choose to Edit, Delete, Merge or Sell To a customer by selecting the corresponding button located at the bottom of the screen.
Clicking on the Sell To button will bring up the Sales Screen. See "Sales" for information regarding sales.
The Print button allows you to print your current customer lookup (list). A variety of formats are available, but the default is a report sorted by name, account number, and balance.
The Merge button allows you to combine duplicate customer entries into one. First, hold down the Ctrl key on your keyboard. Next, click on the customers you wish to merge. Now, click on the Merge button. A dialog will come up and you will need to select the master account (the one that will be kept).
A dialog will come up asking you if you would like to proceed with the merge. Click Yes and the accounts will then be merged. Accounts not selected as master will have their information transferred to the master account in the notes section under the Additional Info tab in the Customer Information Screen.

