Difference between revisions of "ITrack/Pro/Purchase Orders Screen"
(No difference)
|
Revision as of 09:53, 10 July 2009
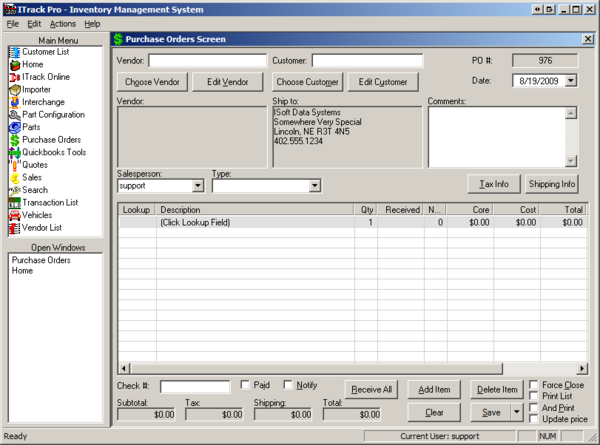
The Purchase Orders Screen allows you to create purchase orders and assign them to vendors and customers you already have entered into ITrack Pro.
| Tip |
| If you are ordering a part because you want to have it in stock, not for a specific customer, enter your company as a customer. |
To open this screen, click on Purchase Orders in the Main Menu.
Creating Purchase Orders
Before you can create a purchase order, you must have already entered the part you are ordering into your inventory. When you are entering a part into inventory, you can set the minimum quantity your company should have in stock at any give time. Now, when you are creating a purchase order, you can order a part by clicking the Add Item button which will bring up the Search Screen. Then you can search for the part and double click on it to add it to your purchase order.
Add Vendor
You are now ready to create a purchase order from the Purchase Orders Screen. Entering a vendor can be done in a couple different ways.
- Type the entire name or partial part of a name into the Vendor field. If there is only one vendor with that name, the information will automatically fill in when you hit the tab key on your keyboard. If there is more than one with the name, the Vendor List Screen will open so you can select the correct vendor. Double click on the one you want. The information will transfer over to the Purchase Orders Screen.
- Type the vendor number into the Vendor field and then ht the tab key on your keyboard and that vendor's information will be automatically filled in. If there is only one vendor with those digits, the information will automatically fill in when you hit the tab key on your keyboard.
- Type in the last digits (you can choose how many, we recommend the last four) of the vendor's phone number. If there is more than one with the same last digits, the Vendor List Screen will open so you can select the correct vendor. Double click on the one you want. The information will transfer over to the Purchase Orders Screen.
- Click the Choose Vendor button to open the Vendor List Screen, then conduct a search and double click on the correct vendor. The information will transfer over to the Purchase Orders Screen.
Add Customer
Entering a customer works the same as entering a vendor.
Add Part
Now, we need to select the part for the purchase order. There are several ways to add parts to the Purchase Orders Screen. You can click in the lookup field and enter one of the following:
- Part SKU Number
- (Tag number prefaced by a "T" (ie. ""TTAG3")
- Part Model name Prefaced by a "P" (ie. "PRTLO13610B")
- OEM Number prefaced by an "O" (ie. "O12345")
- Type#-Interchange# or just Interchange# prefaced by "I" (ie. "I300-1563B")
Alternatively, you can click the Add Item button near the lower right corner of the screen. This will bring up the Search Screen. Conduct a search to find the part. Parts that are out of stock will appear red, and parts that are in stock but below your minimum quantity will appear yellow.
Double click on the part or click the Purchase Order button to add the part to the purchase order. You may also multi-select parts by holding down the Ctrl button on your keyboard and clicking on the item to sell, then click Purchase Order.
| Tip |
| The Purchase Order button is a small icon of a green dollar sign. |
Now you can enter in the quantity you want to order, price, and other details about your order.
| Tip |
| A common practice is to search for items to see if you have the quantity you need in stock. From the Search Screen, choose to search for Reorder Report. When you conduct this search, it will show which items have a lower quantity than your minimum quantity. You can then create purchase orders for these items. |
When you are finished adding items to the purchase order, click the Save button.
If you want to make sure your purchase order saved, you can view it by clicking on Vendor List from the Main Menu. Now conduct a search for your vendor and double click on it. Click on the Purchase Orders tab to view purchase orders for the vendor.
Closing Purchase Orders
Once you have obtained the items in a purchase order, you can close the purchase order. ITrack allows you to record when you have partially received a purchase order and when you have fully received it.
To open an old purchase order, click next to PO # in the Purchase Orders Screen. Enter the purchase order number you wish to open and click OK.
Partial Receiving
Partial receiving is when you have purchase order for a certain quantity of a part and receive less than the total listed in the purchase order.
In the New column of the purchase order, type in the number of items you have received. The Received column will now reflect the number received. Be sure to click Save when you are done to keep your changes.
If you have only received part of a purchase order but still wish to close it, check the Force Close box in the lower right corner. Now when you click Save, the purchase order will still close even thought the entire order is not received.
Receive All
To receive all parts from a purchase order, click the Receive All button. Now ITrack will show that you have received all of the items in that purchase order. Be sure to click Save when you are done to keep all of your changes.
