ITrack/Chromium Vehicle Info Page
Vehicle Info
Basic Tab
On the basic information tab, you will be able to fill out most of the information about a specific vehicle.
- After filling out all the information you want, you can either click (A) the Create Vehicle button, or (B) the Create Bid button.
- Clicking Create Vehicle will create a purchase order and allow you to create parts from the vehicle.
- Clicking the Create Bid button will create a bid on the vehicle, but not a purchase order.
- On the top bar (C) there are several options. You can:
- Leave the current vehicle you are editing to create a new vehicle.
- Click the Enter Part button to go to the Part Info Page to create a new part using the vehicle.
- Click the Show Parts button to go to the part search page.
- Clicking the Print button will allow you to print off a tag, or other information about the vehicle.
- Finally, clicking the blue search button will allow you to search for another vehicle.
- In the vehicle information section, you can fill out the vehicle's make, model, year, and VIN.
- When creating a new vehicle, the Vehicle information section must be filled out, and the create vehicle button must be clicked before you are allowed to edit any of the other sections on the basic tab or access any of the other tabs.
- The details and miscellaneous fields allow you to fill out more specific info about the vehicle.
- Finally, the description and internal notes sections allow you to enter any other information you want. While the description can be seen by your customers when you put a part online, the internal notes are for you alone to see.
Attachments Tab
The attachments tab for vehicles is similar to the attachment tab for customers and the attachments tab for parts. Here you can upload one or more files from your computer (this can be an image) to associate with this vehicle. In addition, you can attach a video, either by searching for the account or providing the exact URL of the video on Youtube.
Click here to see how to upload a video by URL.
Q & A Tab
- The Q & A tab allows you to enter questions and answers about a vehicle. (awaiting more info due to bug)
Info Tab
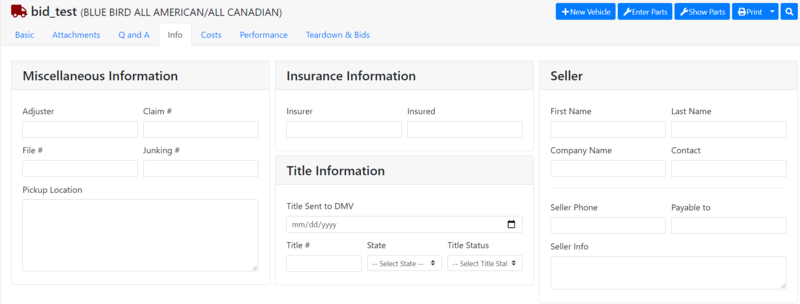
- The info tab allows the user to enter even more information about the vehicle that the basic tab does not cover.
- There are three sections to the Info tab.
- The Misc Info tab allows you to fill out various numbers and the pickup location.
- The insurance information and Title information tabs allow you to enter a vehicles insurance and title information.
- Finally the seller info section allows you to fill in any additional info you want about the seller.
Vehicle Cost Tab
- The vehicle cost tab allows you to enter all costs in getting a vehicle.
- To add a new cost, click the blue new cost button.
- This will bring up a popup where you can select what kind of cost it it, the amount, the vendor, the date and more.
Performance Tab
The performance tab allows you to see the status of the parts from a specific vehicle. This page allows you to see how much revenue you have made from a vehicle, showing if you still need to sell more to break even, if you have already broken even, or if you have already made a profit.
Teardown & Bids Tab
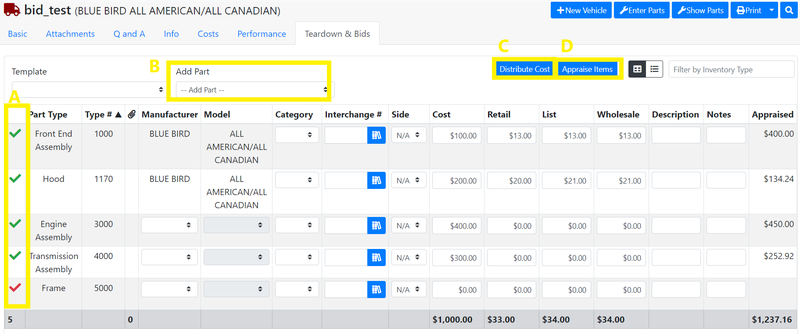
The Teardown tab allows you to add parts to your inventory from your vehicle. Below are some important parts of the Teardown tab.
- (A) Once you have added several parts, you can choose whether they are added to your inventory or not by clicking the checkmark. If the checkmark button by a part is green, the part will be added to your inventory. If it is red, the part will not be added to your inventory. This is useful when you use a template to load a large group of parts, but you only want some of them to be added.
- (B) This is how you actually add a part. Simply click this when select the part you want to add from the dropdown.
- (C) The Distribute Cost button will divide the total vehicle cost between all its parts. While you can edit this manually, the Distribute Cost button is a quick way to make sure all of your cost is accounted for in your parts.
- (D) The Appraise Items button allows you to use Berryhill auctions, Heavytruckparts.net, or your own sales records, to create a rough estimate of what the part can sell for.


