Difference between revisions of "ITrack/Pro/Options Screen"
Daytonlowell (talk | contribs) |
m (→Reports) |
||
| (37 intermediate revisions by 4 users not shown) | |||
| Line 1: | Line 1: | ||
[[Image:Pro_Options_General_tab_1.png|thumb|right| | [[Image:Pro_Options_General_tab_1.png|thumb|right|400px|Options Screen]] | ||
==Options Dialog== | ==Options Dialog== | ||
The Options dialog box contains various tabs that access different settings for ITrack Pro. | The Options dialog box contains various tabs that access different settings for ITrack Pro. | ||
| Line 5: | Line 5: | ||
The options listed in this section are the standard ITrack Pro options seen below. | The options listed in this section are the standard ITrack Pro options seen below. | ||
Your ITrack Pro system may have additional options if you have purchased special modules. If you need information about an option not described, please [[Call ISoft|contact ISoft Data Systems]]. | Your ITrack Pro system may have additional options if you have purchased special modules. If you need information about an option not described, please [[Call ISoft|contact ISoft Data Systems]]. | ||
| Line 18: | Line 18: | ||
There are very few times you will need to change any of the top pieces of information in the General tab. Whenever a new computer is added to the network, or automatic changes to the network occur, some parts of this tab must be changed. If you need to change any of this information, it is highly recommended that you [[Call ISoft|contact ISoft Data Systems technical services]]. | There are very few times you will need to change any of the top pieces of information in the General tab. Whenever a new computer is added to the network, or automatic changes to the network occur, some parts of this tab must be changed. If you need to change any of this information, it is highly recommended that you [[Call ISoft|contact ISoft Data Systems technical services]]. | ||
The bottom three check boxes located on the General tab are useful and can be changed without assistance. | The bottom three check boxes located on the General tab are useful and can be changed without assistance. | ||
[[Image:Pro_Options_General_Tab(with_letters).png|thumb|right|400px|Options General Tab]] | |||
*'''A''' If checked, a dialog box will pop up after you have saved a part from the [[ITrack/Pro/Parts Screen|Parts]] Screen, telling you the tag number. | *'''A''' If checked, a dialog box will pop up after you have saved a part from the [[ITrack/Pro/Parts Screen|Parts]] Screen, telling you the tag number. | ||
*'''B''' If checked, new parts will have the print tag check box on the [[ITrack/Pro/Search Screen|Search]] Screen checked by default. | *'''B''' If checked, a dialog box will pop up after you have saved a vehicle from the [[ITrack/Pro/Vehicles_Screen|Vehicle]] Screen, telling you the tracking number. | ||
*''' | *'''C''' If checked, new parts will have the print tag check box on the [[ITrack/Pro/Search Screen|Search]] Screen checked by default. | ||
*'''D''' Prints interchange information on invoices. | |||
*'''E''' If checked, when selecting a model prior to selecting a make, ITrack will automatically select a relevant make for that model. | |||
*'''F''' If checked, the enter key will move your current selection to the next available field if it is able to do so. | |||
*'''G''' If checked, whenever you select a field and that field has an available drop down menu, the drop down menu is displayed. | |||
*'''H''' If checked, hovering over a button or text field with your mouse will bring up useful tips. | |||
*'''I''' If checked, speeds up the loading process of attachments. | |||
*'''J''' If checked, automatically makes new parts on a purchase order, automatically checks the "print tag" checkbox. | |||
'''Remember, changing the information in the General tab could result in your information being moved! Please contact a technician before changing this information. Restricting users' ability to edit this page will significantly decrease the chance that information will be changed .''' | '''Remember, changing the information in the General tab could result in your information being moved! Please contact a technician before changing this information. Restricting users' ability to edit this page will significantly decrease the chance that information will be changed .''' | ||
==Printer Settings== | ==Printer Settings== | ||
| Line 32: | Line 38: | ||
To open options, first click on the Edit menu. Keep holding down your mouse clicker and then release it when you have highlighted the word Options. | To open options, first click on the Edit menu. Keep holding down your mouse clicker and then release it when you have highlighted the word Options. | ||
This will bring up the options dialog box. | This will bring up the options dialog box. | ||
To set up your printer settings, first click on the Edit menu, then, instead of clicking on options, move your mouse to the '''my preferences box'''. This will bring up another set of options, click on the Printers box. | |||
Now you can select the type of printer you will be using and where you want it to print. Click the arrow in the field next to Printer Type. This will give you a list of the different types of printing options available in ITrack. | Now you can select the type of printer you will be using and where you want it to print. Click the arrow in the field next to Printer Type. This will give you a list of the different types of printing options available in ITrack. | ||
| Line 44: | Line 53: | ||
Click on the drop down list and select Report. Then set the Printer Name for Report. If you go back to Invoice, you will see that the Printer Name was saved. If you are done with the Options box for now, be sure to click OK to save all of the information you have entered so far. | Click on the drop down list and select Report. Then set the Printer Name for Report. If you go back to Invoice, you will see that the Printer Name was saved. If you are done with the Options box for now, be sure to click OK to save all of the information you have entered so far. | ||
'''The " | [[Image:Pro_Options_Printer_tab_1.png|thumb|center|400px|Options Printer Tab]] | ||
'''The "Copies Per Invoice" option applies only to the "Invoice" printer type.''' | |||
==Tax Items== | ==Tax Items== | ||
| Line 62: | Line 72: | ||
===Editing Tax Items=== | ===Editing Tax Items=== | ||
To edit a tax item, click on the tax item you need to edit. The text on the Edit button will then go from grey to black. You may now click the Edit button to bring up the Tax Item box, just like when you clicked the Add button. Now you can make changes and click OK to save. | To edit a tax item, click on the tax item you need to edit. The text on the Edit button will then go from grey to black. You may now click the Edit button to bring up the Tax Item box, just like when you clicked the Add button. Now you can make changes and click OK to save. | ||
[[Image:Pro_Options_TaxItems_Tab_1.png|thumb|center|400px|Options Tax Item Tab]] | |||
==Company Information== | ==Company Information== | ||
Located at the very top left of the screen, you will see three drop down menus. These menus are File, Edit and Help. | Located at the very top left of the screen, you will see three drop down menus. These menus are File, Edit and Help. | ||
| Line 69: | Line 80: | ||
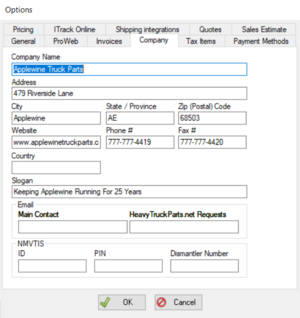
Click on the Company tab to bring up company information. | Click on the Company tab to bring up company information. | ||
Now you can fill out information about your company. When you are finished filling out your company information, click OK to save. You may go back and change this information any time you wish. | Now you can fill out information about your company. When you are finished filling out your company information, click OK to save. You may go back and change this information any time you wish. | ||
[[Image: | [[Image:Pro_Options_Company_tab_1.png|thumb|center]] | ||
==Setting up payment Methods== | ==Setting up payment Methods== | ||
Located at the very top left of the screen, you will see three drop down menus. These menus are File, Edit and Help. | Located at the very top left of the screen, you will see three drop down menus. These menus are File, Edit and Help. | ||
| Line 77: | Line 89: | ||
When you click the Add or Edit buttons, it brings up a small box that allows you to set specifications and a name for the payment type. | When you click the Add or Edit buttons, it brings up a small box that allows you to set specifications and a name for the payment type. | ||
There are three optional checkboxes: | |||
# '''Use Check or Authorization number''' will require that a check or authorization number is filled in on the sales quote screen whenever making payments. | |||
# '''Automatically assign to new customers''' will add this payment method to any new customer you make, otherwise, you will need to manually add it on the '''payment info''' tab of the Customer Information screen. | |||
# '''Prompt for Payment''' will make a dialogue box pop up if you save an invoice without making any payments with this method. | |||
When you are finished adding or editing the information, click OK to save. Any payment methods you have saved in the Payment Methods tab will show up as a Payment Method option on the Sales screen. | When you are finished adding or editing the information, click OK to save. Any payment methods you have saved in the Payment Methods tab will show up as a Payment Method option on the Sales screen. | ||
[[Image:Pro_Options_PaymentMethod_1.png|thumb|center|400px|Options Payment Method]] | |||
==Pricing Options== | ==Pricing Options== | ||
[[Image:Pro_Options_Pricing_tab_1.png|thumb| | [[Image:Pro_Options_Pricing_tab_1.png|thumb|center]] | ||
Located at the very top left of the screen, you will see three drop down menus. These menus are File, Edit and Help. | Located at the very top left of the screen, you will see three drop down menus. These menus are File, Edit and Help. | ||
To open options, first click on the Edit menu. Keep holding down your mouse clicker and then release it when you have highlighted the word Options. | To open options, first click on the Edit menu. Keep holding down your mouse clicker and then release it when you have highlighted the word Options. | ||
Click on the Pricing tab to change your company's pricing options. First, enter in a pricing breakpoint, then determine mark-ups and mark-downs for both retail and wholesale sales. Items below the breakpoint will use the below breakpoint markup. This allows for higher profit margins for inexpensive items. | Click on the Pricing tab to change your company's pricing options. First, enter in a pricing breakpoint, then determine mark-ups and mark-downs for both retail and wholesale sales. Items below the breakpoint will use the below breakpoint markup. This allows for higher profit margins for inexpensive items. | ||
==Reports== | ==Reports== | ||
[[Image:Pro_Options_Report_tab_1.png|thumb| | [[Image:Pro_Options_Report_tab_1.png|600px|thumb|left]] | ||
Located at the very top left of the screen, you will see three drop down menus. These menus are File, Edit and Help. | Located at the very top left of the screen, you will see three drop down menus. These menus are File, Edit and Help. | ||
To open | To open reports, first click on the Edit menu. | ||
Hold your mouse over the '''Global Preferences''' and click on the '''Reports''' option. | |||
It is important to note that report settings affect all computers using the same ITrack Pro database, not just the computer you are using. | It is important to note that report settings affect all computers using the same ITrack Pro database, not just the computer you are using. | ||
Latest revision as of 11:36, 20 May 2020
Options Dialog
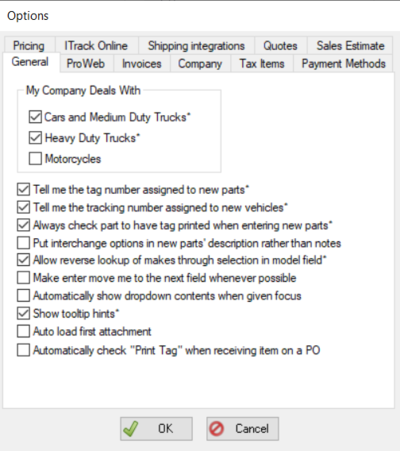
The Options dialog box contains various tabs that access different settings for ITrack Pro.
The options listed in this section are the standard ITrack Pro options seen below. Your ITrack Pro system may have additional options if you have purchased special modules. If you need information about an option not described, please contact ISoft Data Systems.
General Information
Located at the very top left of the screen, you will see three drop down menus. These menus are File, Edit and Help.
To open the options dialog, first click on the Edit menu. Keep holding down your mouse clicker and then release it when you have highlighted the word Options.
Click on the General tab to bring up general information.
There are very few times you will need to change any of the top pieces of information in the General tab. Whenever a new computer is added to the network, or automatic changes to the network occur, some parts of this tab must be changed. If you need to change any of this information, it is highly recommended that you contact ISoft Data Systems technical services. The bottom three check boxes located on the General tab are useful and can be changed without assistance.
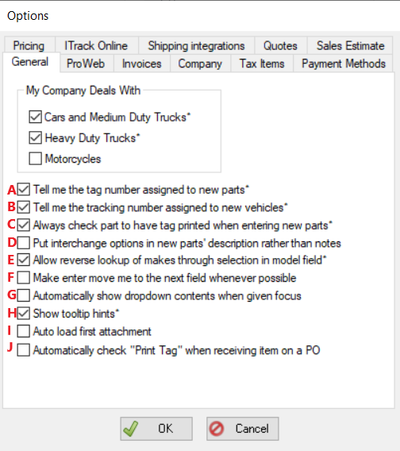
- A If checked, a dialog box will pop up after you have saved a part from the Parts Screen, telling you the tag number.
- B If checked, a dialog box will pop up after you have saved a vehicle from the Vehicle Screen, telling you the tracking number.
- C If checked, new parts will have the print tag check box on the Search Screen checked by default.
- D Prints interchange information on invoices.
- E If checked, when selecting a model prior to selecting a make, ITrack will automatically select a relevant make for that model.
- F If checked, the enter key will move your current selection to the next available field if it is able to do so.
- G If checked, whenever you select a field and that field has an available drop down menu, the drop down menu is displayed.
- H If checked, hovering over a button or text field with your mouse will bring up useful tips.
- I If checked, speeds up the loading process of attachments.
- J If checked, automatically makes new parts on a purchase order, automatically checks the "print tag" checkbox.
Remember, changing the information in the General tab could result in your information being moved! Please contact a technician before changing this information. Restricting users' ability to edit this page will significantly decrease the chance that information will be changed .
Printer Settings
Located at the very top left of the screen, you will see three drop down menus. These menus are File, Edit and Help.
To open options, first click on the Edit menu. Keep holding down your mouse clicker and then release it when you have highlighted the word Options. This will bring up the options dialog box.
To set up your printer settings, first click on the Edit menu, then, instead of clicking on options, move your mouse to the my preferences box. This will bring up another set of options, click on the Printers box.
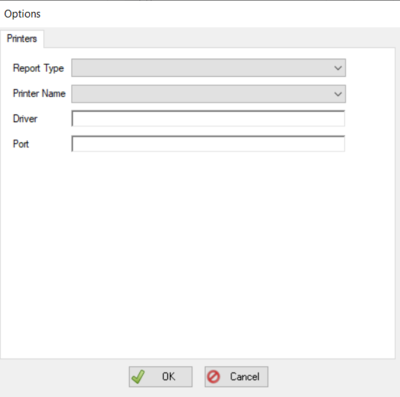
Now you can select the type of printer you will be using and where you want it to print. Click the arrow in the field next to Printer Type. This will give you a list of the different types of printing options available in ITrack.
Let's choose Invoice first. Your screen may already show Invoice because it is the first printer type listed. Other types of printing options include Label Tag and Thermal which print part tags and Report which prints all Home Screen reports in addition to some miscellaneous reports. Most printing options are self explanatory.
Now you can decide where to print invoices. You may also choose how many copies of the invoice you want printed each time. Additionally, you may enter and edit an invoice memo that will appear on all of your invoices.
ITrack only knows about the printers that Windows recognizes as installed.
Now let's say we want to set up a printer for reports. ITrack automatically stores printer information. This means that after you are done with printer information for invoices, you can just go to the next type of printing without having to click any buttons.
Click on the drop down list and select Report. Then set the Printer Name for Report. If you go back to Invoice, you will see that the Printer Name was saved. If you are done with the Options box for now, be sure to click OK to save all of the information you have entered so far.
The "Copies Per Invoice" option applies only to the "Invoice" printer type.
Tax Items
Located at the very top left of the screen, you will see three drop down menus. These menus are File, Edit and Help.
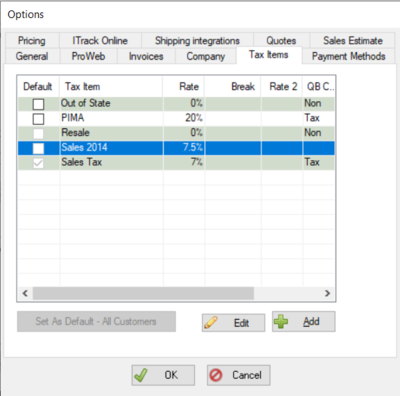
To open options, first click on the Edit menu. Keep holding down your mouse clicker and then release it when you have highlighted the word Options. Click on the Tax Items tab to bring up tax items. You can now edit the current tax information, or add new tax items.
Add New Tax Item
To add a new tax item, click on the Add button. This will bring up a small Tax Item box and allow you to enter in the new tax item. At this point you can also add a second tier tax. A second tier tax is used when a different tax rate is used for totals that are over a certain dollar amount. (i.e.: On a total of $1,500, the first $1,000 is taxed at 6% but the next $500 is taxed at a 4% rate.) When you are done with the Tax Item box, click OK. Your new tax will now show up with the other taxes listed.
Editing Tax Items
To edit a tax item, click on the tax item you need to edit. The text on the Edit button will then go from grey to black. You may now click the Edit button to bring up the Tax Item box, just like when you clicked the Add button. Now you can make changes and click OK to save.
Company Information
Located at the very top left of the screen, you will see three drop down menus. These menus are File, Edit and Help.
To open options, first click on the Edit menu. Keep holding down your mouse clicker and then release it when you have highlighted the word Options. Click on the Company tab to bring up company information. Now you can fill out information about your company. When you are finished filling out your company information, click OK to save. You may go back and change this information any time you wish.
Setting up payment Methods
Located at the very top left of the screen, you will see three drop down menus. These menus are File, Edit and Help.
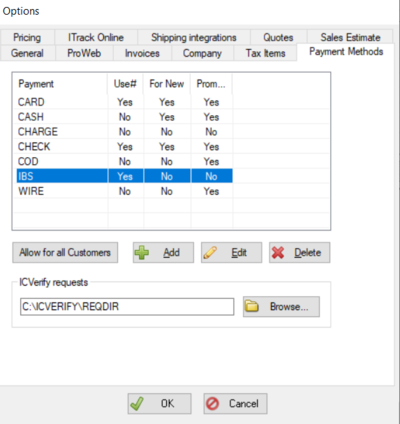
To open options, first click on the Edit menu. Keep holding down your mouse clicker and then release it when you have highlighted the word Options. Click on the Payment Methods tab to add new payment types or edit existing payment methods. (Options Payment Methods Tab screen shot)
When you click the Add or Edit buttons, it brings up a small box that allows you to set specifications and a name for the payment type. There are three optional checkboxes:
- Use Check or Authorization number will require that a check or authorization number is filled in on the sales quote screen whenever making payments.
- Automatically assign to new customers will add this payment method to any new customer you make, otherwise, you will need to manually add it on the payment info tab of the Customer Information screen.
- Prompt for Payment will make a dialogue box pop up if you save an invoice without making any payments with this method.
When you are finished adding or editing the information, click OK to save. Any payment methods you have saved in the Payment Methods tab will show up as a Payment Method option on the Sales screen.
Pricing Options
Located at the very top left of the screen, you will see three drop down menus. These menus are File, Edit and Help.
To open options, first click on the Edit menu. Keep holding down your mouse clicker and then release it when you have highlighted the word Options.
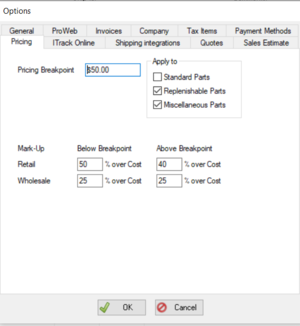
Click on the Pricing tab to change your company's pricing options. First, enter in a pricing breakpoint, then determine mark-ups and mark-downs for both retail and wholesale sales. Items below the breakpoint will use the below breakpoint markup. This allows for higher profit margins for inexpensive items.
Reports
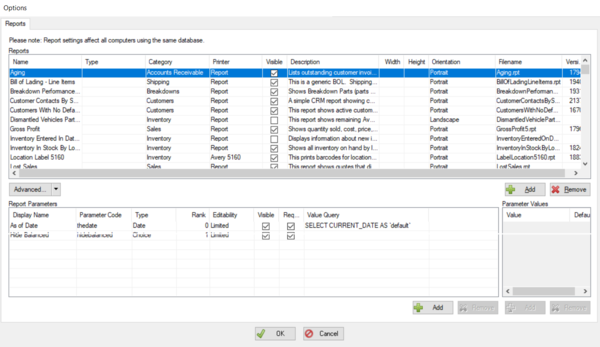
Located at the very top left of the screen, you will see three drop down menus. These menus are File, Edit and Help. To open reports, first click on the Edit menu.
Hold your mouse over the Global Preferences and click on the Reports option.
It is important to note that report settings affect all computers using the same ITrack Pro database, not just the computer you are using.
To add a new report, click the Browse button and select the report. Then, type in a report name. Finally, click the Add button to add the report. You can select a printer type for the report by clicking on the Printer Type drop down list and selecting a printer type. When you are finished making your report, click the OK button to save your report. Contact ISoft Data Systems technical services to purchase reports customized to fit your business needs.
