Difference between revisions of "ITrack/Pro/Vendor Screen"
(Fixing internal links) |
|||
| (15 intermediate revisions by 4 users not shown) | |||
| Line 1: | Line 1: | ||
== | ==Adding a New Vendor== | ||
[[Image:AddVendor.png|thumb| | [[Image:AddVendor.png|thumb|right|500px|Adding a Vendor]] | ||
To add a new vendor: | To add a new vendor: | ||
| Line 10: | Line 9: | ||
:4. When you are finished entering vendor information, click the Save & Close button. | :4. When you are finished entering vendor information, click the Save & Close button. | ||
{{Tip|Entering the Zip Code will automatically fill out the city, state and country fields.}} | |||
{{Tip|If the Shipping Address is the same as the Billing Address clicking the Copy>> button will automatically copy the address fields.}} | |||
==Additional Info Tab== | |||
If you want to continue adding information about your vendor, the Additional Info tab on the Vendor Information Screen is useful. | |||
Click on the Additional Info tab located to the right of the Address Info tab. From this screen you can enter more information about the vendor such as an email address, a web page address, and other important information. | |||
([[:Image:AdditionalInfoTab.png|Additional Info Tab]]) | |||
==Purchase Orders Tab== | |||
The Purchase Orders tab is the final tab on the Vendor Information Screen. This tab allows you to view purchase orders you have created for this vendor. You can see which orders have already been received and which purchase orders are still pending. | |||
([[:Image:PurchaseOrdersTab.PNG|Purchase Orders Tab]]) | |||
Clicking on the Reprint button in the lower left corner will reprint a selected item from the line items. | |||
Double clicking on a purchase order will open it in the [[ITrack/Pro/Purchase Orders Screen|Purchase Orders]] Screen. From here you can add to or edit the purchase order. | |||
[[Category:ITrack/Pro/Extensions]] | |||
Latest revision as of 12:48, 13 April 2012
Adding a New Vendor
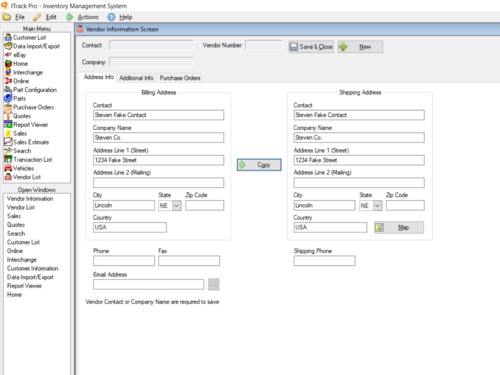
To add a new vendor:
- 1. Click Vendor List in the Main Menu.
- 2. Click the Add button at the bottom of the page and the Vendor Information Screen will open.
- 3. Enter the address into the appropriate fields.
- 4. When you are finished entering vendor information, click the Save & Close button.
| Tip |
| Entering the Zip Code will automatically fill out the city, state and country fields. |
| Tip |
| If the Shipping Address is the same as the Billing Address clicking the Copy>> button will automatically copy the address fields. |
Additional Info Tab
If you want to continue adding information about your vendor, the Additional Info tab on the Vendor Information Screen is useful.
Click on the Additional Info tab located to the right of the Address Info tab. From this screen you can enter more information about the vendor such as an email address, a web page address, and other important information.
Purchase Orders Tab
The Purchase Orders tab is the final tab on the Vendor Information Screen. This tab allows you to view purchase orders you have created for this vendor. You can see which orders have already been received and which purchase orders are still pending.
Clicking on the Reprint button in the lower left corner will reprint a selected item from the line items. Double clicking on a purchase order will open it in the Purchase Orders Screen. From here you can add to or edit the purchase order.
