Presage/User Guide/Analysis Management Screen
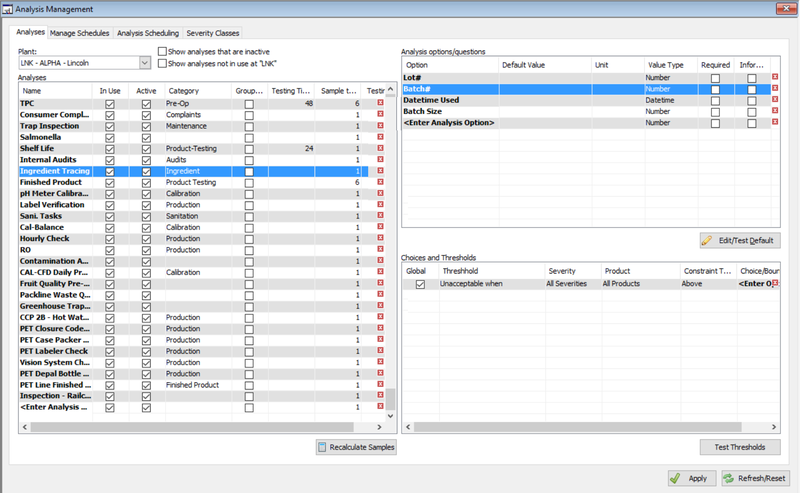
Analysis Management is found under the Main Menu. This screen is used to create and manage analyses.
Analyses Tab
Click on the link below to watch a VIDEO TUTORIAL for the Analyses Tab.
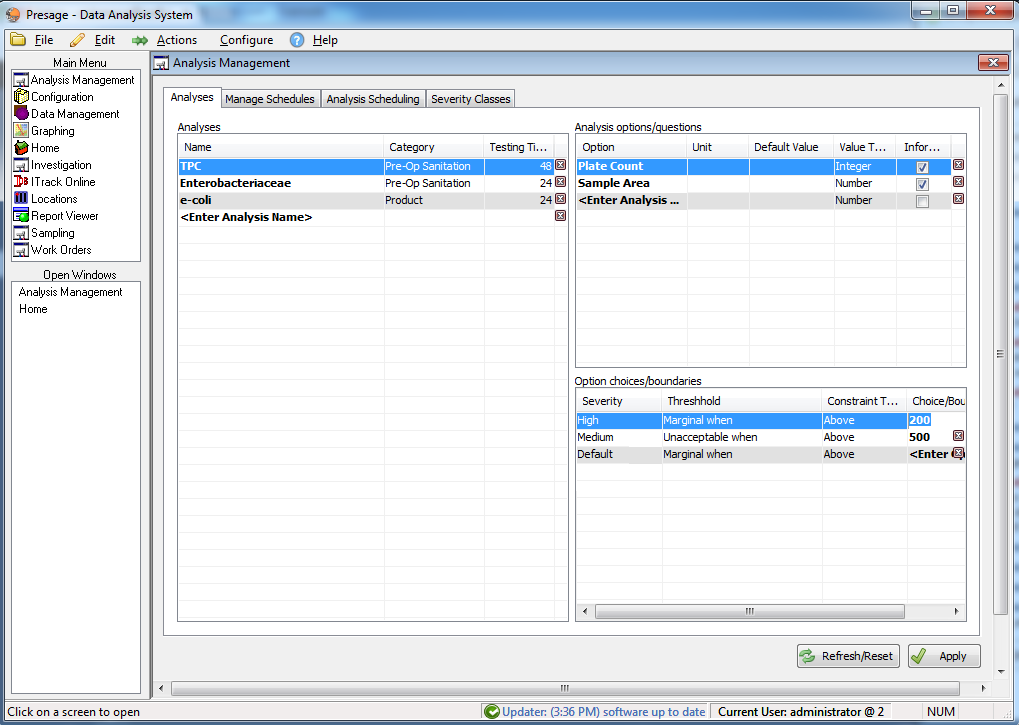
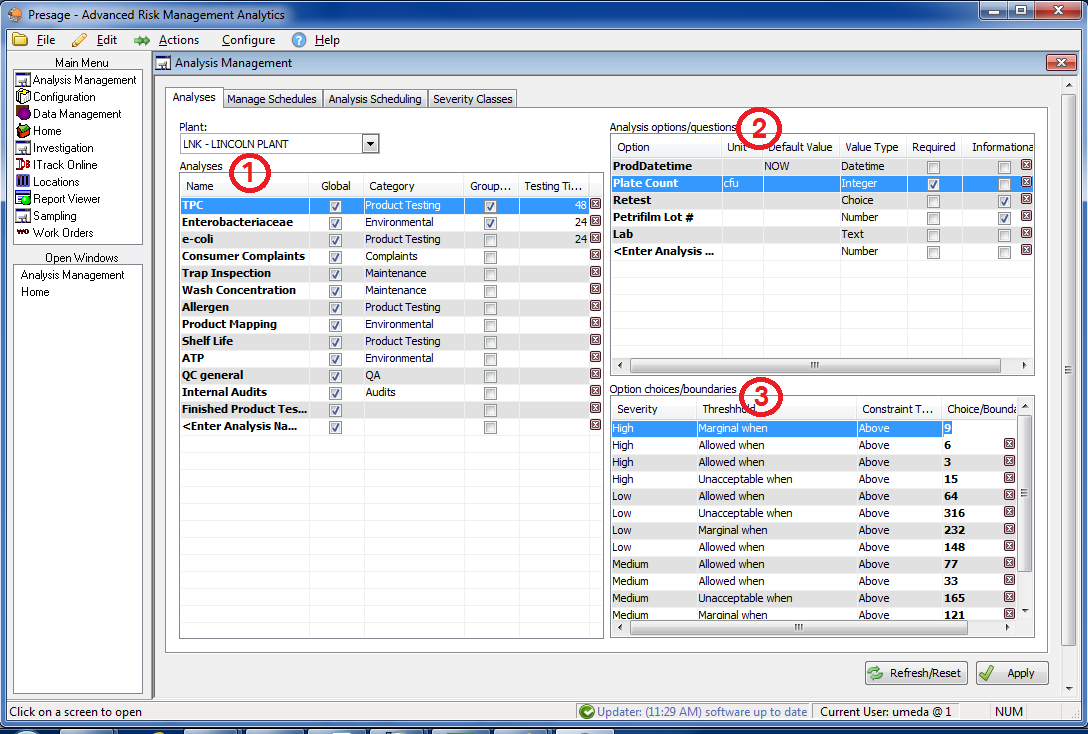
To create a new analysis, click on the box <Enter Analysis Name>. Enter the analysis name on the box provided.
For existing analyses, you will be able to edit them if you have Global permissions to configure analyses, or if the analysis is only in use at plants you have access to, and you have plant-level privileges to configure analyses. You will be unable to edit analyses that are also in use at other plants if you do not have privileges to those plants.
The "In Use" checkbox indicates this analysis is used at the selected plant, and the "Active" checkbox indicates this item is presently active. You can filter the list to exclude items not in use at the plant, or inactive items, using the check boxes to the right of the Plant menu.
In the next column, type in the category name. This column is used to group analyses.
Testing Time is for lab use. Type in the number hours the sample must rest in the incubator.
Keep the analysis name selected before going to the next section, Analysis options/questions.
Under Option, enter what is being tested for; for example: plate count, sample area, detect-ability, etc.
Unit When appropriate, enter the unit in the next column; for example: cfu, ppm, etc.
Required
Options marked as Required will need to be filled out before a work order can be closed, otherwise a warning message will be prompted in the Work Order screen if the field is left blank.
Informational
The Informational box is for options which don't need to be graphed. Check if appropriate.
Default Value
Entering data in this field will automatically fill out the option field in the Work Order screen. This auto-filled data can always be overwritten.
Note: For Datetime options, the Default Value format is YYYY-MM-DD. Only numbers and decimals for number options. Numbers, characters, and letters for text options. One of the choices configured in the thresholds box for choice options.
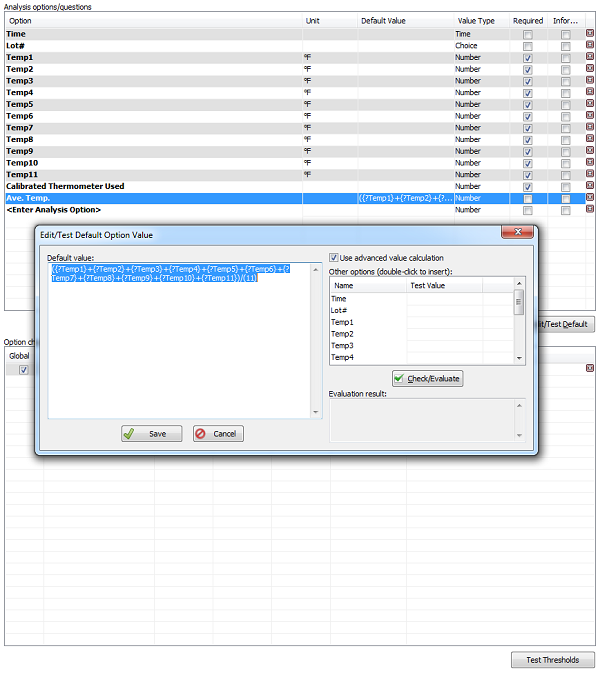
Double click on a cell under Default Value for options which need to be calculated using results entered in other options. Make sure to check the box next to Use advanced value calculation. Then double click on the options that are involved in the calculation. In the Work Order screen, once results are entered for all options involved in the calculation, the resulting option will be automatically filled out. Once again, like other fields with Default Values, the calculated value can be overwritten.
Value Type Then choose the Value Type from the drop-down list provided. For example, plate count is measured in number, and qualitative analyses are measured in boolean: positive or negative. To create a drop-down list of various options to select from, choose Choice.
Thresholds
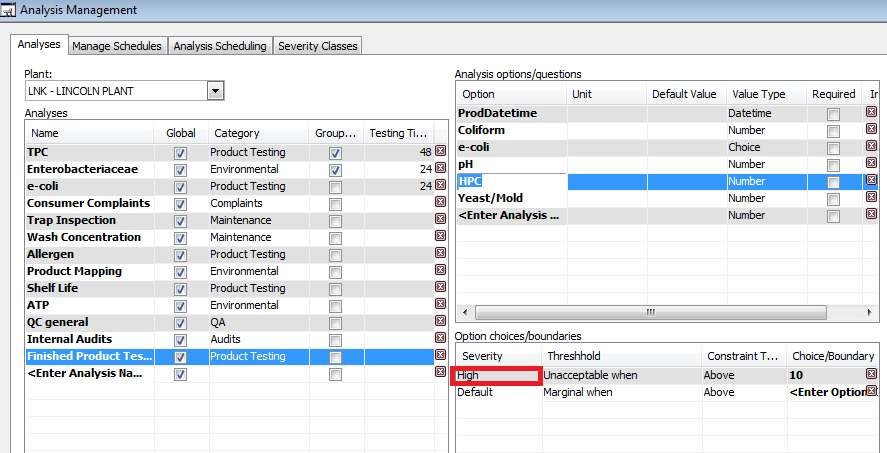
Keep analysis name and analysis option selected to go on to the next section: Option choices/boundaries. Set thresholds for each option separately.
First, select the severity from the drop-down list. To set up severity classes, refer to Analysis Management: Severity Classes.
For Threshold, select an option from the drop-down list. Marginal values are those which are acceptable, but are nearing the unacceptable boundary. Unacceptable values represent failure. Invalid values are those which have no value or validity.
Constraint Type sets the minimum and maximum boundary value. Choose the appropriate Choice/Boundary Value, or fill it in manually. For example, to set 10 cfu as a maximum acceptable limit for an analysis, choose Unacceptable when under Thresholds; Above under Constraint Type; and type in 10 under Choice/Boundary.
Click Apply to save changes.
Manage Schedules Tab
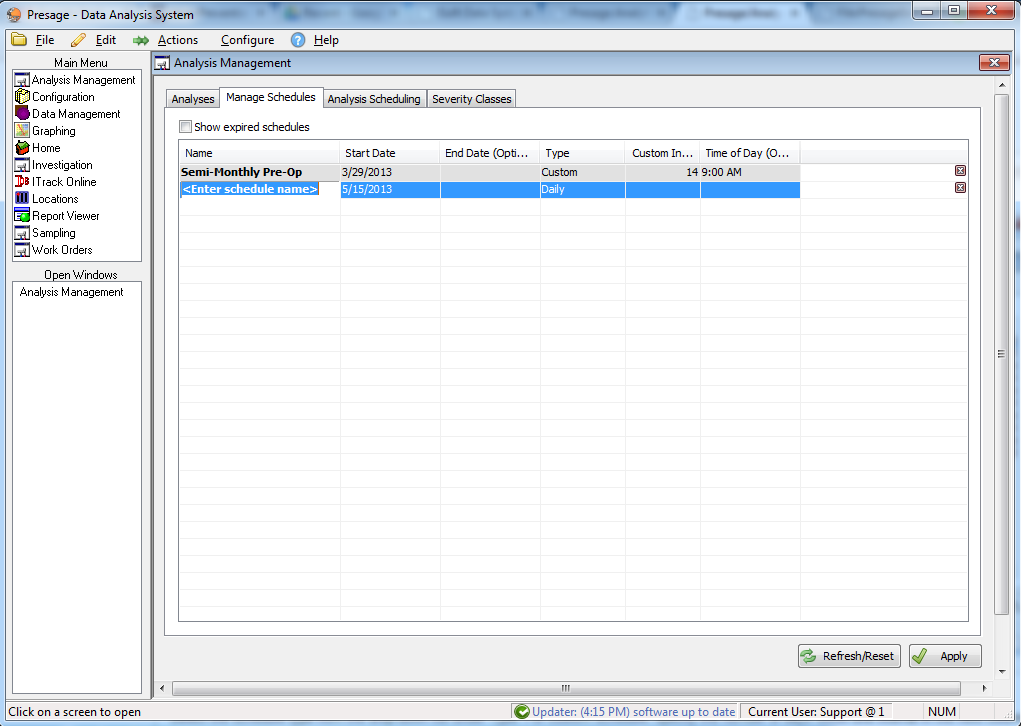
This is where schedule intervals are defined. Choose a name for the schedule that will best identify the interval (i.e. Mondays, Weekly, By Week's End, etc.). Make sure to give each schedule a unique name that best identifies it. Click on <Enter Schedule Name> for the cursor to appear; type in the new schedule title.
Enter a start date, usually today’s date. End Date is optional. If the end date is not set, the schedule will continue indefinitely.
Select the schedule type from the drop-down list under Type. For custom schedule, specify the number of days within one period interval in the next column. In the final column, specify the time of day (optional) the test is scheduled for.
To delete a schedule, click on the corresponding red box with white X button on the far right of each line. Click Apply to save changes.
Analysis Scheduling Tab
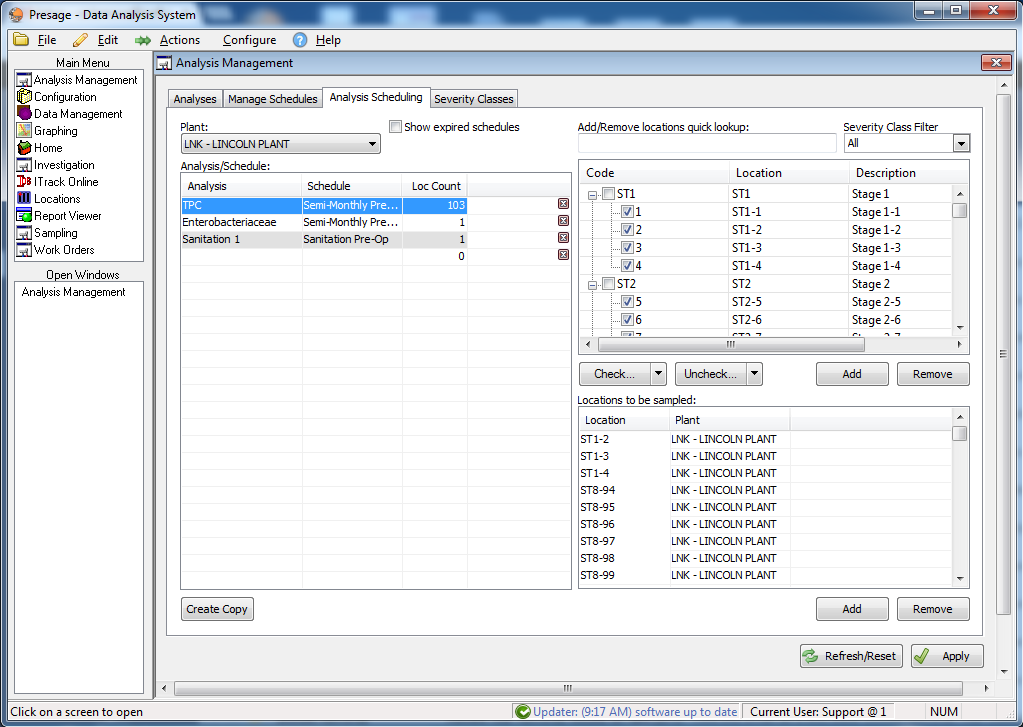
Use this screen to build an analysis schedule for each plant. First select the plant from the drop-down list.
Check the box next to Show expired schedules to see all expired, in addition to current, schedules.
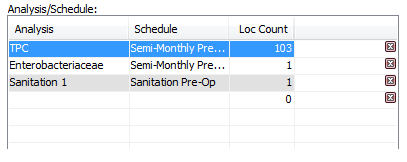
Under the column title Analysis, select the analysis type from the drop-down list. This list includes all analyses created under Analysis Management: Analyses.
Select the schedule period interval from the drop-down list under Schedule. This list is created under Analysis Management: Manage Schedules.
The Location Count is automatically filled out when the locations are selected in the next step.
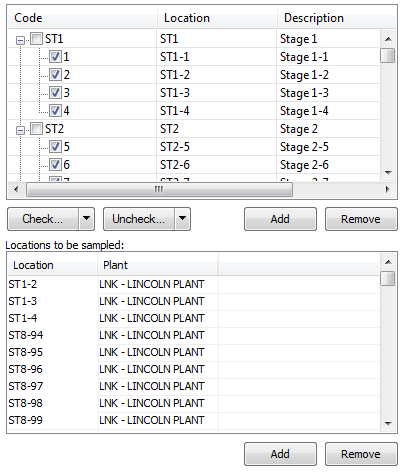
The right side of the screen is for choosing locations to perform the analyses on. Select one analysis under Analysis/Schedule:. Then check the box next to the locations which need to be sampled.
For a quick look-up, type in the first letter or number of the display code for the location. The corresponding locations will show up in the display below. The list can also be filtered by severity class. Choose the severity class from the drop-down; the list in the display will narrow down to locations with the severity class specified.
Use the Check... button to select groups of locations. Use the Uncheck... button to deselect groups of locations. Click Add (on the middle of the screen, not the one on the lower portion of the screen) to add the selected locations to the list of locations to be sampled. Click Remove to take out locations from the list.
To add locations one at a time, use the Add button on the lower portion of the screen under Locations to be sampled:. To remove a location, select a location from the list and click Remove. To remove multiple locations, hold down the Ctrl button on keyboard while selecting multiple locations, then click Remove.
Click Apply to save any changes and use the Refresh/Reset button to remove any unsaved changes.
Severity Classes Tab
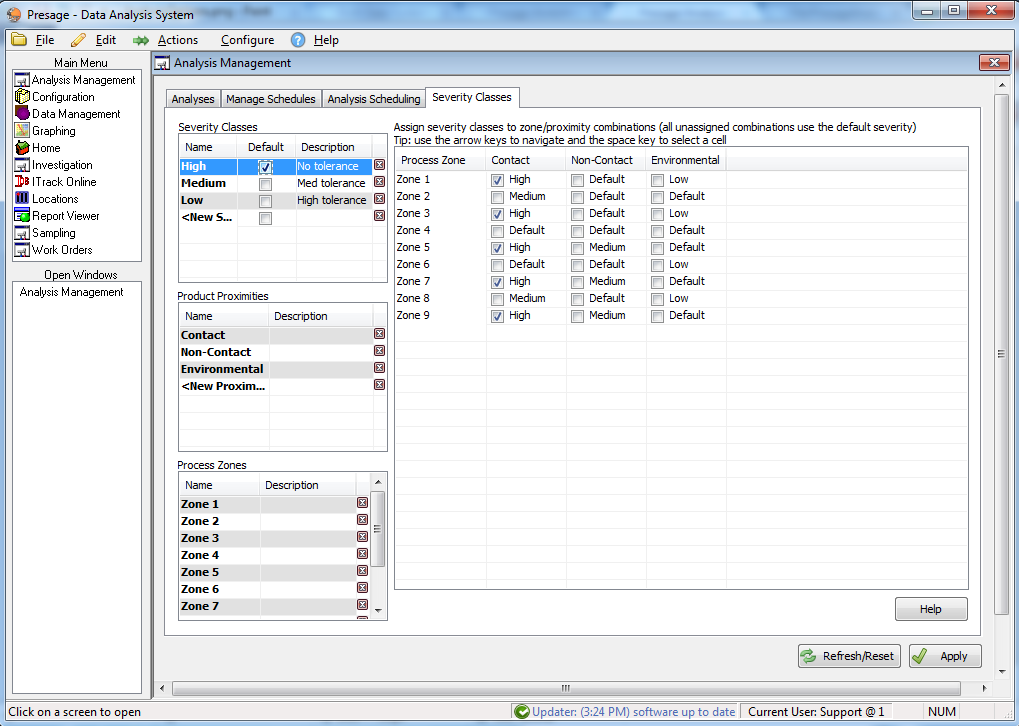
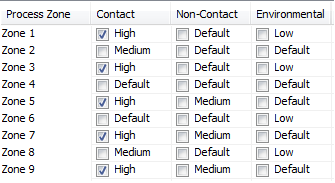
This screen is for assigning severity classes to zone/proximity combinations.
First give a unique names to all severity classes. Severity classes are based on limits which are set based on product proximities and process zones. Examples are High, Medium, and Low; or 10, 100, 500. Use terminology or numbers which best fit your system.
Click on the box under Default (may have to expand the column to see the full column title), to set a default. Default severity class is usually the one used the most often.
Product proximity refers to contact or non-contact surfaces. To add new product proximities, click on <New Proximity>. Type in the new proximity title. To remove product proximity, click on the red box with a white X to the right of each line. To rename, select the appropriate row and type in the new proximity name.
Process zones are different operational zones such as Chilling or Packaging. To add new zones, click on <New Zone> (It may be necessary to scroll down to see this row.) To delete a zone, click on the red box with white X to the right of each line. To rename, select the appropriate row and type in the new zone name.
To assign severity classes to zone/proximity combinations, click on one severity class under Severity Classes on the left display to highlight it, then check the boxes where the selected severity class is appropriate on the right display.
Now, click the next severity class to highlight it, then check the boxes where this severity class is appropriate on the right display. Not all boxes have to be checked.
Click Apply to save the changes.
HOW TO:
How to set up a sample.
1) Click on Analysis Management under the Main menu. Stay on the first tab Analyses.
2) To create a new analysis, click on the box <Enter Analysis Name>. Enter the analysis name on the box provided. In the next column, type in the category name. This column is used to group analyses. Testing Time is for lab use. Type in the number hours the sample must rest in the incubator.
3) Under Option, enter what is being tested for; for example: plate count, sample area, detect-ability, etc.
When appropriate, enter the unit in the next column; for example: cfu, ppm, etc.
The Informational box is for options which don't need to be graphed. Check if appropriate.
Then choose the Value Type from the drop-down list provided. For example, plate count is measured in number, and qualitative analyses are measured in boolean: positive or negative. To create a drop-down list of various options to select from, choose Choice.
An analysis disappeared from Analyses screen, and I did not delete it.
If an analysis has a global setting, then it is used by all plants within a company. If one plant unchecks the global setting, then the analysis is hidden for all other plants except for the plant that set the analysis to be plant-specific.
Note: This does not mean the analysis and all data attached to it is deleted for all other plants. It is simply hidden.
Make sure another plant has not unchecked the global setting in the Analysis Management-Analyses screen.
If not, call the customer support rep at 1.800.309.1704.
How to set up a threshold.
1) Click on Analysis Management under the Main Menu. Stay on the first tab Analyses.
2) Select an analysis and a specific option you want to set thresholds or specifications to. Set thresholds for each option separately.
3) Select the severity from the drop-down list. To set up severity classes, refer to Analysis Management: Severity Classes.
4) For Threshold, select an option from the drop-down list. Marginal values are those which are acceptable, but are nearing the unacceptable boundary. Unacceptable values represent failure. Invalid values signify an error.
5) Constraint Type sets the minimum and maximum boundary value.
6) Choose the appropriate Choice/Boundary Value, or fill it in manually. For example, to set 10 cfu as a maximum acceptable limit for an analysis, choose Unacceptable when under Thresholds; Above under Constraint Type; and type in 10 under Choice/Boundary.
7) Click Apply to save changes.
How to make thresholds plant-specific for global analyses.
Select a plant-specific Severity with each threshold. Default Severities are global and will show for all plants.
How to set up a schedule.
1) First select the plant from the drop-down list.
2) Under the column title Analysis, select the analysis type from the drop-down list. This list includes all analyses created under Analysis Management: Analyses.
3) Select the schedule period interval from the drop-down list under Schedule. This list is created under Analysis Management: Manage Schedules.
4) The Location Count is automatically filled out when the locations are selected in the next step.
5) The right side of the screen is for choosing locations to perform the analyses on. Select one analysis under Analysis/Schedule:. Then check the box next to the locations which need to be sampled.
6) For a quick look-up, type in the first letter or number of the display code for the location. The corresponding locations will show up in the display below. The list can also be filtered by severity class. Choose the severity class from the drop-down; the list in the display will narrow down to locations with the severity class specified.
7) Use the Check... button to select groups of locations. Use the Uncheck... button to deselect groups of locations. Click Add (on the middle of the screen, not the one on the lower portion of the screen) to add the selected locations to the list of locations to be sampled. Click Remove to take out locations from the list.
8) To add locations one at a time, use the Add button on the lower portion of the screen under Locations to be sampled:. To remove a location, select a location from the list and click Remove. To remove multiple locations, hold down the Ctrl button on keyboard while selecting multiple locations, then click Remove.
9)Click Apply to save any changes and use the Refresh/Reset button to remove any unsaved changes.
How to set up a severity/proximity/zone matrix.
1) Click Analysis Management under the Main Menu.
2) Click Severity Classes.
3) Give a unique names to all severity classes. Severity classes are based on limits which are set based on product proximities and process zones. Examples are High, Medium, and Low; or 10, 100, 500. Use terminology or numbers which best fit your system.
4) Click on the box under Default (may have to expand the column to see the full column title), to set a default. Default severity class is usually the one used the most often.
5) Product proximity refers to contact or non-contact surfaces. To add new product proximities, click on <New Proximity>. Type in the new proximity title. To remove product proximity, click on the red box with a white X to the right of each line. To rename, select the appropriate row and type in the new proximity name.
6) Process zones are different operational zones such as Chilling or Packaging. To add new zones, click on <New Zone> (It may be necessary to scroll down to see this row.) To delete a zone, click on the red box with white X to the right of each line. To rename, select the appropriate row and type in the new zone name.
7) To assign severity classes to zone/proximity combinations, click on one severity class under Severity Classes on the left display to highlight it, then check the boxes where the selected severity class is appropriate on the right display.
8) Now, click the next severity class to highlight it, then check the boxes where this severity class is appropriate on the right display. Not all boxes have to be checked.
9) Click Apply to save the changes.
Not able to mark a threshold as 'Global'.
To be able to mark a threshold or thresholds 'Global', no specific Severity or Product must be selected. All Severities must be selected under Severity and All Products must be selected under Product for each specific threshold (each row) for it to be able to be 'Global'.
