Presage/User Guide/Investigation Screen
Investigation Screen
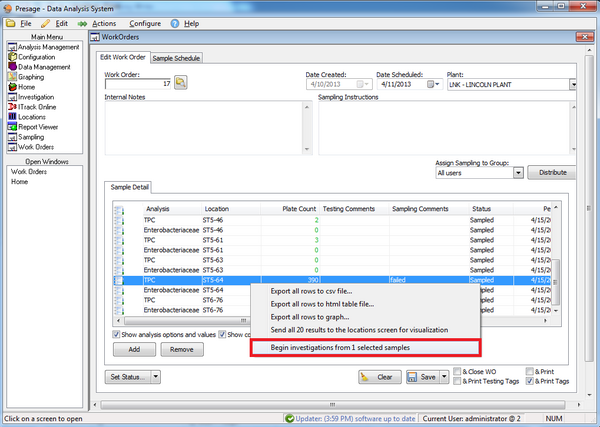
To send an analysis for investigation, first find the failed analysis from the Work Order screen or Sampling History; right-click on it, and select Begin investigation from # selected samples.
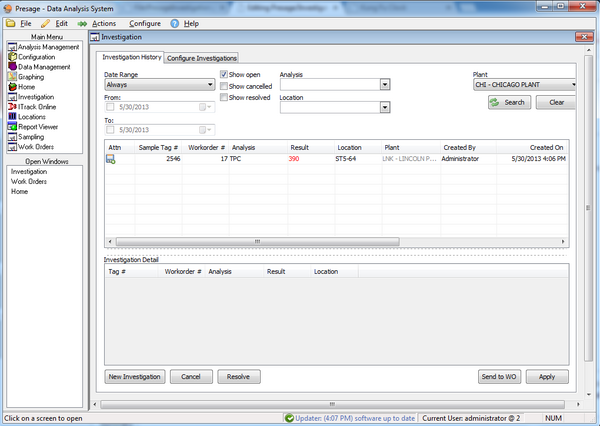
User is automatically taken to the Investigation Screen.
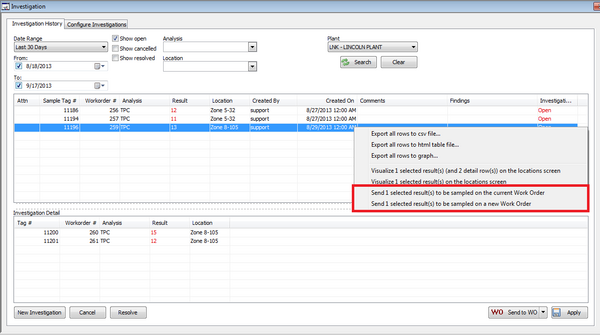
Right-click on the analysis on this page to see multiple action options: view the location visualization or send to the work order. There is also a Send to WO button on the lower, right-hand portion of the screen. Click on the arrow next to the Send to WO button, choose between Send to Existing WO and Send to New WO.
Drag the bar to the right to see the column titled Comments and Findings. Type in the findings and corrective actions taken in the space provided. You can also record a Root Cause and add Root Cause Comments.
If there are more fails related to this investigation, send the next failed analysis to the investigation screen. This fail will be listed in the Investigation Detail (lower) box. Make sure to send the initial analysis listed in the upper box in the Investigation Screen to the WO for a retest.
Configure Investigations
Automatic Investigation Rules Sub-Tab
The Automatic Investigation Rules tab is where you can configure when an investigation is created, based on a sample result. These rules are set up on a per-plant basis, based on the plant selected at the top of the screen.
Active: You can uncheck a rule to temporarily deactivate it without deleting it. This is useful if you wish to pause or archive an investigation rule.
Analysis & Option Select the analysis for which to create an investigatory rule. Investigations must be set up per option; you cannot create a blanket investigation rule for an analysis.
Location / Product: Rules can be configured so that they only apply to a selected location, a selected product, or a combination thereof.
Count: How many of the selected acceptability must be reached to trigger an investigation.
Acceptability: You can set up investigations to be created for a given number of a specific acceptability type (such as Unacceptable, Invalid, or Acceptable), or all acceptability levels except "Acceptable" (this includes Unacceptable, Invalid, and Marginal). In most cases, you will select "Unacceptable", to have a failure result trigger the investigation.
Interval Length/Interval Type: These fields allow you to set up the frequency during which the count must be reached. Once the threshold has been reached, each subsequent failure will also trigger an investigation.
For example: You have a rule set to create an investigation on the fifth failure in a two-day period.
- On day 1, you record 4 failures. No investigations are triggered.
- On day 2, you record 2 more failures. An investigation is triggered for both of the samples on day 2, because they fulfill the requirement of more than 5 failures in a 2 day period.
- On day 3, you record 2 more failures. No investigations are triggered, because there have only been 4 failures within the rolling two-day interval.
Auto-close: If you wish to create an investigation to generate an alert, but do not wish to perform Corrective Actions, you can check "Auto-close", and any investigations generated by this rule will be automatically closed after they are created.
Retest Mode: This determines how a retest sample is created. If it is set to "Manual", a retest will only be created if the user generates it. If "Same Document" is selected, it will add the retest sample to the same work order as the original failure. If "New Document" is selected, Presage will create a new work order for the retest.
Retest WO Type: If Retest Mode is set to New Document, this field allows you to specify the Work Order Type of the newly generated retest work order.
Retest Analysis: This allows you to specify which analysis will be used for retests generated by this rule. If you leave this blank, a retest sample will use the same analysis as the original test. If you select another analysis, the sample will be created using that analysis.
Description: The Description column defaults to a text description of the rule, but can be overridden with text of your choosing.
Default Comments: This text will be filled out as the comment for any investigations created by this rule. By default, it will indicate the failed sample id, and the investigation rule id.
To remove a rule permanently, select it and click the Delete Rule button.
Click Apply to save your changes.
Alerts and Notifications Sub-Tab
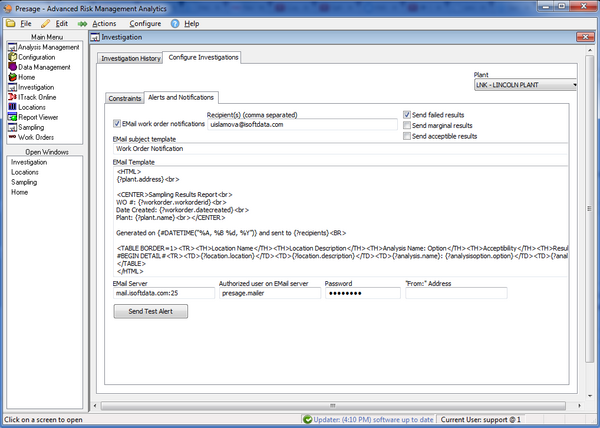
Use this screen to set up e-mail alerts which can be sent from the 'Work Order' screen by checking the box next to Send Notification in the 'Work Order' screen and clicking on Save.
First, select a plant.
Second, enter the e-mail addresses for the recipients.
Third, select which results should be included in the e-mail: fails, marginals, and/or acceptable results.
The template can be customized to each company's needs, simply contact a Presage representative with requests.


