Difference between revisions of "Presage/User Guide/Product Management Screen"
(Created page with "==Product Management Screen== =Products/Ingredients Tab= Product Management is where ingredients and products can be managed. In this screen, users can keep an up-to-date glo...") |
|||
| Line 1: | Line 1: | ||
=Product Management Screen= | |||
=Products/Ingredients Tab= | ==Products/Ingredients Tab== | ||
| Line 22: | Line 22: | ||
==How to add a product.== | ===How to add a product.=== | ||
1. Click on '''Product Management''' under the ''Main Menu''. | 1. Click on '''Product Management''' under the ''Main Menu''. | ||
| Line 39: | Line 39: | ||
==How to delete a product.== | ===How to delete a product.=== | ||
1. Click on '''Product Management''' under the ''Main Menu''. | 1. Click on '''Product Management''' under the ''Main Menu''. | ||
| Line 56: | Line 56: | ||
==How to inactivate a product.== | ===How to inactivate a product.=== | ||
1. Click on '''Product Management''' under the ''Main Menu''. | 1. Click on '''Product Management''' under the ''Main Menu''. | ||
| Line 71: | Line 71: | ||
==How to assign a product to a plant.== | ===How to assign a product to a plant.=== | ||
1. Click on '''Product Management''' under the ''Main Menu''. | 1. Click on '''Product Management''' under the ''Main Menu''. | ||
| Line 83: | Line 83: | ||
5. Click '''Apply'''. | 5. Click '''Apply'''. | ||
==How to attach an image to a product.== | ===How to attach an image to a product.=== | ||
1. Click on '''Product Management''' under the ''Main Menu''. | 1. Click on '''Product Management''' under the ''Main Menu''. | ||
| Line 99: | Line 99: | ||
7. Click '''Apply'''. | 7. Click '''Apply'''. | ||
=Recipes Tab= | |||
==Suppliers Tab== | |||
You can use the Suppliers tab to manage supplier information. | |||
==Recipes Tab== | |||
Revision as of 11:31, 12 May 2016
Product Management Screen
Products/Ingredients Tab
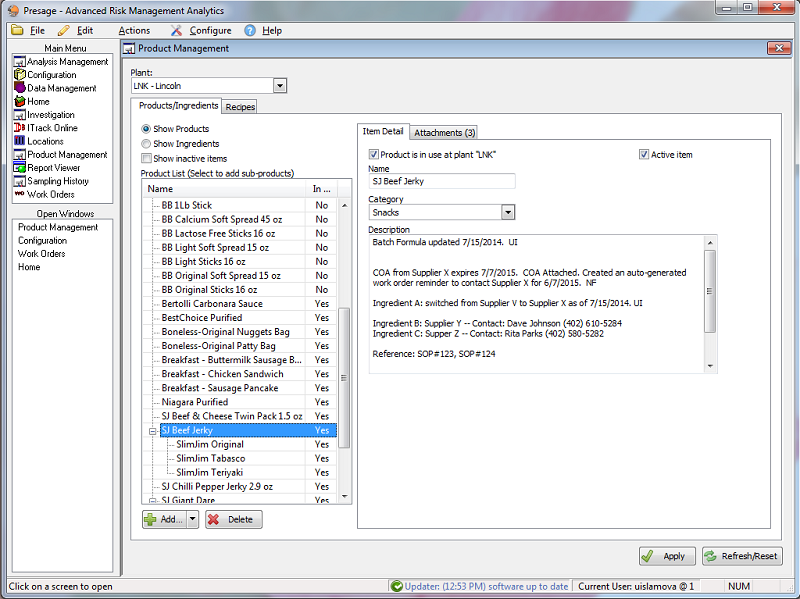
Product Management is where ingredients and products can be managed. In this screen, users can keep an up-to-date global list of products and assign and remove products and ingredients to and from each plant.
Click Show Products for the Product list. Click Show Ingredients for the Ingredient list.
Click on the link below to watch a VIDEO TUTORIAL for Products/Ingredients Tab.
Add and Edit Products and Ingredients
How to add a product.
1. Click on Product Management under the Main Menu.
2. Select the appropriate plant from the Plant: drop-down menu.
3. Click an existing line in the Product List.
4. Click the down-arrow next to the Add... button.
5. Select an appropriate position for the new product: above, next to, or below.
6. A new selected line appears in the list. Fill in the appropriate fields: Name, Category, Description, and make sure to check the appropriate boxes: Product is in use at the plant and Active Product.
7. Click Apply.
How to delete a product.
1. Click on Product Management under the Main Menu.
2. Select the appropriate plant from the Plant: drop-down menu.
3. Click an existing line in the Product List.
4. Click Delete.
Note: Deleting a product means all data attached to it will also be deleted from the historical samples. An alternative is to inactivate the product.
5. A pop-up appears warning about the above note. Click OK.
6. Click Apply.
How to inactivate a product.
1. Click on Product Management under the Main Menu.
2. Select the appropriate plant from the Plant: drop-down menu.
3. Click an existing line in the Product List.
4. Uncheck the box next to Active Product.
5. Click Apply.
Note: To see this inactivated products, check the box next to Show inactive products directly below the Products tab.
How to assign a product to a plant.
1. Click on Product Management under the Main Menu.
2. Select the appropriate plant from the Plant: drop-down menu.
3. Click an existing line in the Product List.
4. Check the box next to Product is in use at plant "X".
5. Click Apply.
How to attach an image to a product.
1. Click on Product Management under the Main Menu.
2. Select the appropriate plant from the Plant: drop-down menu.
3. Click an existing line in the Product List.
4. Click on the Attachments tab.
5. Click Add.
6. Select an image and click Open on the pop-up.
7. Click Apply.
Suppliers Tab
You can use the Suppliers tab to manage supplier information.
Recipes Tab
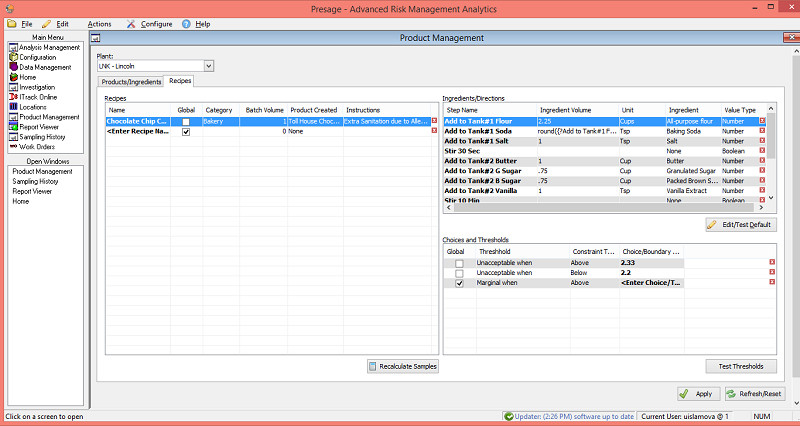
Recipes are managed in this tab. Recipes screen is designed similar to the Analysis Management screen.
Enter the recipe name under Name in the left box.
Check Global if this recipe is used in more than one plant.
Enter the Category to group the recipes. You will be able to filter by the Category in the Sampling History screen.
Ingredients measurements are based on the Batch Volume. In the Work Order screen, ingredient measures will be automatically calculated based on the Production Volume entered.
Product Created give the drop-down of the products from the Products list in the previous tab to select from.
Use Instructions field to enter notes.
Move on to the box to the right Ingredients/Directions.
Type in the ingredients OR select ingredients from the drop-down box in each row and use the first column for general steps.
Ingredient Volume is based on the Batch Volume.
Enter the Units.
Select Ingredients from the drop-down list if they are listed in the Ingredients list.
Select the Value Type. In the Work Order screen, there will be a column where users can enter the exact values as a verification step.
Move on to the box on the bottom.
Similar to Analysis Management, this is where thresholds are set up.
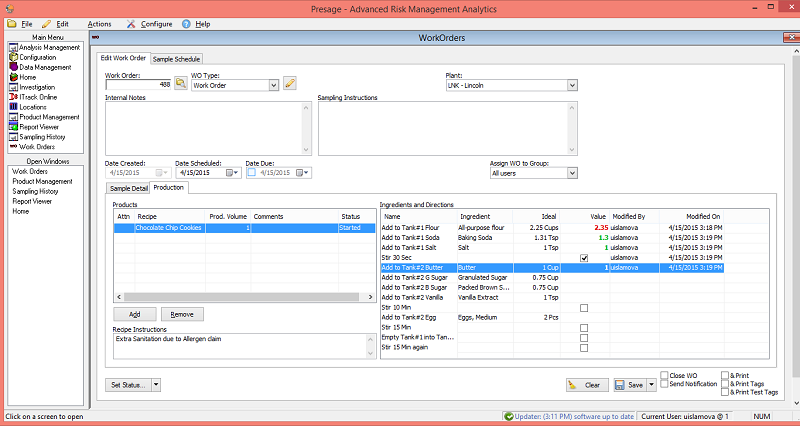
In the Work Order screen, click on the tab Production.
Click Add to add a new recipe to a work order.
Enter the Production Volume, remember this is associated with 'Batch Volume'. For example, if the Batch Volume is 1, and Production Volume is 1.5. Then all ingredient quantities will be multiplied by 1.5 to give the correct measures for the volume user is working with.
In Value column, users can enter the actual quantities they are using and be able to compare to the ideal quantities configured in the Recipes screen.
Click on the link below to watch a VIDEO TUTORIAL of the Recipe Screen.


