Difference between revisions of "ITrack/Pro/Parts Screen"
Daytonlowell (talk | contribs) |
|||
| Line 42: | Line 42: | ||
The '''Pub.''' column defines if a particular image will be displayed on web. If the check box next to the image it is not checked, it won't be displayed on the web but will still be viewable in ITrack. | The '''Pub.''' column defines if a particular image will be displayed on web. If the check box next to the image it is not checked, it won't be displayed on the web but will still be viewable in ITrack. | ||
==Breakdown Tab== | |||
The last tab on the Part Management screen is the Breakdown Tab. The breakdown tab displays a list of parts that have been or can be broken down from the parent part which is loaded on the Part Management screen. It can contain multiple child parts of the same type. | |||
===Creating and Removing Child Parts=== | |||
To indicate that a particular child part has been broken off of the parent part, find it in the list and change its quantity to anything greater than zero. If you do not enter a tag number for the given child part, one will be chosen for you. To remove a child part from the list, simply reset its quantity to zero. | |||
===Editing Child Parts=== | |||
To edit this list, you can simply change the value of any field, but please be aware that changing the part type on the Part Info tab without saving your changes on the breakdown tab will cause those changes to be lost, since there is a different list of potential parts that can be broken down from each parent part type. The information on child parts listed in this tab is saved whenever you save the parent part. | |||
[[Category:ITrack/Pro/Extensions]] | [[Category:ITrack/Pro/Extensions]] | ||
Revision as of 10:48, 7 April 2010
Adding Parts
There are two main reasons to add parts from this screen versus the teardown screen.
- The part you are entering is aftermarket or miscellaneous, you did not purchase the truck to which this part belongs.
- You have a part off of one of your vehicles and wish to enter in more detailed information about it than you are allowed to from the teardown screen. For example, if you want to upload images of the part.
Access the Part Management Screen by clicking Parts in the Main Menu. Or, bring up the screen by clicking on the Enter Parts button in the Vehicle Management Screen. Then decide which type of part you want to add: Standard, Aftermarket or Miscellaneous.
When you click on Enter Parts from the Vehicle Management Screen, the vehicle information about the part will automatically fill in.
If you click on Parts from the Main Menu, the Part Management Screen will be blank.
Part Information Tab
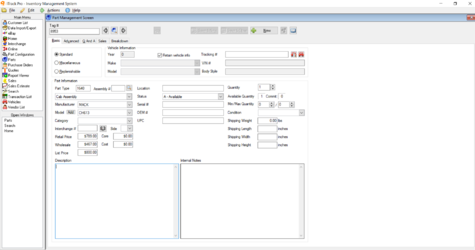
The first tab on the Part Management Screen is Part Information. From this screen you can fill out all of the basic information about the part. Some parts can be broken down into component parts, such as engine assemblies. To break down these parts, click the Breakdown button in the lower right corner. From here, you can tell ITrack which components you have.
Advanced Tab
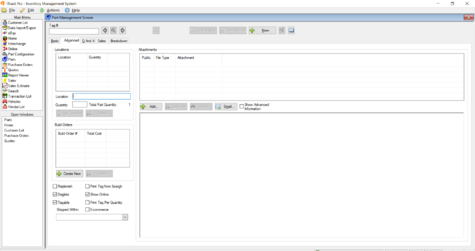
The Advanced tab allows you to enter more information about your parts. From this tab you can view locations for the part, create build orders, and add images and attachments.
Locations
From the Advanced tab in the Part Management Screen you can specify locations for parts. The locations section allows you to add more quantities of a part to your inventory.
Locations also allows you you to have a quantity of a certain part in one part of your store and more quantities in another location.
The order of locations is important since as parts are sold, they are taken out of the highest ranked location on the list with parts available.
Build Orders
From the Advanced tab in the Part Management Screen you can create build orders. Build orders allow you to combine a group of component parts to make a new part. For example, you may combine a transmission core, a rebuild kit and labor to build a new transmission that is ready to use.
Click the Create New button to create a new build order. This will open up the Quotes Screen. This is where you will enter in the different components to make the completed part.
When you have entered in all of the components, click the Save button to go back to build orders. Your build order will now appear with the total cost of creating the new part.
Attachments and Images
The Advanced tab in the Part Management Screen allows you to enter images and attachments that will be associated with the part. You may enter an unlimited number of images and attachments for each part.
Click the Add button next to access particular file. Then select the file you want to add. Click the Open button to attach the file. ITrack attaches the image to the part and previews the image in the space below the list.
Other digital files can be associated with the part using the Attachments section. An example of an attachment would be if there was an email sent about the part you could save it as a file and then attach the file to the part.
The Pub. column defines if a particular image will be displayed on web. If the check box next to the image it is not checked, it won't be displayed on the web but will still be viewable in ITrack.
Breakdown Tab
The last tab on the Part Management screen is the Breakdown Tab. The breakdown tab displays a list of parts that have been or can be broken down from the parent part which is loaded on the Part Management screen. It can contain multiple child parts of the same type.
Creating and Removing Child Parts
To indicate that a particular child part has been broken off of the parent part, find it in the list and change its quantity to anything greater than zero. If you do not enter a tag number for the given child part, one will be chosen for you. To remove a child part from the list, simply reset its quantity to zero.
Editing Child Parts
To edit this list, you can simply change the value of any field, but please be aware that changing the part type on the Part Info tab without saving your changes on the breakdown tab will cause those changes to be lost, since there is a different list of potential parts that can be broken down from each parent part type. The information on child parts listed in this tab is saved whenever you save the parent part.

