Configuring MAS90 and Sage100
This page describes how you go about configuring an existing MAS90/Sage100 install to handle importing data from ITrack's GL Entry system.
Stuff you need beforehand
This process assumes you have the following. If you don't, get them first.
- A valid install of ITrack Enterprise
- ITrack Enterprise has already had its GL Entry system set up to match pre-existing GL categories from MAS90
- MAS90 or Sage100 have already been installed and configured for daily use
Configuration
Now that you have those things, here's the steps you need to follow to get things created
- Get a user account created for ISoft (for creation/configuration/debugging)
- user name: isoft (or whatever suits your fancy)
- user pass: generate a random one, lower case letters and numbers, 8-12 characters, and record it in the company's fogbugz case
- Log in to MAS90/Sage100
- In Tasks, open (MAS/Sage) ERP->Modules->Visual Integrator->Main and click Import Job Maintenance
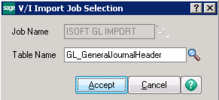
- Set the Job Name as ISOFT GL IMPORT, and the table name as GL_GeneralJournalHeader, then press accept
- On your new job:
- Set the long description as 'ISoft-created Job for importing GL entries'
- Set the file type as 'ODBC Data Source' and press the key icon. The name/pass is the login for the database connection
- Set the data source as 'itrackenterprise', then click the Tables button
- Scroll through the Tables->Available Tables list until you find v_mas90glsummary, then highlight and add it
- On the Fields tab, add every field that doesn't start with a *
- Press Accept
- Go to the Data tab
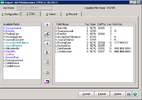
- Remove, add, and edit fields as necessary to make them match this setup:
- Press Accept, and then NO when asked to execute the job
- Add the IS journal type if it doesn't exist
- In your tasks tree, go to ERP (top folder)->Modules->General Ledger->Source Journal Maintenance
- Press the magnifying glass. If you do NOT see a Source Journal entry 'IS', do the following:
- On the Source Journal Maintenance screen, type IS in the Source Journal Field
- Set the description to 'ISoft Data Systems'
- The Journal Type is Financial
- Leave the next journal and register as they are
- Press Accept
Testing
To make sure you configured everything correctly, we'll do a test import
- In Tasks, open (MAS/Sage) ERP->Modules->Visual Integrator->Main and click Import Job Maintenance
- Click the magnifying glass next to Job Name and choose ISOFT GL IMPORT
- Click Accept, and then YES when asked to execute the job
- Click Test, put a check in All Records, then press OK
A good test run means number of Records Read equals Records Imported.
If there are errors, they can be viewed in the job log and corrective action can be taken from there.
After the push
In order to complete the accounting process after entries are pulled from ITrack by Sage100, a separate tool needs to be run to remove those entries from ITrack (i.e. mark them as exported) You can find the tool at trunk/ITrackEnterprise/Utilities/Mas90 Export Sync Tool/
- Grab the files, deploy it to the workstation that will be doing the accounting push.
- Put in the correct database connection credentials
- Run the batch file.
Ease of Use
We normally add the job to the Jobs Menu so that users can easily find and run it
- In Tasks, open (MAS/Sage) ERP->Modules->Visual Integrator->Main and click Import Job Maintenance
- Click the magnifying glass next to Job Name and choose ISOFT GL IMPORT
- On the Configuration tab, click Menu
- Choose 'Add Task to Menu', pick the job name of 'ISoft GL Import', set the Role to Default, and then Finish.
Installing MAS90 At Valley Truck Parts
Valley installs MAS90 as a distributed client. Essentially that means it is both installed from and installed to a network path. If someone from Valley calls and asks for us to help install MAS90, do the following things:
- Make sure the workstation has a mapped network drive pointed to M:/MAS90. Someone at Valley should be capable of setting that up.
- When you go to start the installation, navigate to M:/MAS90/Wksetup folder.
- Run Wksetup.exe.
- Do not run AUTORUN.exe! Even though MAS90 will install and even launch using this installation method, it will not function properly and will have to be uninstalled, and you'll have wasted a bunch of time!
- Early on in the installation process you will probably see a setup message like "Setup could not verify the presence of MDAC 2.7 or 2.8 on this system." That is normal and does not affect the installation process.
- If during the installation process MAS90 prompts you to specify an installation directory, you've done it wrong. Done correctly the installer does not ask for an installation location and skips that part of the installation process.
- That's all that should need to be done!
MAS90, ITrack and Crystal Reports
MAS90 and ITrack share some of the same DLLs for Crystal. Unfortunately, there can be version incompatibilities that occur when you try to use the Report Preview functionality in either ITrack or MAS90. There are simple but specific steps you need to take to make them both work. Wheeler was the last one to successfully do this.
- Run the ITrack Enterprise Installer
- Make sure that "Printing Support Options" is checked AND "Quickbooks Support" is checked.
- Run the installer for MAS90. See the above section for how to do this correctly.
- That's it! It should work!
MAS90 and ITrack should both be able to print and preview without issues. If ITrack or MAS90 throw errors on print or preview there was a problem. If this is the case you should:
- Delete the entire ITrack Enterprise Program folder and registry entries. (This isn't strictly necessary but I have had the best results with this process starting from a clean slate, and that means a full ITrack Enterprise re-install. You may be able to get away with just uninstalling Crystal 11 Test.)
- Uninstall and/or delete the MAS90 Program.
- Delete the "Business Objects Folder" (Probably in C:/Program Files (x86))
- Uninstall Crystal 11 Test.
- Use Regedit and delete the SOFTWARE/Business Objects folder. (May reside in the WOW6432Node.)
Then try the process from the top again.
Note: If you're dealing with Valley and you click the Print or Preview in ITrack and it simply does NOTHING (no error, no response), you need to specify the path to Valley's report/images/attachment directories in the host.ini file for ITrack. You can find these paths in Valley's company case file.
Note 2: The Enterprise Installer will try to grab the Quickbooks SDK from our downloads space, and won't find it. You'll want to get QBSDK80.exe from dl.isoftdata.com and install it manually after the Enterprise installation has completed.
Note 3: Virtually any application that uses Crystal can break printing compatibility. When Wheeler got this working, it was only with MAS90 and ITrack present. If you receive an error message during MAS90 installation that refers to "craxdrt.dll", chances are there is another piece of software on the system that is causing a conflict. There is no current solution to that problem, as we do not have the resources or knowledge to fix the compatibility issue. We only support fixing this when it is just ITrack and MAS90 on a workstation.
List of programs known to or which may break compatibility:
- Infor Visual 8.0
- Infor Visual CRM 8.0
- Team Developer 6.2

