Presage/User Guide/Work Orders Screen
Work Orders
Edit Work Order Tab
Using this page, you can create, edit, or copy work orders, and enter data for analyses.
Click here to watch our video tutorial for Work Order screen.
You can access the work order screen either by selecting Work Order in the Main Menu, or by double-clicking on a work order in the Home screen list. You can also open a specific work order by clicking the magnifying glass icon, then entering the work order number.
Copying a work order
If you load an existing copy of a work order, you can make a copy by clicking the "Copy" button (two pieces of paper) between the Work Order number field and the WO Type menu. You will be able to choose Copy WO and Values, which will create a new copy of the work order with all samples and sample values, or Copy WO Only, which will create a copy of the work order and the samples on it, but the samples will not be filled out.
Analyses & Work Orders
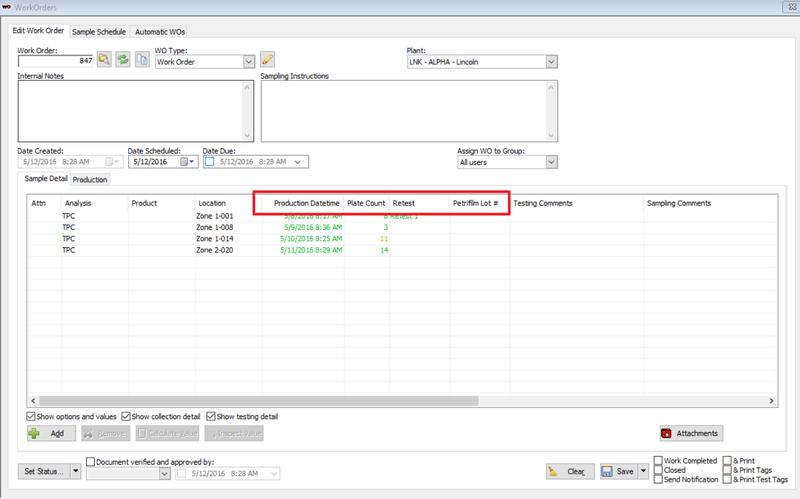
The format of a work order will depend on the analyses selected. If all analyses have the same group of options, the option names will appear on the column headers. And results need to be entered below the option header. Like the following:
If the analyses have different set of options. Then the option names will appear in a field under the column header Option # Label. And results need to entered next to the option name under the column Option # Result. See below:
Work Order Type
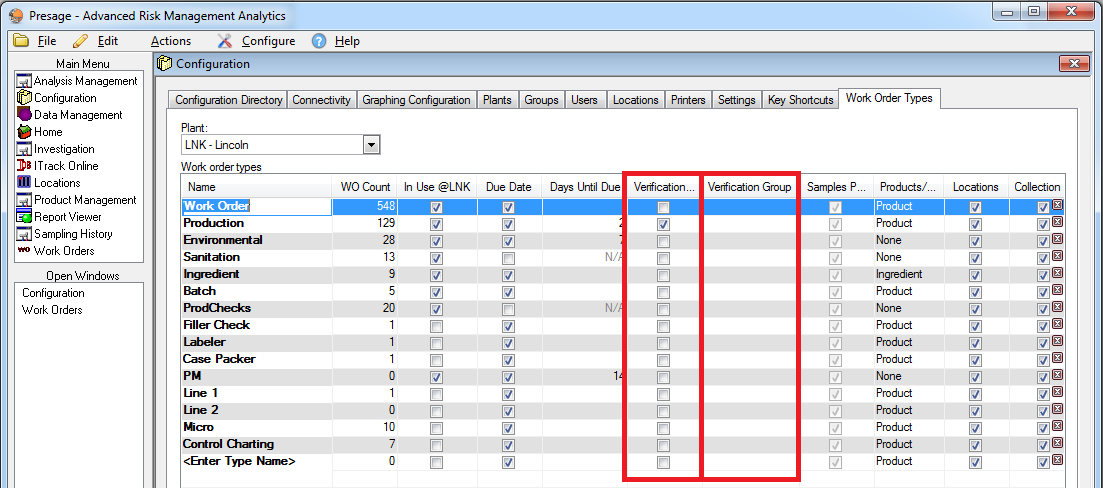
Select the appropriate Work Order Type. Remember these are set up in the Configuration Screen and control which fields show up in the work order, for example: Product, Ingredient, Neither, Location, No Location. Analysis field is a requirement.
Add Sample
To add an analysis, click Add, a new highlighted row will pop up. Start entering data for the new analysis. To remove an analysis, select the row (use CTRL key to select multiple rows), then click Remove on the lower portion of the screen.
Set Date Scheduled and Date Due
Date Scheduled is by default the date work order is created. To change Date Scheduled click on the calendar icon next to the date. To add Date Due, check the box on left of the date then click on the calendar icon on the right of the date.
Note: If there is no Date Due field, it could be because the work order type is configured not to have a due date.
Assign to Group
To assign the work order to a group, select the group name from the drop-down list under Assign WO to Group:. Click Save.
Add Attachment
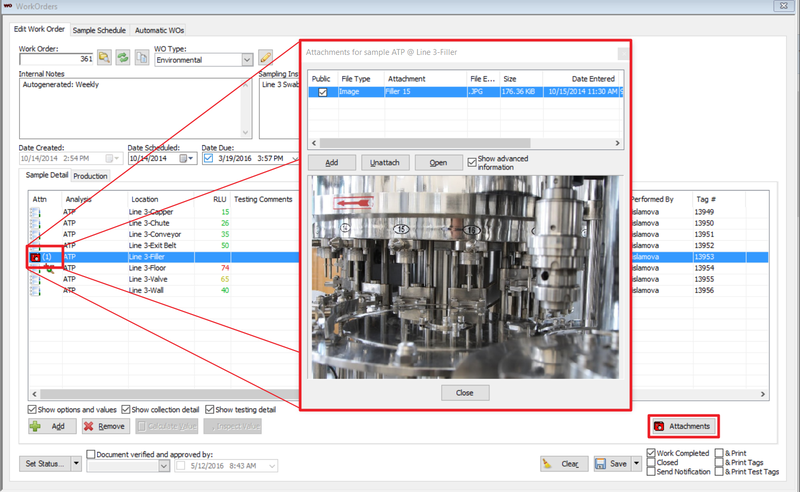
To add an attachment to a sample, select a sample and click the Attachments >> Add >> select an image >> Open >> Close.
A camera icon will appear for the sample under the Attn column.
To view the attachment, double-click the Attachment icon, or select the sample and click Attachments. Select the attachment you would like to view.
Save
To save all changes, click Save. There are options to print and close work order once changes are saved; if applicable, click on the check-box.
Print Tags
When printing reports or tags, check the &Print box when saving the work order. A window will pop-up with list of reports, choose the appropriate report. On the next window, choose the appropriate printer and click OK.
Status, Performed On, Performed By
These columns are filled out automatically, but can be edited (only on the software, not the scanner).
Under Sample Detail, click on the box under Status to change the status of the work order. Select the appropriate status title from the drop-down menu: Opened, Sampled, Closed, and Cancelled. Set the appropriate date and time the analysis was performed in the next column. Then select the appropriate user who performed the test in the column Performed By.
Edit Tag#
By default Tag# is generated by Presage. Turn on the ability to edit Tag# in the Configuration >> Users or Groups >> Permissions.
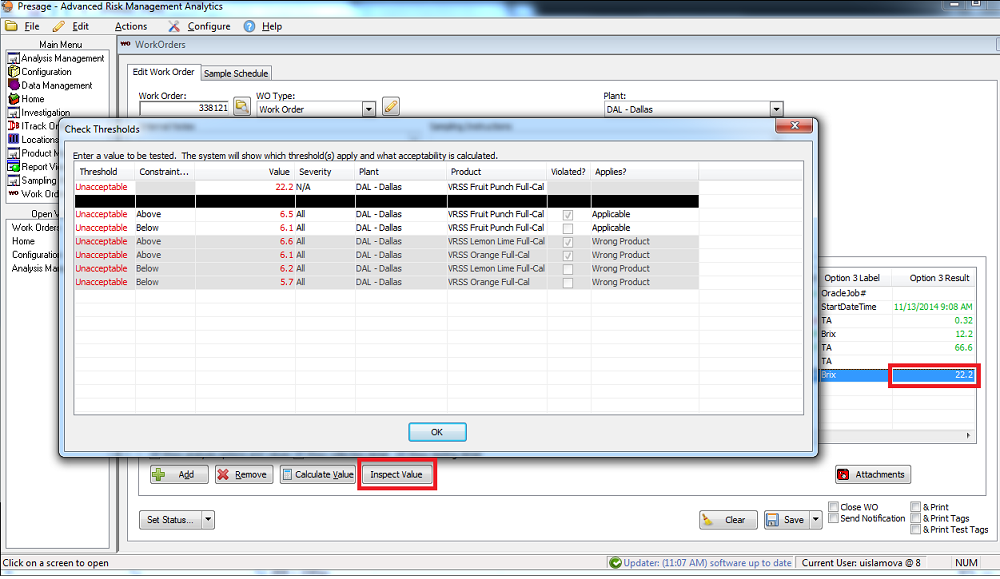
Inspect Value
To inspect how the result acceptability was calculated, select the result then click Inspect Value. A pop-up window will show all the specifications considered in calculating the value acceptability.
Set Status
The Set Status... button on the lower left corner of the screen allows users to change the status of groups of analyses simultaneously. Select All Items... or Only Selected Items..., then To Cancelled to invalidate the analyses in the Work Order. Invalidated samples do not show under Sample History.
Hide Select Columns
To hide some columns, uncheck the appropriate boxes on the lower portion of Sample Detail tab. The Show analysis and option values box hides columns titled Option Name and Option Value. The Show collection detail box hides columns titled Performed On and Performed By. The Show testing detail box hides columns titled Testing Began, Testing Ended and Tested By.
Verification
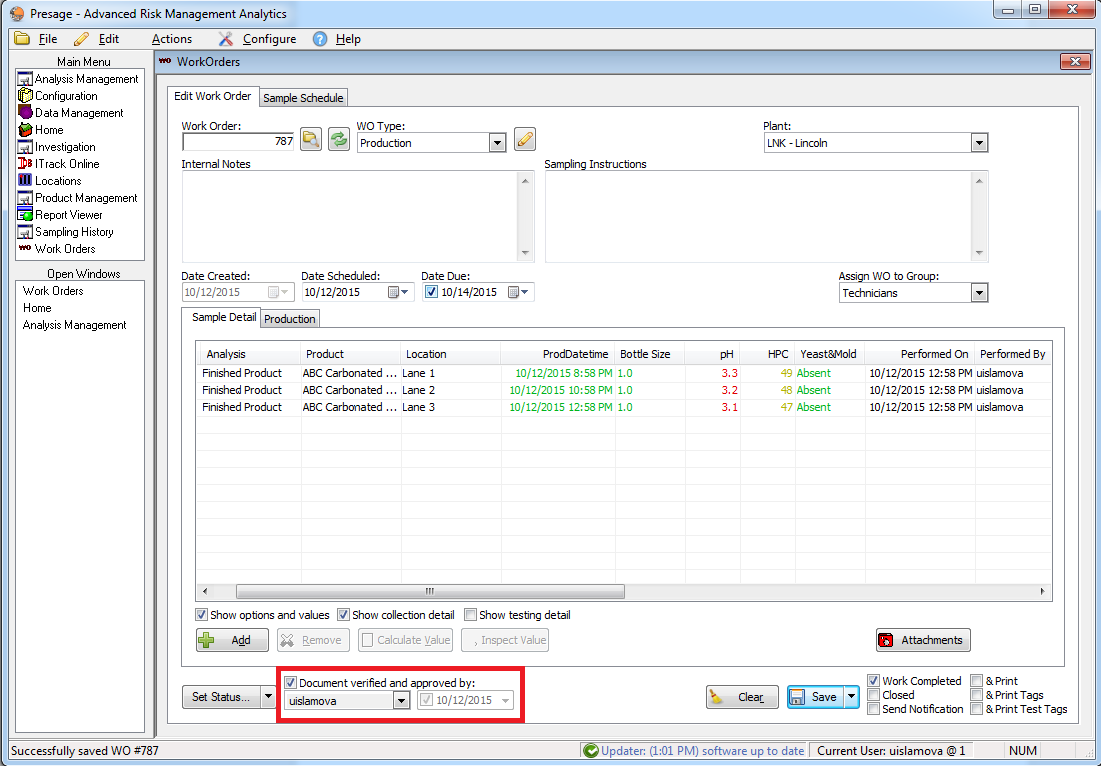
Users supervisory privileges can be given permission to verify work orders. To verify a work order, check the box next to Document verified and approved by: which automatically fill out the user login and current date and time. This information will be visible in the Sampling History screen for each sample.
If a user does not have the permission to verify a work order, this check box is grayed out for them.
a. Permission
Find the permission in Configuration >> Users or Groups tabs.
Permission Name: Verify work orders
Description: Defines whether the user can mark work orders as verified.
b. Work Order Type
Assign Verification requirement per Work Order Type in Configuration >> Work Order Type. Work orders cannot be closed without a verification if Verification Required in checked. Users can still verify a work order if this box is not checked, but it won’t be required to close a work order. Select which group needs to verify the work order. As soon as work order is marked Complete, it will be assigned to this group automatically. Members of this group will have to be aware of their Home screen queue. Make sure to check both My Groups and All in the Assigned To filter in the Home Screen.
Production
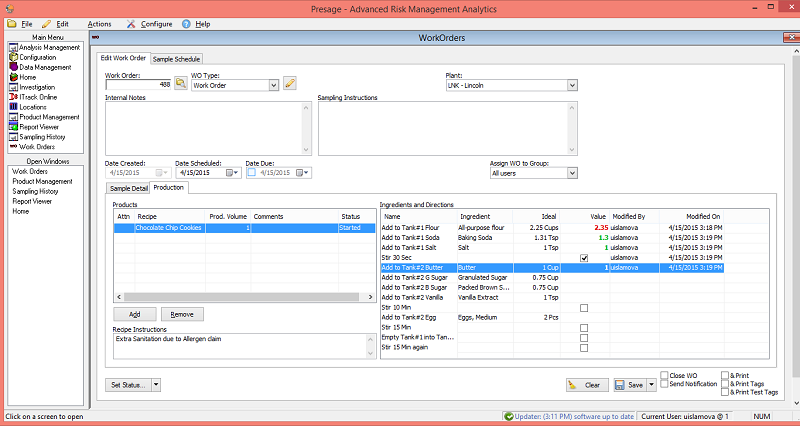
Recipes can be verified or recorded using this screen.
Click 'Add' to add a new recipe to a work order.
Enter the Production Volume, remember this is associated with Batch Volume in the Recipe screen under Product Management. For example, if the Batch Volume is 1, and Production Volume is 1.5. Then all ingredient quantities will be multiplied by 1.5 to give the correct measures for the volume user is working with.
In Value column, users can enter the actual quantities they are using and be able to compare to the ideal quantities configured in the Recipes screen.
There can be data both in the Production and Sample Detail tabs in the Work Order screen so all data is organized under one work order number.
Sample Schedule
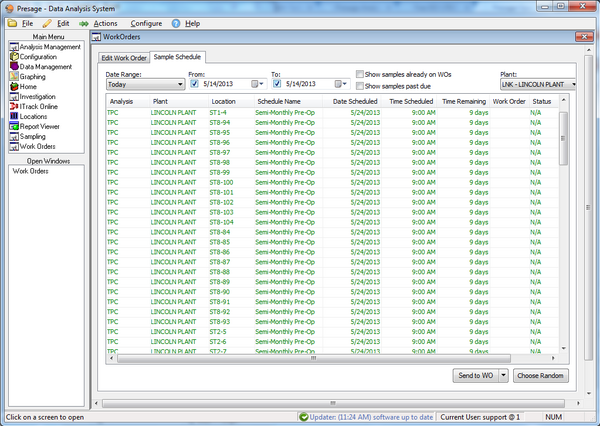
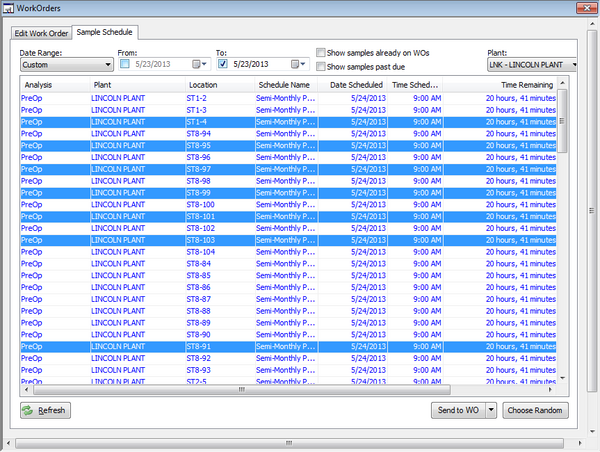
This screen lists all the analysis tests which need to be performed. First column lists the analyses which are created in the Analysis Management screen. Second column lists the plant that particular analysis is scheduled to be tested in. Next column is the site the analysis is assigned to be sampled from. Schedule Name is the interval period the test is performed in; it is created in the Analysis Management. Date scheduled is the date the analysis was created and Time Remaining is the number of days left to perform the test.
Choose the plant from the drop-down menu on the right.
Choose the date range to view analyses scheduled for specific dates. For custom date range, select Custom from the drop-down menu. Then set the From: and To: dates from the calendar icon or type it in. Otherwise, leave the date range as is, as this schedule is ordered by the least number of days remaining to be performed.
Check the Show samples already on Wos box to see all analyses, ones already assigned to a work order in addition to ones not assigned yet. The work order numbers will show up in the second to last column, and work order status will show up in the last column.
Click on the column titles to put the list in order based on the selected category. For example, click on the Analysis column title to order the list alphabetically by analysis names; click on Location to order the list alphabetically based on the name of locations, etc.
This list is color-coded. These colors are the default and can be customized.
Blue samples need to be completed within 24 hours.
Green samples have more than a day left to be completed.
Grey samples are past due.
Note: Past due samples will not automatically move to current schedule. They will have to be manually selected and sent to work orders. Set the date range to the past to see past due orders.
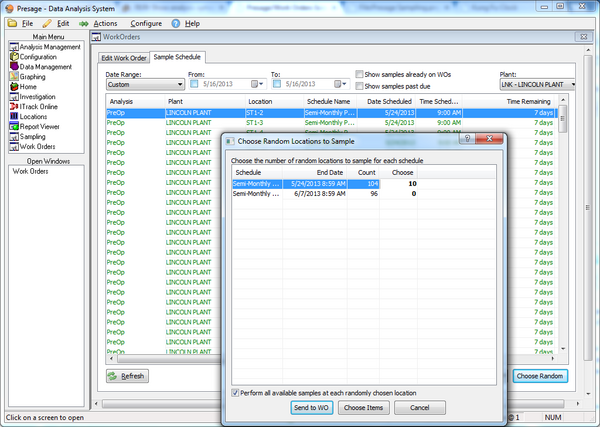
To assign random sights to a work order, click on Choose Random. A new window will pop-up. Specify the number of locations the system should pick out randomly under the Choose column.
Click Choose Items. Random analyses will be selected in the Sample Schedule.
Now, click Send to WO. The highlighted analyses from Sample Schedule will now show up under the Edit Work Order tab.
Make sure the correct Date Scheduled and Plant are selected.
Click Save.
Now, the work order is created and is listed under Work Orders in the Home Screen.
There is also a way to make manual selections. Press on the Ctrl key while making multiple selections on the schedule. Click Send to WO, then Save. Click Clear (before Save) to put samples back to the schedule.
If multiple analyses are assigned to one location, the system can grab all analyses tied to that location to the work order. So, if a user specifies ten locations to be randomly picked out from the Sample Schedule, there may be more than ten analyses in that work order depending on how many analyses are assigned to each location chosen.
To achieve that, simply make selections from the schedule, click on the arrow-down button next to Send to WO, check the box next to the pop-up message Perform all scheduled analyses for each chosen location, then click Send to WO.
Automatic WOs
You can use the Automatic WOs tab to schedule recurring work orders, or make on-demand copies of existing work orders. Automatic and Favorite work orders are set up by plant.
Favorites
In the left portion of the screen, you can set up and manage your Favorite work orders. Use the Date Range menu to automatically populate From and To dates, or you can manually enter dates, just like the Home screen. There are also three check boxes to manage what is shown in this list: - Show open documents: displays open work orders - Show closed documents: displays open work orders - Only show 'favorite' documents: displays only work orders that have already been marked as favorites.
Once you've set up your filters, click the Refresh button in the lower left corner to see the work orders that match your criteria. To mark a work order as Favorite, check the Favorite check box. To remove a work order from your Favorites list, simply uncheck the check box.
Below your list of work orders, you have two additional buttons:
Schedule WO(s) will send the selected work order(s) to the Schedule table.
Copy will immediately make a copy
Scheduled Work Orders
The right portion of the screen allows you to view and manage your scheduled work orders. You can add a new scheduled work order either by using the "Schedule WO(s)" button below the favorites list, or by clicking the Add button and then manually entering the work order number.
There are options which can be set for each scheduled work order. If you hover over the column title, a tooltip will appear with more information about that option.
Schedule Type: Determines how often the work order copy will generate. The options are Daily (Weekdays), Daily, Weekly, Monthly, Quarterly, or Yearly.
Day Offset: Determines how many days into the selected time period must pass before the copy is made. It is only available for Monthly, Quarterly and Yearly schedule types. If you wish for a copy to be generated on the 15th of every month, you would set the Schedule Type to Monthly, and the Day Offset to 15.
Month Offset: This is only available for Quarterly and Yearly, and works the same way as Day Offset. If you want an item to generate in June, you would select Yearly, and set Month Offset to 6. If you want it to generate in the second month of each quarter, you would select Quarterly, and set Month Offset to 2.
Day of Week: Causes a copy to be generated on a given day of the week. This can be used with Weekly, Monthly, Quarterly and Yearly schedule types. If used in conjunction with Day Offset and Month Offset, it will select the first occurrence of the selected day after the other conditions are met. For example, if you wanted a work order generated the second Tuesday of every month, you would select schedule type "Monthly", Day Offset would be set to 7, and Day of Week would be set to Tuesday. The work order would generate the first Tuesday that after 7 days had elapsed in the month. More simply, if you wanted a work order generated every Saturday, you would select Schedule Type of Weekly, and Day of Week of Saturday.
Time of Day: Select which hour you would like the work order to generate. The work orders generate hourly, so if you select a time between two hours, it will be rounded down to the nearest hour.
Next Occurrence: This displays when the work order will clone next. It is helpful when determining whether you have set up the rules you achieve your desired result. Note: After a work order generates, this may erroneously list the time as 12:00 AM, but this can be ignored.
Clone Values: When checked, a copied work order will also copy forward any analysis option values entered on the source work order's samples.
Clone Most Recent: When checked, a copied work order will generate a copy from the most recent copy of the source work order, rather than the original work order. When combined with the Clone Values option, it will also clone forward the analysis option values on the most recent copy, rather than the original source. This can be useful if you have a work order where things may change slowly over time.
Description: A text description, to be filled out with whatever information is helpful to you. Common descriptions include things like "Weekly Calibrations" or "Daily Finished Product Testing".
Date Created: The date the copy rule was set up in Presage.
When you are finished setting up a new work order rule, be sure to click Apply to save your changes!
In addition to the options for configuring work order copy rules, there are additional features to help you manage your scheduled work orders:
Add: Add a new line to the Scheduled Work Order table.
Deleted: Deletes the selected row from the Scheduled Work Order table.
Copy Now: Makes an immediate copy of the selected work order.
Re-run Schedule: If your scheduled work order did not create at the correct time, you can click Re-run Schedule, and it will attempt to recreate any work orders that should have been created in the last hour, and were not.
Apply: Saves any changes made to the Automatic WOs screen.
