ITrack/Enterprise/Part Management Screen
Part Management Screen
| Tip |
| ITrack includes numerous fields to track many aspects of your inventory and your business. Not all fields are required. Fill out the information you deem necessary and save at any time. If you are missing required information, ITrack will notify you with a pop up box. |
Another way to add parts is in the Part Management Screen. There are two main reasons to add parts from this screen
versus the Teardown screen.
- The part you are entering is aftermarket or miscellaneous, you did not purchase the truck from which this part belongs.
- You have a part off of one of your vehicles and wish to enter in more detailed information about it than you are allowed to from the Teardown screen. For example, if you want to upload images of the part.
Access the Part Management Screen by clicking Parts in the Main Menu. Or, bring up the screen by clicking on the Enter Parts button in the Vehicle Management Screen. Then decide which type of part you want to add: Standard, Aftermarket, or Miscellaneous.
When you click on Enter Parts from the Vehicle Management Screen, the vehicle information about the part will automatically fill in.
Adding a New Part
If you click on Parts from the Main Menu, the Part Management Screen will be blank. You can create a new part at any time by clicking on the New Part button, and when you are done entering the necessary information you can either hit the Save & New button or the Save & Close button.
Part Information Tab
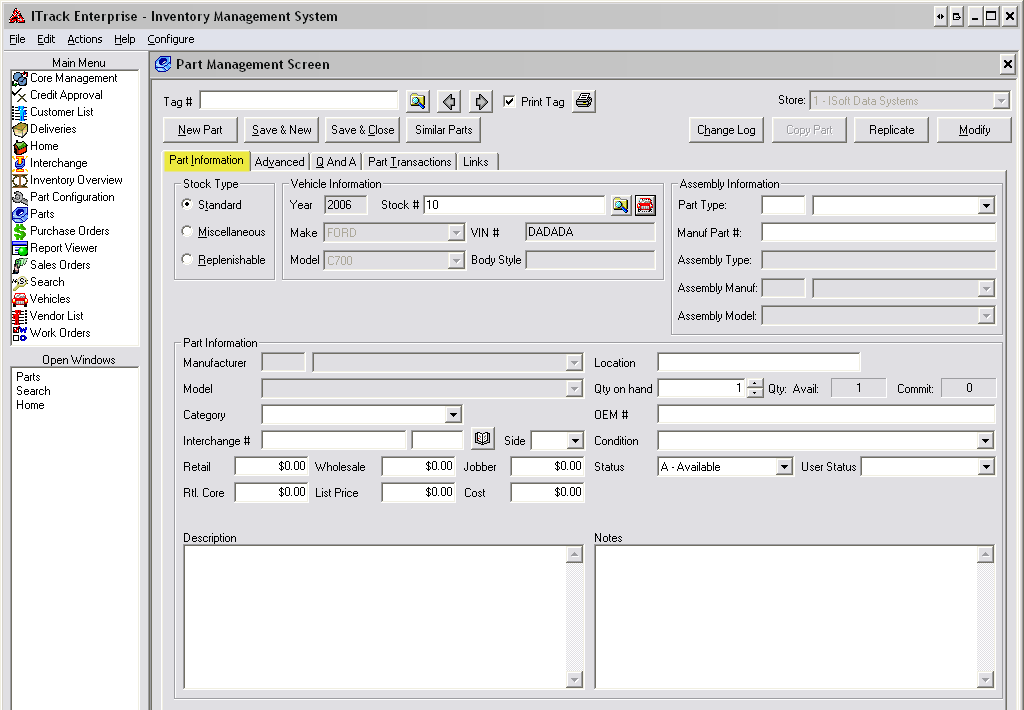
The first tab on the Part Management Screen is Part Information. From this screen you can fill out all of the basic
information about the part.
Stock Type
This is the type of part that you are entering.
- Standard - the default part type. This is the type you would choose if a part came off of a vehicle.
- Miscellaneous - This is the type you would choose if an item did not come off of one of your vehicles, for example: if you purchased the item at an auction.
- Replenishable - This is an item that you would like to constantly keep in stock. For example: gasket kit
| Tip |
| If the part you are entering is from a vehicle you entered, some of the information such as Make and Model will already be filled out for you. |
Vehicle Information
Where you can enter information about the vehicle that you took the part off of. This section is only useful if the part has a stock type of "standard."
Assembly Information
This section allows you to fill out what type of part you are entering (is it an engine assembly or a pressure plate?)
Part Information Section
Under this section you can give more detailed information about the part you are entering. You can select the part's manufacturer and model, the status of the part (available, on hold, sold, etc), as well as what its retail and wholesale price should be.
Advanced Tab
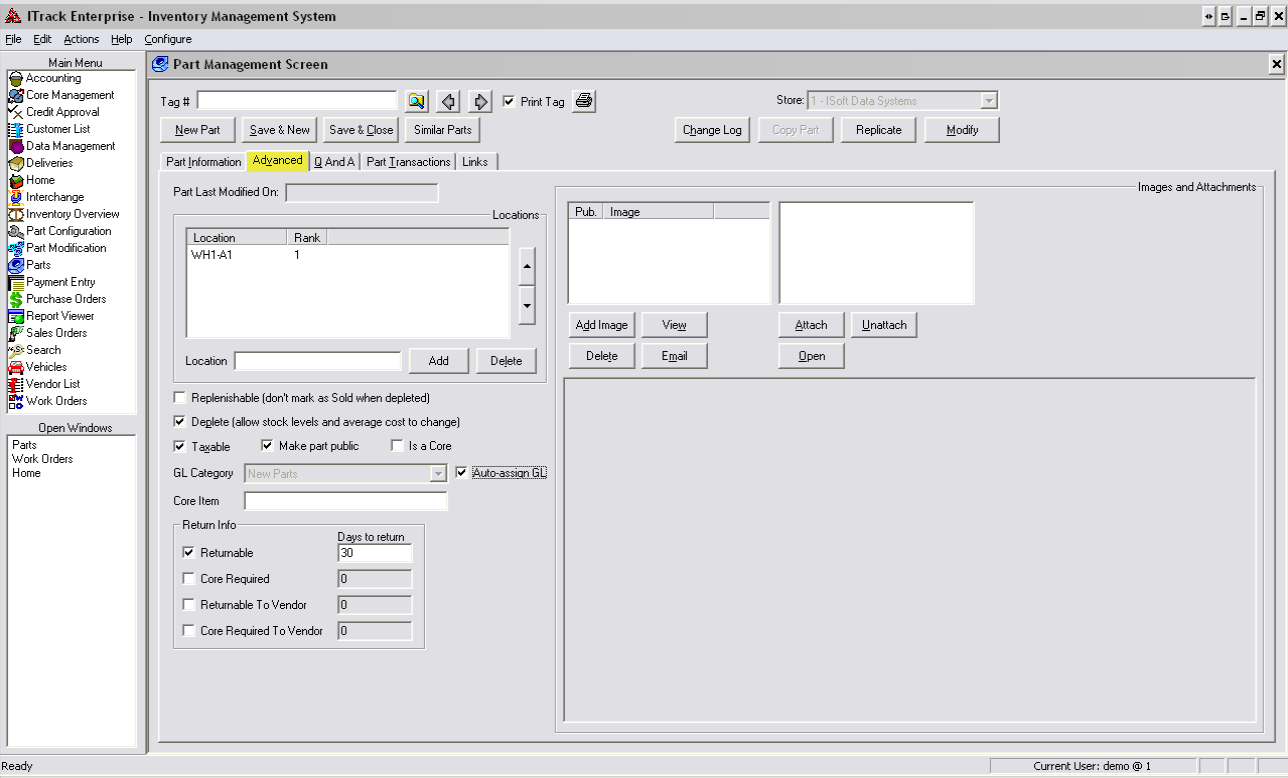
The Advanced tab allows you to enter more information about your parts. From this tab you can view locations for the
part, create build orders, and add images and attachments.
Locations
From the Advanced tab in the Part Management Screen you can specify locations for parts. To add a location, simply type in the location name and click the Add button. To delete a location click on it in the location section and then hit the Delete button.
Images and Attachments
When you are adding a part to inventory it is often a good idea to include an image of it. To upload an image of a part go to the Advanced tab of the Part Management Screen and click on the Add Image button. A dialog will appear and you will need to navigate to where your image is stored. Once you have found the image, double click on it (or hit the Open button) and it will be associated with the part. The image you just selected will now show in the preview box.
| Tip |
| You many enter an unlimited number of images and attachments for each part. |
You can view the image, delete it, or email it by clicking on the respective button associated with those actions.
Attaching files to a part is also useful; an example of an attachment would be if there was an email sent about the part.
You could save it as a text document and then attach the file to the part. To add an attachment to a vehicle click on the
Attach button. As with images, a dialog will pop up and you will need to double click on the file you would like to
attach. Double clicking on the list of attachments or clicking on the Open button will open up the attachment so that
you can see it.
The Pub. column defines if a particular image will be displayed on web. If the check box next to the image it is not checked, it won't be displayed on the web but will still be viewable in ITrack.
Miscellaneous Options of the Advanced Tab
There are other options that you can set in the Advanced Tab:
- Replenishable - The item will not be marked as Sold when it is depleted.
- Deplete - Allow the stock levels and average cost to change.
- Taxable - Allow tax to be charged on the item.
- Make Part Public - Makes the part available on the web
- Is a core - Determines if this item is a core (this will disable the Core Item field)
- GL Category - How this item should be categorized (New Part, Labor, Dirty Core, etc).
- Auto-assign GL - When this is checked it will automatically assign the GL Category based on Vehicle, Manufacturer, or Vendor; when this box is unchecked you can set the GL Category to whatever you want.
- Core Item - The core item that this part came off of.
Return Info
This section allows you to set the return policy on the item. It lets you customize your return policy in terms of how many days a customer has to return the item, whether or not the core is required, and whether or not they should contact the vendor.
Question & Answer Tab
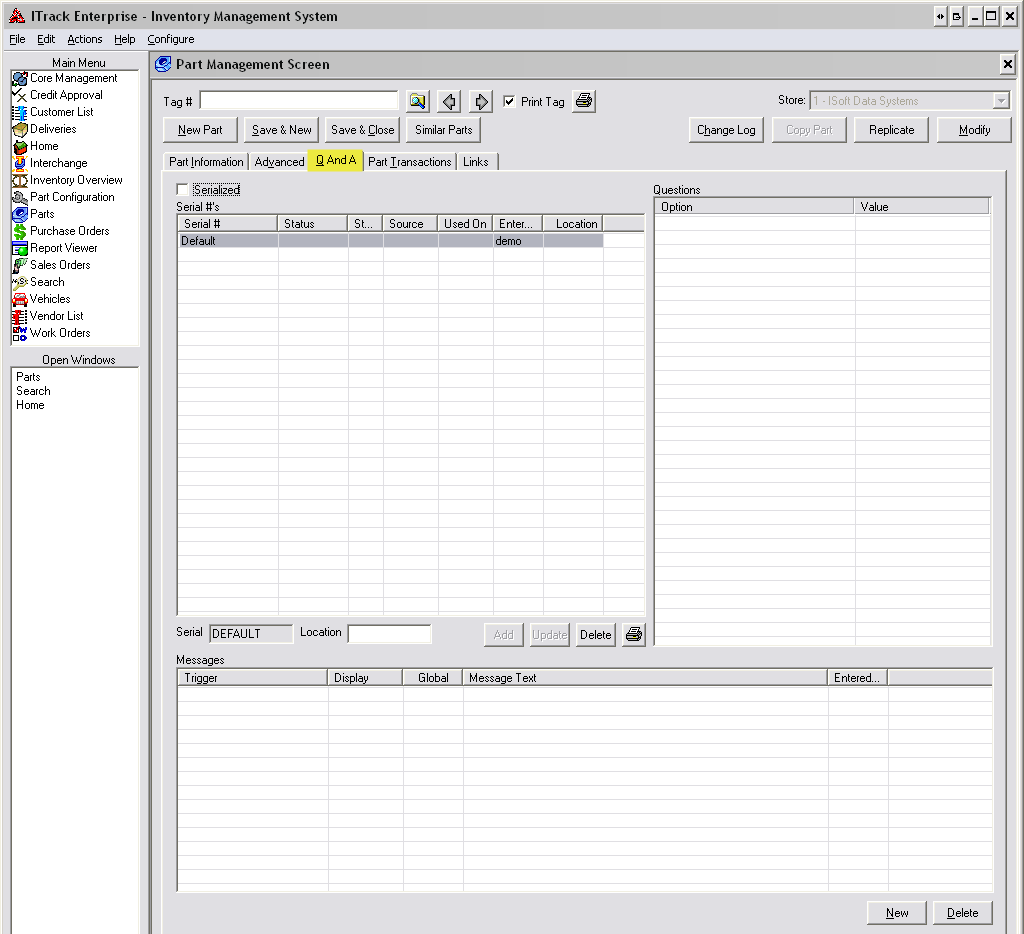
The Q&A tab can be used along with the Part Configuration Screen for a variety of purposes. The Part Configuration Screen
is used to set up the questions for a particular part type, while the Q&A tab is used to fill in the answers to those
questions. If you have a new employee you may want them to ask questions for additional info you will need (like the ratio
of a transmission), or you could use Q&A for upsales - Do you need a gasket as well?
Serialized
You can add different sets of answers for a part by using the Serialized section. To do this, the Serialized box must be checked. Once you have done that, ITrack will allow you to Add, Update, and Delete question sets.
Why is it useful to have sets of answers?
- You may have a set of answers that you want Location A to give, but Location B does things a little bit differently, so they need a different set of answers.
- You might need different answers at different times of the year, such as the holiday season, or when you are having a special sale.
Questions
The Questions section is where you type in the answers to the part type questions. This area is the main section of the Q&A tab.
Messages
The Messages section allows you to set up a trigger, so that notifications will pop up under certain conditions. For example, every time a customer buys a front suspension you can have a message pop up asking if they would like a rear suspension as well.
| Tip |
| If the trigger is set to Global, then every time an item of this type is sold it will display the message. If the trigger is not set to Global then it will only display the message for this single item. |
Part Transactions Tab
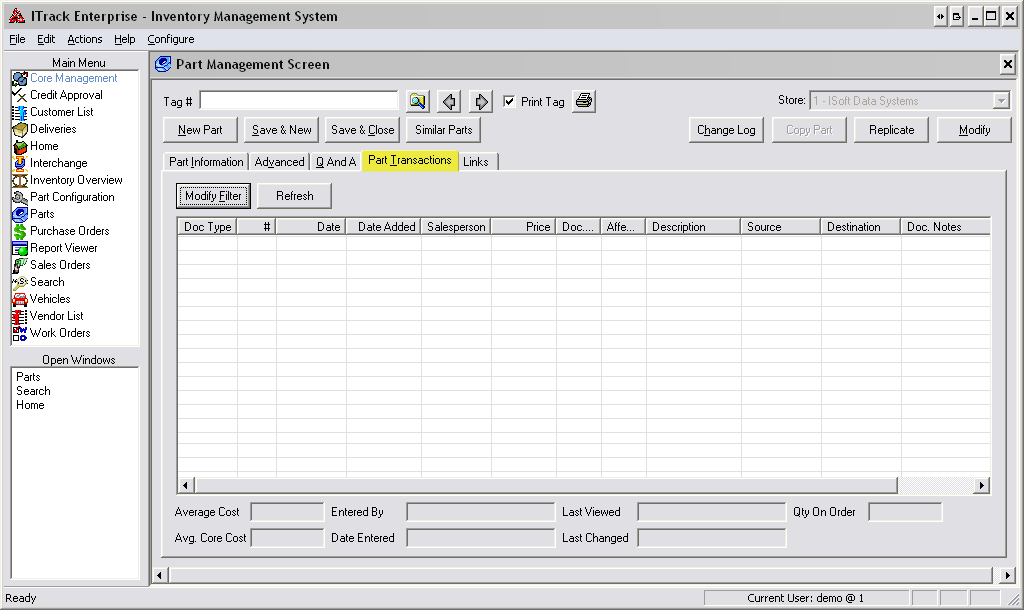
This tab shows the history of a part. All Sales Orders, Purchase Orders, Transfer Orders, and Work Orders where this part
was involved will be displayed here.
The Modify Filter button lets you choose what criteria you want the Part Transactions tab to show. You can have it show only Work Orders within the last 30 days, or you can show everything except Sales Orders for the last year. There are a variety of options that you can customize your search for. After you have changed the search criteria for the Part Transactions tab you can display the new information by clicking on the Refresh button.
Links Tab
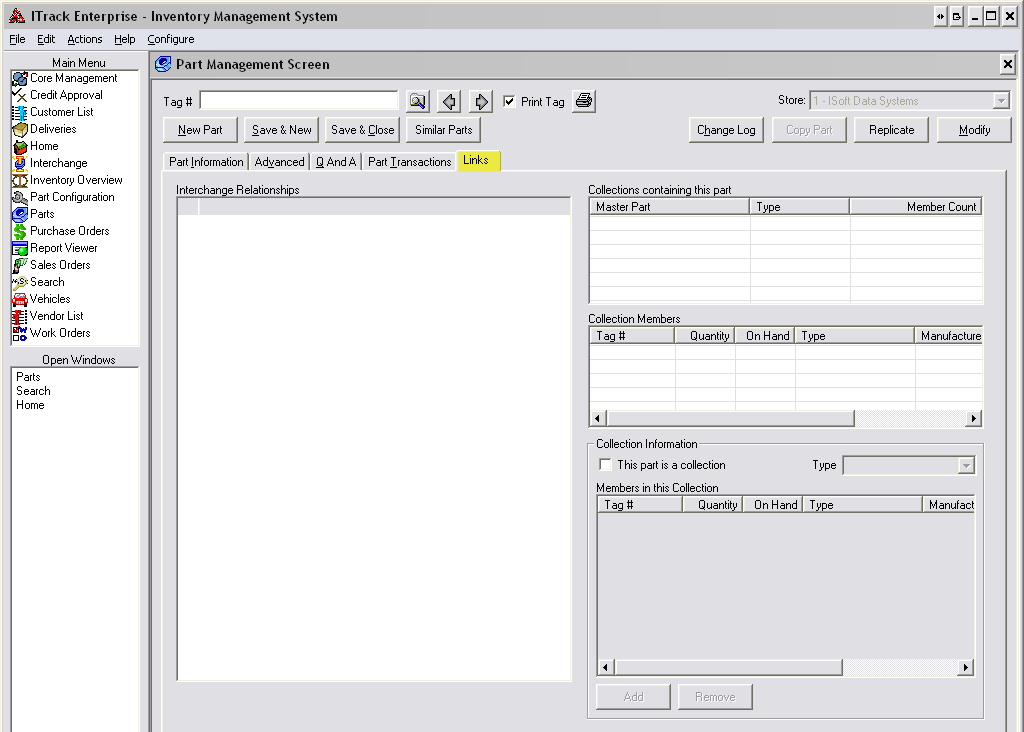
Part-by-part relationships between interchange parts can be edited in this tab. Two different manufacturers may call the
same part type two different things (hubcaps vs rims). If you create a link, it will suggest other possible names of this
part.
Replenishable Tab
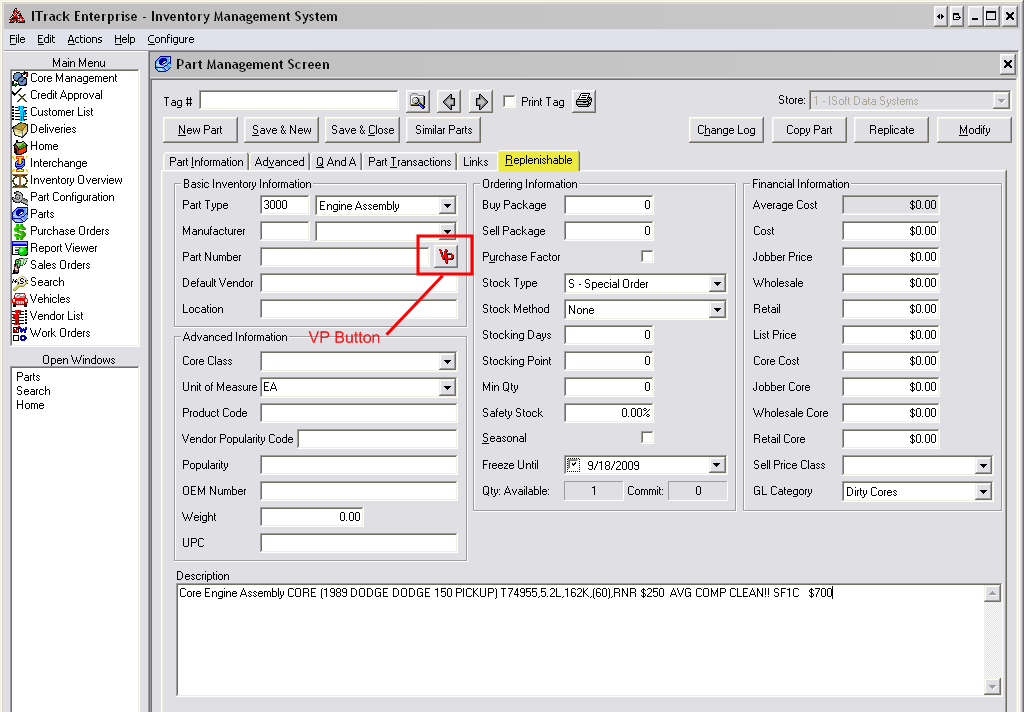
This tab only appears if the part is marked as replenishable on the Part Information Tab. The tab keeps track of the
quantity on hand for this particular replenishable part. It also shows when that item is starting to get low, and when it
hits the reorder point.
Once you hit the VP button beside the part number field, ITrack Enterprise will take you to the Inventory Overview Screen and fill in the related information so that it is quick and easy to reorder parts from a vendor.
Purchase Factor is used to denote if the Buy Package quantity is a single unit to the vendor. In example, if the part is washers and the Buy Package Quantity is 500, then checking the Purchase Factor checkbox will make the PRINTED PO for 1,000 washers show a quantity of 2, while the system value will still be 1,000 quantity.
Safety Stock can more or less be ignored. The main fields you will want to pay attention to when reordering a replenishable part are Minimum Quantity and Stocking Point (the amount of this item you would regularly like to have on hand). Once those fields are filled out you can use the Inventory Overview screen to suggest new orders.
One more thing you should check is that Stock Method should be set to Min/Max. If that field is set to Min/Max then it can be reordered, if it is set to None then it can not be reordered, and the field History is still under development at the moment.

