Difference between revisions of "ITrack/Enterprise/Part Configuration Screen"
(Put a few links in) |
(Made the page all pretty. It's so pretty now that you should marry it.) |
||
| Line 4: | Line 4: | ||
==Parts List Tab== | ==Parts List Tab== | ||
The Parts List Tab displays a list of part types and information regarding each part type. In particular the 'Active' checkbox is worth noting; if the box is checked then it is a part type that your company uses, otherwise that is not an active part used by your company. | The Parts List Tab displays a list of part types and information regarding each part type. In particular the 'Active' checkbox is worth noting; if the box is checked then it is a part type that your company uses, otherwise that is not an active part used by your company. | ||
[[Image:EnterprisePartConfig_PartsList.png|thumb|center|700px]] | [[Image:EnterprisePartConfig_PartsList.png|thumb|center|700px]] | ||
There are also buttons along the bottom of the screen: | There are also buttons along the bottom of the screen: | ||
* Add - To add a new part type click on the Add button. A dialog box will pop up; fill in the information and hit OK. | |||
* Edit - This will bring up a dialog box where you can make changes to the part's information | * '''Add''' - To add a new part type click on the Add button. A dialog box will pop up; fill in the information and hit OK. | ||
* Remove - This button will allow you to delete a part type from ITrack. | * '''Edit''' - This will bring up a dialog box where you can make changes to the part's information | ||
* '''Remove''' - This button will allow you to delete a part type from ITrack. | |||
{{Tip|The information in the 'More Fields' will help you locate this part in the [[ITrack/Enterprise/Search_Screen|Search Screen]]}} | {{Tip|The information in the 'More Fields' will help you locate this part in the [[ITrack/Enterprise/Search_Screen|Search Screen]]}} | ||
* Edit Part Questions - Pressing this button will show a new window where you can add and remove questions for the Q&A section of the [[ITrack/Enterprise/Part_Management_Screen|Part Management Screen]]. The window will also display how many individual parts have answers to each question. | |||
* Edit part messages - Once this button is pressed a new dialog pops up; it will let you set 'triggers' (messages that appear under certain conditions). The triggers let you determine where the messages show up, how they show up, the text of the message, the start/end date, etc. | * '''Edit Part Questions''' - Pressing this button will show a new window where you can add and remove questions for the Q&A section of the [[ITrack/Enterprise/Part_Management_Screen|Part Management Screen]]. The window will also display how many individual parts have answers to each question. | ||
* '''Edit part messages''' - Once this button is pressed a new dialog pops up; it will let you set 'triggers' (messages that appear under certain conditions). The triggers let you determine where the messages show up, how they show up, the text of the message, the start/end date, etc. | |||
For example, you can create a message for the month of July, letting customers know that engine assemblies are 25% off. | For example, you can create a message for the month of July, letting customers know that engine assemblies are 25% off. | ||
| Line 23: | Line 28: | ||
Once a manufacturer is matched up with a specific part type that they make, the results area will populate. The results can be further filtered by entering information into the '''Filter''' textbox and clicking on the '''Refresh''' button. | Once a manufacturer is matched up with a specific part type that they make, the results area will populate. The results can be further filtered by entering information into the '''Filter''' textbox and clicking on the '''Refresh''' button. | ||
[[Image:EnterprisePartConfig_InventoryModels.png|thumb|center|700px]] | [[Image:EnterprisePartConfig_InventoryModels.png|thumb|center|700px]] | ||
When the results area has been populated you can double-click on a model to edit information about it. | When the results area has been populated you can double-click on a model to edit information about it. | ||
In the ''Manufacturers'' area you can add a new manufacturer, edit an existing one, or remove a manufacturer by clicking on the respective button. You can do the same thing for specific models in the ''Models'' section. You can also click on the ''Edit Prices'' checkbox to bring up a new area that will let you type in the list, retail, and wholesale prices of the inventory model that you have selected. | In the ''Manufacturers'' area you can add a new manufacturer, edit an existing one, or remove a manufacturer by clicking on the respective button. You can do the same thing for specific models in the ''Models'' section. You can also click on the ''Edit Prices'' checkbox to bring up a new area that will let you type in the list, retail, and wholesale prices of the inventory model that you have selected. | ||
[[Image:EnterprisePartConfig_InventoryModels2.png|thumb|center|700px]] | [[Image:EnterprisePartConfig_InventoryModels2.png|thumb|center|700px]] | ||
==Vehicle Models== | ==Vehicle Models== | ||
[[Image:EnterprisePartConfig_VehicleModels.png|thumb|center|700px]] | [[Image:EnterprisePartConfig_VehicleModels.png|thumb|center|700px]] | ||
The Vehicle Models screen lists all vehicle models made by each manufacturer. For example, the manufacturer 'Ford' made the vehicle model 'f900'. | The Vehicle Models screen lists all vehicle models made by each manufacturer. For example, the manufacturer 'Ford' made the vehicle model 'f900'. | ||
Fields in the Results Area include: | Fields in the Results Area include: | ||
To view what models are available for each manufacturer you need to click on the manufacturer name on the left side of the screen. | * '''Active''' - If this option is checked, then this is a vehicle model used by your company. | ||
* '''Model''' - The vehicle model | |||
* '''First Year''' - The year that the vehicle became available. If the Ford f900 was not made until 2009, then the value in this field should be 2009, otherwise it should be set to 0. | |||
* '''Last Year''' - The final year that a vehicle was available. If the Ford f900 was discontinued in 2008, then the value should be 2008, if the model is still in service then it should be set to 9999. | |||
* '''Teardown''' - Tells you whether the vehicle is a car or a truck. | |||
* '''Series''' - Describes what series a model belongs to. | |||
{{Tip|To view what models are available for each manufacturer you need to click on the manufacturer name on the left side of the screen.}} | |||
* Check All Button - Set every model in the results are to active. | * '''Add Button''' - Allows you to add a new vehicle model. | ||
* Uncheck All Button - Set every model in the results area to inactive. | * '''Edit Button''' - Edit whichever model has been selected. | ||
* '''Remove Button''' - Remove the selected model. | |||
* '''Check All Button''' - Set every model in the results are to active. | |||
* '''Uncheck All Button''' - Set every model in the results area to inactive. | |||
==Categories== | ==Categories== | ||
[[Image:EnterprisePartConfig_Categories.png|thumb|center|700px]] | [[Image:EnterprisePartConfig_Categories.png|thumb|center|700px]] | ||
From this tab you can decide what categories (new, used, rebuilt, etc) are available for all parts. For example, if your company decided not to sell any rebuilt engine assemblies than you can uncheck the box next to '''Rebuilt''' and when you enter the part in the Parts Screen the 'Rebuilt' option will not appear in the category drop down menu. | From this tab you can decide what categories (new, used, rebuilt, etc) are available for all parts. For example, if your company decided not to sell any rebuilt engine assemblies than you can uncheck the box next to '''Rebuilt''' and when you enter the part in the Parts Screen the 'Rebuilt' option will not appear in the category drop down menu. | ||
| Line 64: | Line 80: | ||
==Teardowns== | ==Teardowns== | ||
[[Image:EnterprisePartConfig_Teardowns.png|thumb|center|700px]] | [[Image:EnterprisePartConfig_Teardowns.png|thumb|center|700px]] | ||
Different types of teardowns can be created on this tab. For example, you can create a teardown called 'Car' where you define that it can have every part type except a semi-trailer. You can create a teardown called 'Truck' where all part types are allowed, or you can create a teardown called Ford where you decide that you don't want to keep any engines off of Ford Trucks. | Different types of teardowns can be created on this tab. For example, you can create a teardown called 'Car' where you define that it can have every part type except a semi-trailer. You can create a teardown called 'Truck' where all part types are allowed, or you can create a teardown called Ford where you decide that you don't want to keep any engines off of Ford Trucks. | ||
All of this can be customized by selecting the teardown and checking/unchecking the box next to part types that you do or do not want to salvage from a vehicle. | All of this can be customized by selecting the teardown and checking/unchecking the box next to part types that you do or do not want to salvage from a vehicle. | ||
To add a new teardown click on the '''Add''' button, and to remove a teardown click on the '''Remove''' button. | To add a new teardown click on the '''Add''' button, and to remove a teardown click on the '''Remove''' button. | ||
* Select All - Will check all of the part types in the results area. | * '''Select All''' - Will check all of the part types in the results area. | ||
* Deselect All - Unchecks all of the part types in the results area. | * '''Deselect All''' - Unchecks all of the part types in the results area. | ||
* Invert Selection - Will change currently checked items to unchecked and vice versa. | * '''Invert Selection''' - Will change currently checked items to unchecked and vice versa. | ||
* Q&A - This is where you can add/remove Questions and Answers | * '''Q&A''' - This is where you can add/remove Questions and Answers in the [[ITrack/Enterprise/Vehicle_Management_Screen|Vehicle Management Screen]]. | ||
==Service Units== | ==Service Units== | ||
| Line 84: | Line 103: | ||
While a dump truck will have tires, license plate, and dump bed assigned to it... | While a dump truck will have tires, license plate, and dump bed assigned to it... | ||
[[Image:EnterprisePartConfig_ServiceUnits.png|thumb|center|700px]] | [[Image:EnterprisePartConfig_ServiceUnits.png|thumb|center|700px]] | ||
A generator will have only Watts. | A generator will have only Watts. | ||
[[Image:EnterprisePartConfig_ServiceUnits2.png|thumb|center|700px]] | [[Image:EnterprisePartConfig_ServiceUnits2.png|thumb|center|700px]] | ||
* Include All - Assign all available properties to a Service Unit. | |||
* >> - Assign a property to a Service Unit. | * '''Include All''' - Assign all available properties to a Service Unit. | ||
* << - Remove a property from a unit type. | * '''>>''' - Assign a property to a Service Unit. | ||
* Clear All - Remove all properties from a Service Unit. | * '''<<''' - Remove a property from a unit type. | ||
* '''Clear All''' - Remove all properties from a Service Unit. | |||
You can add, edit, or remove a Service Unit by clicking on the respective button. Adding, removing, and editing properties works the same way. | You can add, edit, or remove a Service Unit by clicking on the respective button. Adding, removing, and editing properties works the same way. | ||
[[Category:ITrack/Enterprise]] | [[Category:ITrack/Enterprise]] | ||
Latest revision as of 15:21, 4 December 2009
Parts Configuration Screen
The Parts Configuration Screen is used to configure a variety of different functions within ITrack.
Parts List Tab
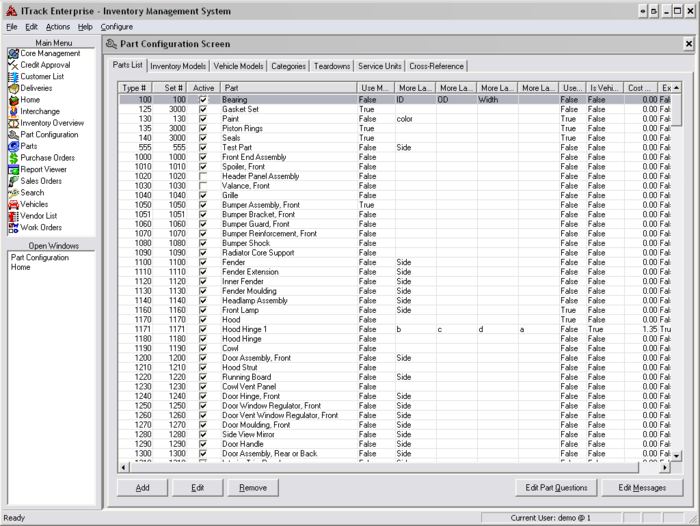
The Parts List Tab displays a list of part types and information regarding each part type. In particular the 'Active' checkbox is worth noting; if the box is checked then it is a part type that your company uses, otherwise that is not an active part used by your company.
There are also buttons along the bottom of the screen:
- Add - To add a new part type click on the Add button. A dialog box will pop up; fill in the information and hit OK.
- Edit - This will bring up a dialog box where you can make changes to the part's information
- Remove - This button will allow you to delete a part type from ITrack.
| Tip |
| The information in the 'More Fields' will help you locate this part in the Search Screen |
- Edit Part Questions - Pressing this button will show a new window where you can add and remove questions for the Q&A section of the Part Management Screen. The window will also display how many individual parts have answers to each question.
- Edit part messages - Once this button is pressed a new dialog pops up; it will let you set 'triggers' (messages that appear under certain conditions). The triggers let you determine where the messages show up, how they show up, the text of the message, the start/end date, etc.
For example, you can create a message for the month of July, letting customers know that engine assemblies are 25% off.
Inventory Models Tab
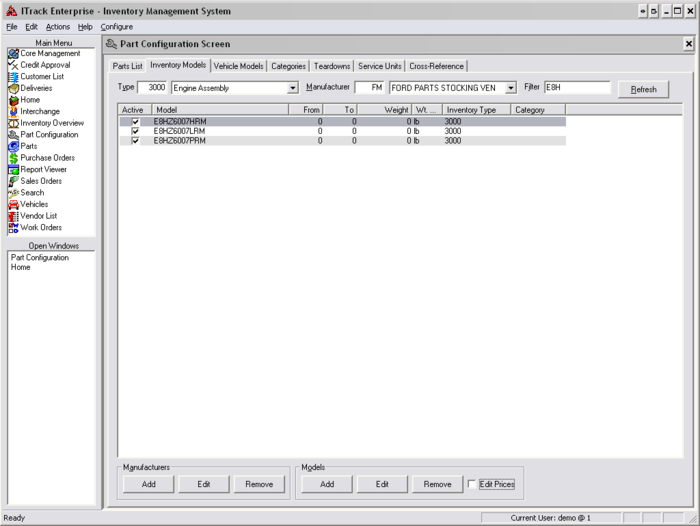
This tab allows you to change information about specific inventory models - such as a part's weight, year range, and whether or not it is active.
Once a manufacturer is matched up with a specific part type that they make, the results area will populate. The results can be further filtered by entering information into the Filter textbox and clicking on the Refresh button.
When the results area has been populated you can double-click on a model to edit information about it.
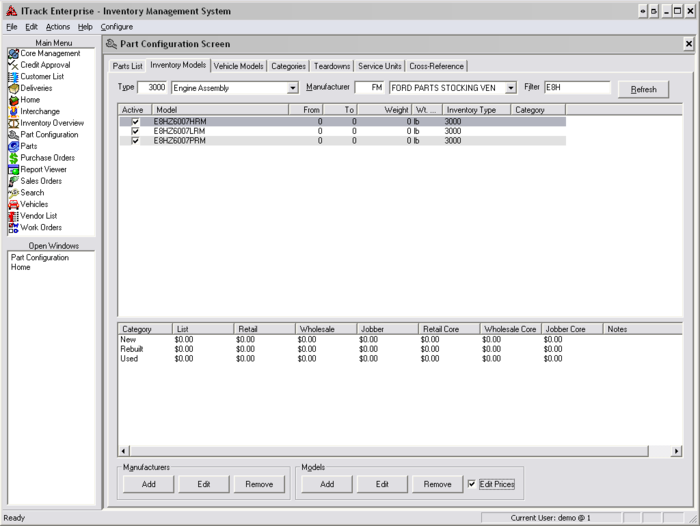
In the Manufacturers area you can add a new manufacturer, edit an existing one, or remove a manufacturer by clicking on the respective button. You can do the same thing for specific models in the Models section. You can also click on the Edit Prices checkbox to bring up a new area that will let you type in the list, retail, and wholesale prices of the inventory model that you have selected.
Vehicle Models
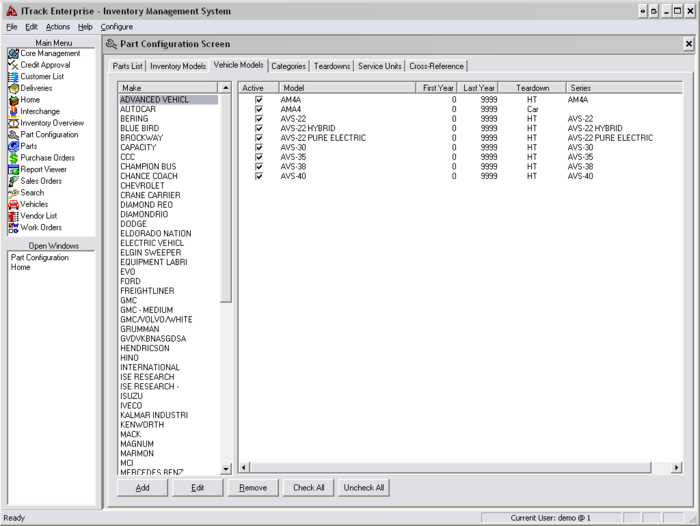
The Vehicle Models screen lists all vehicle models made by each manufacturer. For example, the manufacturer 'Ford' made the vehicle model 'f900'.
Fields in the Results Area include:
- Active - If this option is checked, then this is a vehicle model used by your company.
- Model - The vehicle model
- First Year - The year that the vehicle became available. If the Ford f900 was not made until 2009, then the value in this field should be 2009, otherwise it should be set to 0.
- Last Year - The final year that a vehicle was available. If the Ford f900 was discontinued in 2008, then the value should be 2008, if the model is still in service then it should be set to 9999.
- Teardown - Tells you whether the vehicle is a car or a truck.
- Series - Describes what series a model belongs to.
| Tip |
| To view what models are available for each manufacturer you need to click on the manufacturer name on the left side of the screen. |
- Add Button - Allows you to add a new vehicle model.
- Edit Button - Edit whichever model has been selected.
- Remove Button - Remove the selected model.
- Check All Button - Set every model in the results are to active.
- Uncheck All Button - Set every model in the results area to inactive.
Categories
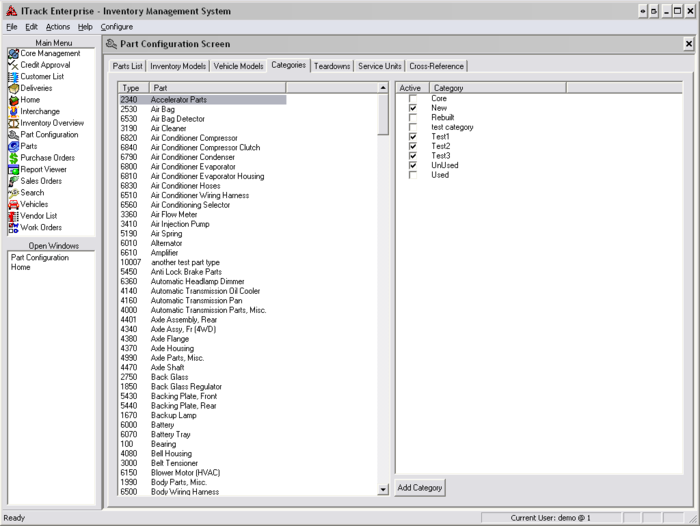
From this tab you can decide what categories (new, used, rebuilt, etc) are available for all parts. For example, if your company decided not to sell any rebuilt engine assemblies than you can uncheck the box next to Rebuilt and when you enter the part in the Parts Screen the 'Rebuilt' option will not appear in the category drop down menu.
You can add a new category by clicking on the Add Category button.
Teardowns
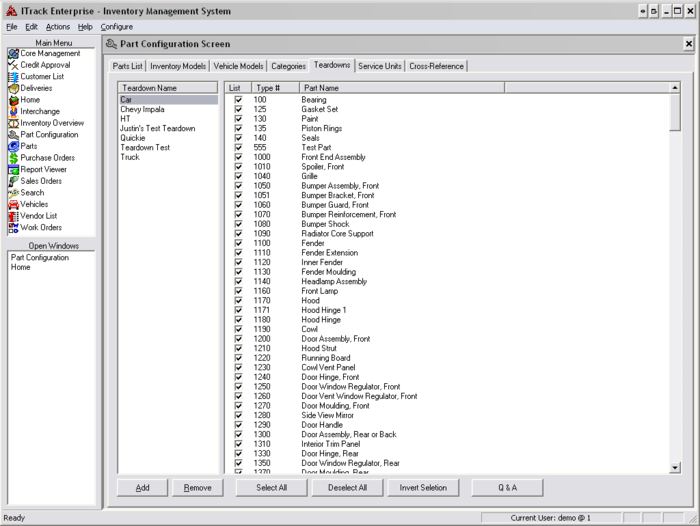
Different types of teardowns can be created on this tab. For example, you can create a teardown called 'Car' where you define that it can have every part type except a semi-trailer. You can create a teardown called 'Truck' where all part types are allowed, or you can create a teardown called Ford where you decide that you don't want to keep any engines off of Ford Trucks.
All of this can be customized by selecting the teardown and checking/unchecking the box next to part types that you do or do not want to salvage from a vehicle.
To add a new teardown click on the Add button, and to remove a teardown click on the Remove button.
- Select All - Will check all of the part types in the results area.
- Deselect All - Unchecks all of the part types in the results area.
- Invert Selection - Will change currently checked items to unchecked and vice versa.
- Q&A - This is where you can add/remove Questions and Answers in the Vehicle Management Screen.
Service Units
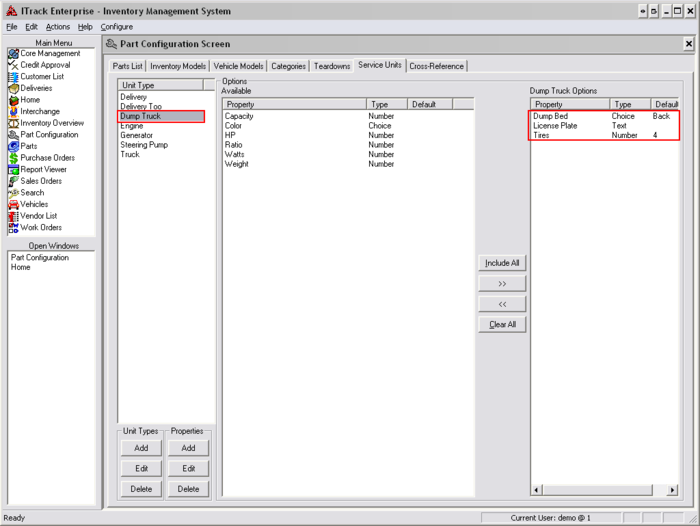
A service unit is the vehicle or part being worked on, on a service order (a type of work order). So if the truck yard is fixing a generator, then 'generator' will be the service unit. If the truck yard is changing the oil on a dump truck, then 'dump truck' is the service unit.
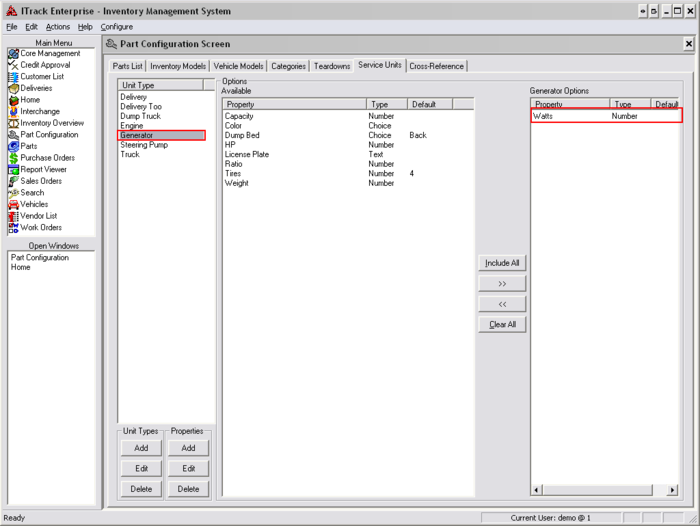
The Unit Type area on the left shows the service units you can use. The Options Available section in the middle lists the properties that have not been added to this particular type of service unit, while the Options section on the right side of the screen shows the options that have been added to the service unit.
While a dump truck will have tires, license plate, and dump bed assigned to it...
A generator will have only Watts.
- Include All - Assign all available properties to a Service Unit.
- >> - Assign a property to a Service Unit.
- << - Remove a property from a unit type.
- Clear All - Remove all properties from a Service Unit.
You can add, edit, or remove a Service Unit by clicking on the respective button. Adding, removing, and editing properties works the same way.
