Difference between revisions of "ITrack/Enterprise/QuickStart"
(Filled in the missing links) |
|||
| (5 intermediate revisions by 3 users not shown) | |||
| Line 14: | Line 14: | ||
[[Image: | [[Image:Login.png|center]] | ||
Type your | Enterprise will automatically insert your Windows username into the username field here. If it is not the same, you can just begin typing to overwrite it; if it is the same simply hit '''Tab''' to go to the password field. Type in your password and, if necessary, select the store to log into from the dropdown. Then, click '''Login''' or hit '''Enter''' to log into Enterprise. | ||
{{Tip|Your password is case sensitive, but the username is NOT case sensitive. For example, if you were using ITrackHT as the password it is different from itrackht.}} | {{Tip|Your password is case sensitive, but the username is NOT case sensitive. For example, if you were using ITrackHT as the password it is different from itrackht.}} | ||
{{Tip|You can control which store is selected by default once in Enterprise. Go to '''Edit''' on the Main Menu at the top, then '''Options.''' On the pop up window, go to the '''Company''' tab. There you will find a store selection dropdown, select which store you normally log in as and hit '''OK.'''}} | |||
Congratulations, you are now ready to use ITrack Enterprise! | Congratulations, you are now ready to use ITrack Enterprise! | ||
Additional users can be created and modified by following the instructions in the | Additional users can be created and modified by following the instructions in the Itrack Enterprise for Heavy Trucks: Administrators Guide or contact your manager and have them add you as a new user. | ||
| Line 35: | Line 34: | ||
ITrack Enterprise is different from other inventory management systems because it allows you to open multiple screens. | ITrack Enterprise is different from other inventory management systems because it allows you to open multiple screens. This allows you to easily toggle back and forth between screens, you can interrupt a task without canceling it. For instance, it is possible to conduct a search while editing a customer record. | ||
Below the [[ITrack/Enterprise/Home_Screen|Main Menu]] you will see an ''Open Windows'' list. Every time you open a new screen from the ''Main Menu'', it will show up in the ''Open Windows'' list. This will show you which screens you have open. You can easily switch to an open screen by clicking it in the list. | Below the [[ITrack/Enterprise/Home_Screen|Main Menu]] you will see an ''Open Windows'' list. Every time you open a new screen from the ''Main Menu'', it will show up in the ''Open Windows'' list. This will show you which screens you have open. You can easily switch to an open screen by clicking it in the list. | ||
| Line 41: | Line 40: | ||
==QuickStart Entering Vehicles== | ==QuickStart Entering Vehicles== | ||
Clicking on the ''Vehicles'' in the [[ITrack/Enterprise/Home_Screen|Main Menu]] will bring up the [[ITrack/Enterprise/Vehicle Management Screen|Vehicle Management Screen]]. The form that opens is blank, with the ''Basic'' tab selected | Clicking on the ''Vehicles'' in the [[ITrack/Enterprise/Home_Screen|Main Menu]] will bring up the [[ITrack/Enterprise/Vehicle Management Screen|Vehicle Management Screen]]. The form that opens is blank, with the ''Basic'' tab selected. | ||
| Line 47: | Line 46: | ||
Enter the VIN number for the vehicle. ITrack Enterprise will automatically fill out several of the fields for you based in VIN information. The remaining fields in the Basic tab are optional. The ''Advanced, Info and Q and A'' tabs have additional optional fields that allow you to enter more information about the vehicle. | Enter the VIN number for the vehicle. ITrack Enterprise will automatically fill out several of the fields for you based in VIN information. Year, Make, Model, Type and Unit Category are required fields. The remaining fields in the Basic tab are optional. The ''Advanced, Info and Q and A'' tabs have additional optional fields that allow you to enter more information about the vehicle. | ||
==QuickStart Entering Parts== | ==QuickStart Entering Parts== | ||
| Line 98: | Line 96: | ||
{{Tip|If the Shipping Address is the same as the Billing Address clicking the '''Copy'''>> button will automatically copy the address fields.}} | {{Tip|If the Shipping Address is the same as the Billing Address clicking the '''Copy'''>> button will automatically copy the address fields.}} | ||
==QuickStart Creating a Quote== | ==QuickStart Creating a Quote== | ||
| Line 113: | Line 110: | ||
#Select '''Quote''' from the Document Field in the upper left hand corner of the ''Sales Order screen''. | #Select '''Price Quote''' from the Document Field in the upper left hand corner of the ''Sales Order screen''. | ||
#Click the '''Add Item''' button near the lower right corner of the screen. | #Click the '''Add Item''' button near the lower right corner of the screen. | ||
#Use the search to find the part. Double click on the part to add the part to the quote. | #Use the search to find the part. Double click on the part to add the part to the quote. | ||
| Line 124: | Line 121: | ||
[[Image:Sales Order Home wiki.png|thumb|center|700px]] | [[Image:Sales Order Home wiki.png|thumb|center|700px]] | ||
==QuickStart Selling Parts== | ==QuickStart Selling Parts== | ||
Latest revision as of 14:10, 22 June 2020
QuickStart
The QuickStart section of the ITrack Enterprise: User's Guide provides a quick overview of the many valuable functions ITrack performs. You can also access help when in ITrack by choosing Help → Manual from the drop down list at the top of ITrack. Detailed instructions and descriptions of the features in ITrack follow the QuickStart section.
| Tip |
| ITrack has numerous optional fields. They provide more detail about the parts but may not be required by your local manager. |
QuickStart Logging In
The first screen you see of the ITrack Enterprise Inventory System is the Login box.
Enterprise will automatically insert your Windows username into the username field here. If it is not the same, you can just begin typing to overwrite it; if it is the same simply hit Tab to go to the password field. Type in your password and, if necessary, select the store to log into from the dropdown. Then, click Login or hit Enter to log into Enterprise.
| Tip |
| Your password is case sensitive, but the username is NOT case sensitive. For example, if you were using ITrackHT as the password it is different from itrackht. |
| Tip |
| You can control which store is selected by default once in Enterprise. Go to Edit on the Main Menu at the top, then Options. On the pop up window, go to the Company tab. There you will find a store selection dropdown, select which store you normally log in as and hit OK. |
Congratulations, you are now ready to use ITrack Enterprise!
Additional users can be created and modified by following the instructions in the Itrack Enterprise for Heavy Trucks: Administrators Guide or contact your manager and have them add you as a new user.
QuickStart Main Menu
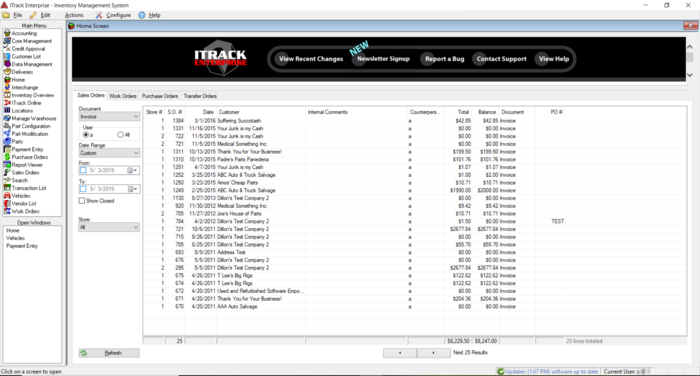
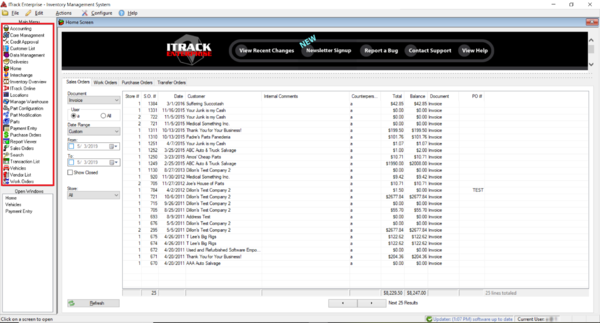
The Main Menu is the command center of your inventory system. The different screens in ITrack Enterprise are available in the Main Menu, located on the left side of the screen.
ITrack Enterprise is different from other inventory management systems because it allows you to open multiple screens. This allows you to easily toggle back and forth between screens, you can interrupt a task without canceling it. For instance, it is possible to conduct a search while editing a customer record.
Below the Main Menu you will see an Open Windows list. Every time you open a new screen from the Main Menu, it will show up in the Open Windows list. This will show you which screens you have open. You can easily switch to an open screen by clicking it in the list.
QuickStart Entering Vehicles
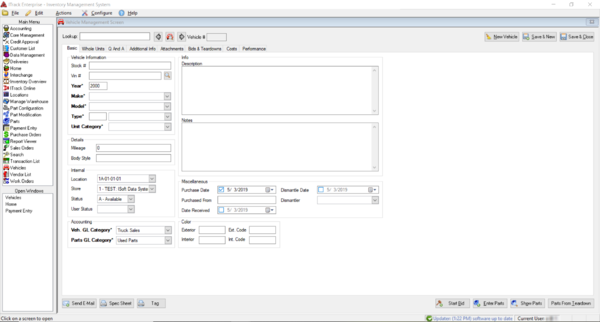
Clicking on the Vehicles in the Main Menu will bring up the Vehicle Management Screen. The form that opens is blank, with the Basic tab selected.
Enter the VIN number for the vehicle. ITrack Enterprise will automatically fill out several of the fields for you based in VIN information. Year, Make, Model, Type and Unit Category are required fields. The remaining fields in the Basic tab are optional. The Advanced, Info and Q and A tabs have additional optional fields that allow you to enter more information about the vehicle.
QuickStart Entering Parts
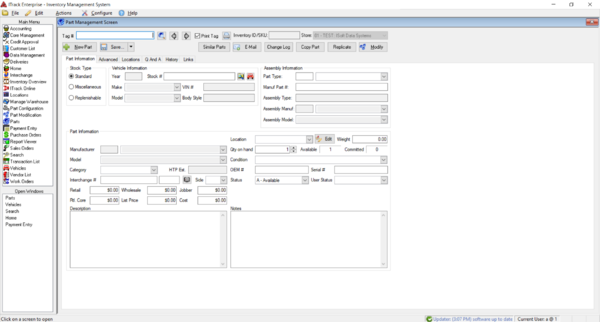
Once you are finished entering the vehicle, click on the Enter Parts button in the lower right corner to enter parts. This brings up the Part Management Screen. The Part Information tab will be selected. The information about the vehicle you just entered will appear in the upper right corner. Now you can enter some parts for the vehicle. In our example we entered an engine.
- Click on the Part Type drop down list and select the appropriate part type. If you know the part type number you are entering, you may enter it rather than scrolling through the part list.
- Fill in any other information about the engine such as condition, location, price, etc.
- Click on the Advanced tab at the top of the screen to enter advanced part information such as digital images. Miscellaneous or aftermarket parts can be entered by selecting the appropriate button from the list located in the upper left corner.
- When you are finished with the part, click on the Save & Close button.
QuickStart Searching for Parts
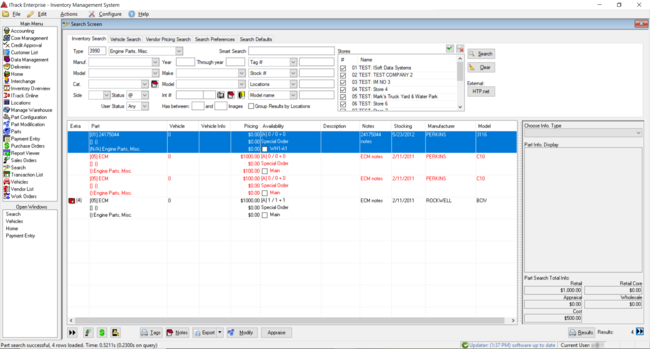
1. Click on the Search button in the Main Menu to bring up the Search Screen. The Inventory Search tab will be selected. The more information that you enter in the fields, the fewer number of results will be returned. (Leaving all fields blank will find all available parts.)
2. If you were to search for an Engine Parts, Misc., you would enter 3990 (the part number for Engine Parts, Misc.) in the Type # field.
3. Click the Search button on the right side of the screen to see the inventoried engines. Once you have results for your search, you may choose to print out your search results or sell a part to a customer. Clicking on the Sell button brings up the Sales Screen.
| Tip |
| The Sell button is a small icon of a stack of coins. |
To try a new search, click the Clear button. Practice using the Inventory Search tab by doing a variety of searches. When you are finished searching for parts, click on the Vehicles Search tab to search for a vehicle. You will notice that searching for vehicles is nearly identical to searching for parts.
Quickstart Adding a New Customer
To add a new customer:
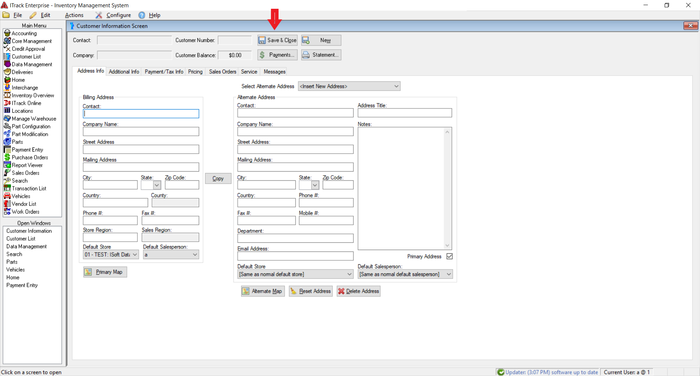
- Click Customer List in the Main Menu.
- Click the Add button at the bottom of the page and the Customer List Screen will open.
- Enter the address into the appropriate fields.
- When you are finished entering customer information, click the Save & Close button.
| Tip |
| Entering the Zip Code will automatically fill out the city, state and country fields. |
| Tip |
| If the Shipping Address is the same as the Billing Address clicking the Copy>> button will automatically copy the address fields. |
QuickStart Creating a Quote
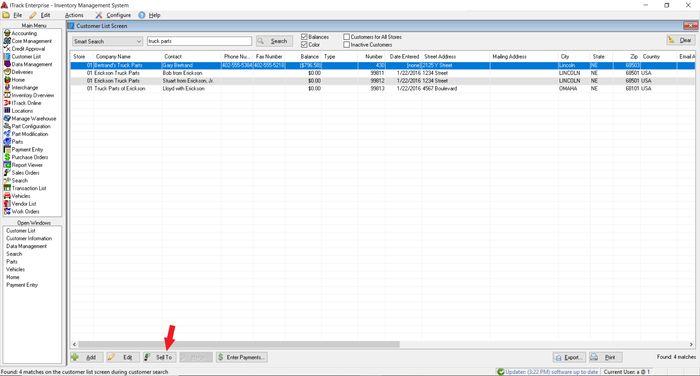
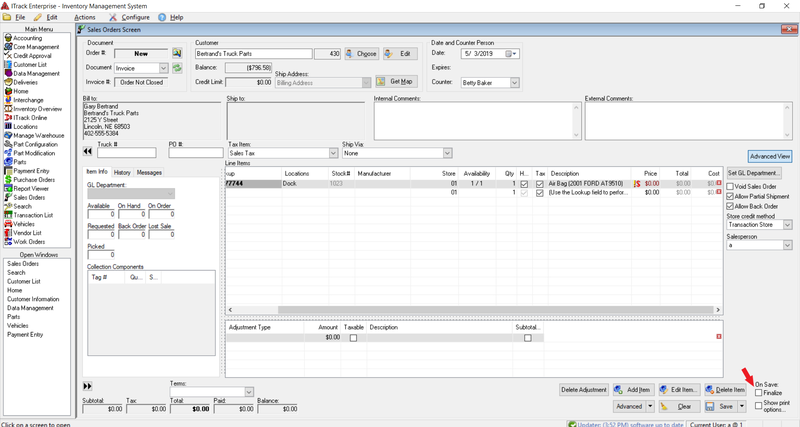
To make a quote, click on the Sell To button in the bottom right of the Customer List Screen.
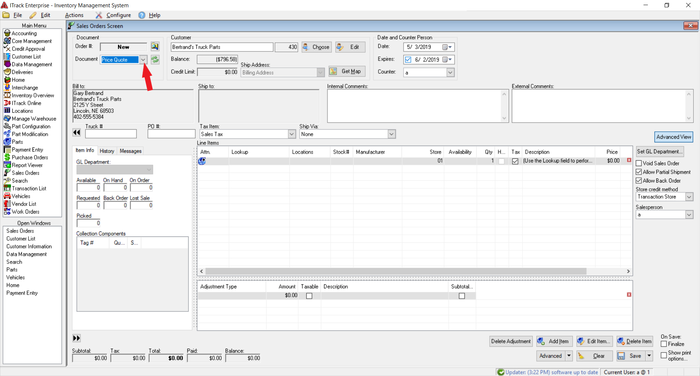
This will open up the Sales Order Screen.
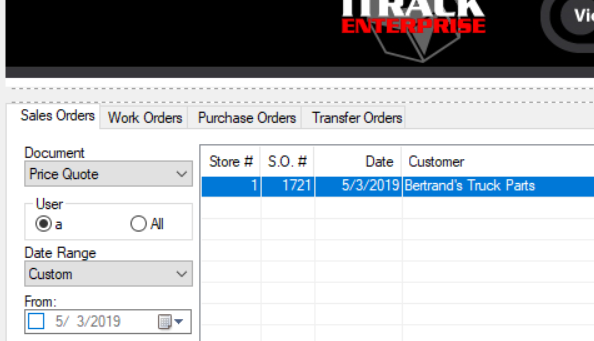
- Select Price Quote from the Document Field in the upper left hand corner of the Sales Order screen.
- Click the Add Item button near the lower right corner of the screen.
- Use the search to find the part. Double click on the part to add the part to the quote.
- Now, fill in the remaining information about the quote, such as an expiration date.
- The price can be changed by clicking the field and typing in a new price. The tax will be automatically calculated.
- Once you are finished with the quote, click the Save button in the lower right corner.
The quote will now show up in the quotes list on the Main Menu. (The Home Screen may need to be refreshed in order to see the new quote.)
QuickStart Selling Parts
There are many ways to get a part ready to sell. We will only discuss the main way in the QuickStart Guide. For more details on selling, see Using the Sales Screen.
- From the Main Menu, click on the Sales Orders Screen. Search for a customer by clicking on the Choose button to the right of the Customer field.
- In the Customer List screen, select the customer to sell to, and click on the Sell To button at the bottom right of the screen. This will return you to the Sales Orders Screen.
- In the Sales Orders Screen, click on the Add Item button in the lower right corner, this brings up the Search Screen.
- Search for a part. When you have found the part you wish to sell, double click on it.
- The part will now show up in the Sales Order Screen. Choose a payment method for the customer and then enter the amount they are going to pay.
- Click the Save/Print button. This will save the sale as an invoice. However, the transaction will not be complete until the finalize box is checked in the bottom right.
QuickStart Adding a New Vendor
To add a new vendor:
- Click Vendor List in the Main Menu.
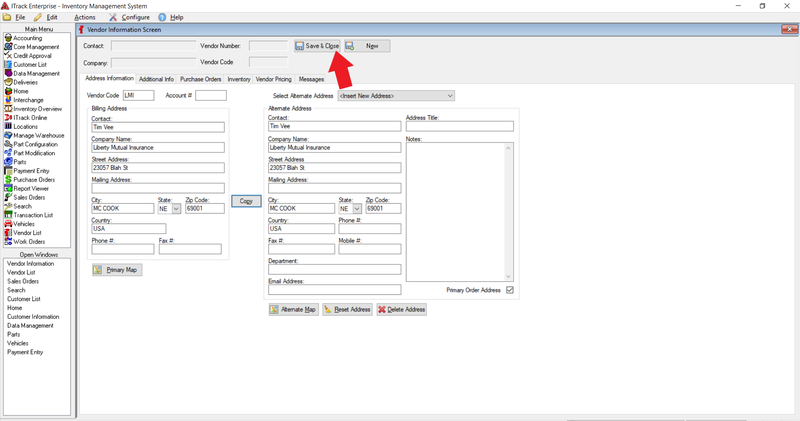
- Click the Add button at the bottom of the page and the Vendor Information Screen will open.
- Enter the necessary information into the appropriate fields.
- When you are finished entering vendor information, click the Save & Close button.
| Tip |
| Entering the Zip Code will automatically fill out the city, state and country fields. |
| Tip |
| If the Shipping Address is the same as the Billing Address clicking the Copy>> button will automatically copy the address fields. |
